This is the multi-page printable view of this section. Click here to print.
Getting Started
1 - First Steps with Findy Agency
Full Agency Setup
Agency services can be setup easily locally using Docker. Check further instructions here. The instructions describe how to launch all the needed backend services in Docker containers together with a simulated ledger. There is also a native development setup instructions for web wallet application which will be needed in order to run web wallet application together with other agents.
Once you have the services running on your computer,
- try to run the Alice-Faber-Acme demo
- start to build a service agent of your own.
- or you can play around with the credentials using the tools: CLI tool findy-agent-cli or UI tool findy-issuer-tool
CLI
findy-agent-cli is a command-line tool that can be used to
- register new agents
- authenticate agents
- operate agents
- make connections
- issue and accept credentials
- verify and prove credentials
- operate bots (simple service agents)
- operate ledger
- create schemas
- create credential definitions
- operate agency
Findy agent cli tool

Usage:
  findy-agent-cli [command]

Available Commands:
  agency      Manage Agency
  agent       Work with the Cloud Agent
  authn       WebAuthn commands
  bot         Manage Bot
  completion  Generate shell completion scripts
  connection  Manage connections
  help        Help about any command
  new-key     Create a new key for the authenticator
  tree        Prints the findy-agent-cli command structure

Flags:
      --config string     configuration file, FCLI_CONFIG
  -n, --dry-run           perform a trial run with no changes made, FCLI_DRY_RUN
  -h, --help              help for findy-agent-cli
      --logging string    logging startup arguments, FCLI_LOGGING (default "-logtostderr=true -v=0")
      --server string     gRPC server addr:port, FCLI_SERVER (default "localhost:50051")
      --tls-path string   TLS cert path, FCLI_TLS_PATH
  -v, --version           version for findy-agent-cli

Use "findy-agent-cli [command] --help" for more information about a command.
Check out the dedicated guide for CLI commands to get familiar with the usage.
Note:
- before CLI usage, you need to have a working Findy Agency installation
- findy-agent-cli is also a reference on how to use the Agency gRPC API with golang. Check the sources for more details.
UI Tool
findy-issuer-tool is a UI tool for
- making pairwise connections
- issuing credentials
- verifying credentials
- creating schemas and credential definitions.

See setup instructions and usage instructions in project repository.
Note:
- before UI-tool usage, you need to have a working Findy Agency installation
- findy-issuer-tool works also as a sample implementation for a Findy Agency service agent implemented with JavaScript.
2 - Service Agents
Service agents i.e. organization agents utilize Findy Agency through its gRPC API. The agent creation and authentication is handled through the headless authenticator, acator, that implements the FIDO2 protocol. Once authenticated, all agent functionality is available to service agents via the core gRPC API, findy-agent-api.
Read more about getting started with service agents from the blog:
You can use our helper libraries for go, Typescript or Kotlin or use directly the gRPC interface with the language of your choice.
You can also find reference implementations, that you should probably explore before starting to implement an agent of your own:
- sample repository for all supported languages
- go: findy-agent-cli
- JavaScript: findy-issuer-tool, specifically api/src/agent/index.js
Sample flow: connecting to another agent
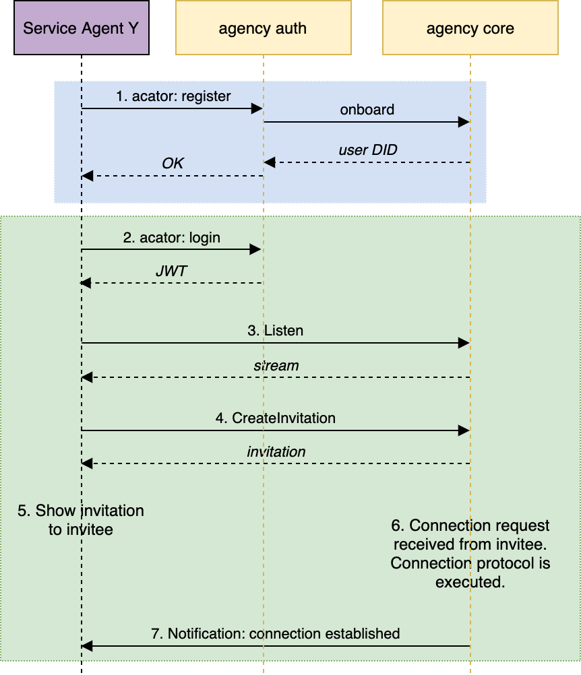
Service Agent onboarding and connecting to another agent by creating a connection invitation.
- Service Agent (SA) registers with acator tool/library to agency. SA should use a unique user name and the selected authenticator key should be kept secret. Note: the registration needs to be done only once. After the first registration, authentication is done using the same user name and authenticator key.
- SA does login with acator tool/library. After successful login, a JWT token is returned to SA.
- SA starts listening to agent status events with gRPC API.
- SA creates connection invitation using gRPC API.
- SA displays/sends/etc. invitation json to another Aries compatible agent (invitee).
- Invitee sends connection request to the core agency, that handles the connection protocol on behalf of SA.
- Core agency notifies SA when the connection is established. SA can query core agency for the needed connection details and continue with e.g. issuing or verifying data with the new connection.