This is the multi-page printable view of this section. Click here to print.
Findy Agency Blog
- Autonomous LLMs Compromise Open Source Trust
- Rethinking SSI
- The Swiss Army Knife for the Agency Project, Part 3: Other GitHub Tools
- The Swiss Army Knife for the Agency Project, Part 2: Release Management with GitHub
- The Swiss Army Knife for the Agency Project, Part 1: GitHub Actions
- Issuing Chatbot
- I want mDL!
- Managing GitHub Branch Protections
- Path to Passwordless
- Test Coverage Beyond Unit Testing
- How To Write Modifiable & Readable Go Code
- How To Write Performant Go Code
- GopherCon UK 2023
- Beautiful State-Machines - FSM Part II
- The Agency Workshop
- The Time to Build SSI Capabilities Is Now
- Digital Identity Hack Part 3 – Introduction to SSI Presentation
- Digital Identity Hack Part 2 – Panel Discussion on Blockchain Projects
- Digital Identity Hack – Unlocking the Potential of SSI
- Deploying with CDK Pipeline
- Agency's IaC Journey
- No-Code SSI Chatbots - FSM Part I
- How to Equip Your App with VC Superpowers
- Getting Started with SSI Service Agent Development
- Ledger Multiplexer
- The Hyperledger Global Forum Experience
- The Findy Agency API
- Trust in Your Wallet
- SSI-Empowered Identity Provider
- Replacing Indy SDK
- The Missing Network Layer Model
- Fostering Interoperability
- Anchoring Chains of Trust
- The Arm Adventure on Docker
- Travelogue
- Announcing Findy Agency
Autonomous LLMs Compromise Open Source Trust
This post is not a critique of LLM-assisted development such as code completion, refactoring aids, or interactive tooling. Those increase developer productivity while preserving understanding and responsibility.
The problem discussed here is autonomous LLM-based code contribution: the generation and submission of code with little or no human understanding, ownership, or accountability.
A Short Reminder: What Historically Drove OSS Contributions?
Historically, open source development was driven by a small but effective set of incentives:
- Developers scratched a personal itch or needed a feature themselves.
- Contributions demonstrated real competence and were valuable in a CV.
- Peer review worked because submitting poor patches carried reputational cost.
- The probability of being exposed as incompetent was non-trivial. (A culture that should drive every enterprise, shouldn’t it?)
Understanding the code was inseparable from contributing to it.
What Changed?
Autonomous LLM use breaks this coupling.
Today, it is possible to:
- Generate large multi-file patches without understanding the codebase.
- Submit frequent PRs that appear productive at first glance.
- Iterate via trial-and-error without learning.
- Walk away with no lasting cost if the PR is rejected or reverted.
The incentives remain (visible activity, CV value), but the cost of failure has
dropped close to zero.
No reputational damage. No accountability. Often no identity continuity.
That asymmetry did not exist before.

Contribution Paths
Pros and Cons (Mostly Cons—for Now)
Pros
Autonomous LLMs can be effective when applied to:
- Mechanical refactoring
- Boilerplate generation
- Test scaffolding
- Bug discovery and exploratory testing
Cons
- Code review becomes significantly harder: intent is unclear.
- Reasoning about correctness degrades when patches lack causal grounding.
- Many PRs fail basic scrutiny and require multiple review cycles.
- Simple fixes are obscured by large, AI-generated diffs.
If autonomous generation worked reliably, PRs would succeed on the first try. They usually don’t. That alone is a strong signal.
A practical lesson emerges:
Artificial cleverness should be applied to tedious, bounded tasks—not to areas
that require deep system understanding.
A Real-World Example
In one project I maintain, a contributor (identity not verified) reported a real bug with an excellent issue description.
What was excellent is that this contributor had delivered a high-quality bug report with the help of AI tools.
The proposed fix, however:
- Introduced ~300 lines of new code
- Increased complexity
- Missed the root cause
The correct fix was a single-line change, i.e., adding a missing function argument.
The contrast is telling: AI helped where it explored and analyzed, but failed where responsibility and understanding were required.
Maintainers Are Already Reacting
Some projects are explicitly responding to this shift:
- Cloud Hypervisor introduced a no–AI-generated-code policy, requiring contributors to attest that submissions are human-authored due to security and licensing concerns. WebProNews + The Register
- Gentoo Linux has banned AI-generated and AI-assisted code contributions, citing copyright, quality, and ethical concerns. The Register
- NetBSD explicitly forbids commits of code created with AI tools. Reddit
- QEMU adopted a policy rejecting contributions containing AI-generated code, in part due to Developer’s Certificate of Origin implications. Open Source Guy
- Across GitHub, maintainers have requested tooling support to block or identify Copilot-generated issues and pull requests to protect review bandwidth. Socket
This is not ideological resistance. It is an operational response.
The Core Issue: Trust (Old and New)
This is ultimately a trust problem.
Open source has always relied on an implicit model:
- Contributors understand what they submit.
- Reviewers can assume intent and competence.
- Bad behavior is eventually visible and costly.
Autonomous LLM-based contribution undermines this by making it cheap to submit code without understanding—and hard to detect when that happens.
Importantly, this trust problem existed even before AI, especially in security-critical projects. AI merely amplifies it.
A working trust model would therefore solve two problems at once: maintainer workload and contribution integrity.
What Could Help?
Tooling platforms could do more. For example:
- Flag patterns associated with autonomous generation in pull requests
- Encourage smaller, auditable changes
- Preserve contributor identity and behavioral continuity
GitHub already offers Copilot to open source maintainers.
Helping maintainers defend their review bandwidth would be an equally
valuable contribution.
What Happens Next?
If nothing changes:
- Maintainers burn out faster.
- Review latency increases.
- Projects become more closed and conservative.
The solution is not rejecting LLMs.
It is restoring responsibility.
Open source does not require perfect code.
But it does require that someone understands—and stands behind—what they submit.
And no amount of autonomy can replace that.

Rethinking SSI
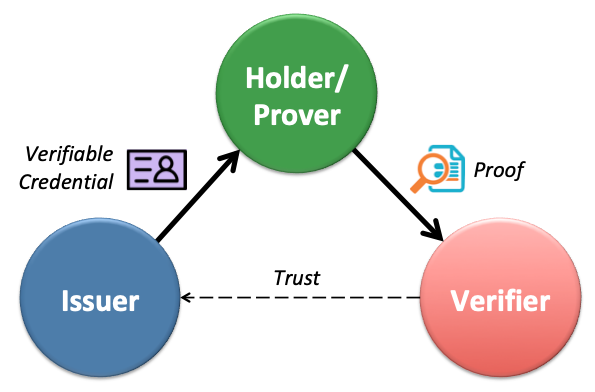
Since blockchain, decentralization has become a buzzword—and many of us still struggle to define what it really means to build fully decentralized systems. One key aspect often overlooked is trust. We cannot claim to have achieved decentralized infrastructure unless we also decentralize the trust model itself. That means going beyond central authorities and even beyond algorithmic “trustless” assumptions, toward Self-Certification as a foundational principle.
In the SSI space, three roots of trust have emerged:
- Administrative trust, as seen in traditional PKI (e.g., certificate authorities).
- Algorithmic trust, exemplified by blockchain-based systems—sometimes called “trustless,” though they still rely on pre-established consensus rules and protocols.
- Self-certifying trust, where entities define and prove trust relationships without requiring centralized or consensus-based validation.
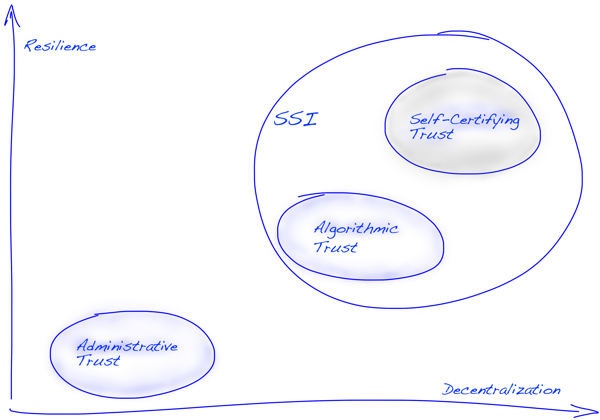
Root of Trust Models — Foundations for Security & Sovereignty
This last model—self-certifying trust—is both the most ambitious and the most necessary if we are to realize the full potential of self-sovereign identity. From our experience, SSI will never become truly decentralized or user-controlled until we solve the challenge of enabling self-certifying roots of trust at scale.
This raises an important question: Should we approach identity-related use cases through an algorithmic zero-trust lens, or should we aim for a decentralized trust model based on self-certification?
Or should we simply build identity around PKI, as seen in current government-led approaches like the mobile Driver’s License (ISO mDL) or the EUDI Wallet? These systems rely on administrative trust models — and while they may not be decentralized, they offer well-understood security, strong governance, and user familiarity.
What seems increasingly clear is that these approaches are not mutually exclusive. To build inclusive, resilient, and user-friendly identity systems, we may need to combine the reliability of PKI, the resilience of algorithmic trust, and the sovereignty of self-certification. The future of identity likely lies in how well we can bridge and blend these trust models — not in picking one over the others.
Algorithmic Zero-Trust
Algorithmic zero-trust is a model where no actor is implicitly trusted, and all entities must continuously prove their authenticity and permissions through cryptographic or logical assertions. It’s common in enterprise security: access control decisions are made by policy engines based on signals like device health, IP reputation, or session risk.
In identity systems, zero-trust often implies constant re-verification, reliance on centralized attestations, and heavy use of encryption and secure channels. While secure and auditable, these systems are inherently closed and non-portable—they rely on predefined relationships and central policy evaluators, making them incompatible with open, permissionless ecosystems.
Zero-trust is effective when scope is limited, infrastructure is known, and risk can be algorithmically modeled. But it doesn’t support user-controlled identity, transitive trust, or cross-domain delegation—key goals in decentralized ecosystems.
Trust Based on Self-Certification
Self-certification flips the model. Instead of requiring a central verifier to approve every interaction, entities prove their claims through cryptographic self-assertions (e.g., signed DIDs, verifiable credentials, blinded signatures). Trust is not assumed—it’s earned or negotiated through transitive relationships and context-based reasoning.
In this model, identity becomes a fabric woven from peer-based attestations, localized trust decisions, and voluntary disclosure. Trust is not enforced by algorithms alone, but emerges from networks of autonomous actors—each defining their own trust domain.
This is the essence of the decentralized trust model: issuers, holders, and verifiers operate without centralized approval or universal agreement. Instead, trust arises through social proofs, credential provenance, and endorsement chains. It enables privacy, sovereignty, and interoperability—but also requires new tooling to reason about trust, detect fraud, and handle revocation and rotation.
Key Learnings from Real-World SSI Projects with Hyperledger Indy
These aren’t just technical findings — they’re observations about what truly matters when designing decentralized identity systems.
Decentralized Trust Is Hard to Scale
While Indy supports decentralized identifiers and verifiable credentials, scaling trust without introducing central authorities remains a major challenge. Transitive trust models — the foundation of any decentralized Web of Trust — lack global context and require custom trust policies per verifier. Bridging isolated trust domains without creating new chokepoints is still an open issue.
Why Symmetric Communication Matters
💡 From Sessions to Relationships
Traditional web services treat identity as a temporary session.
SSI flips the model: identity becomes persistent, portable, and relational.Instead of logging in, users bring their agent.
Instead of onboarding, services recognize credentials.
No accounts. No passwords. Just trust — established cryptographically,
remembered across time and channels.
The Internet was built on the client/server model — efficient, scalable, and simple. But it also created a core asymmetry: servers are persistent and authoritative; clients are ephemeral and disposable. This model has made it nearly impossible for users to maintain continuity across interactions without depending on centralized platforms.
Each time a client connects, it must authenticate itself from scratch. Persistent identity lives server-side, and the user is just a temporary session. This has contributed directly to the rise of centralized identity silos and the dominance of platform-centric Web2 services.
What if clients — or more accurately, identity agents — had persistent state of their own? What if they could maintain ongoing relationships with services, carry trust context across channels, and even operate across devices or over time?
Symmetric, peer-to-peer communication models like DIDComm make this possible. Instead of logging in and starting over, agents can resume where they left off — with long-lived, secure relationships that don’t require sign-ups, onboarding flows, or federated logins. Trust becomes transitive, contextual, and user-controlled.
This model reimagines the client not as a throwaway session but as a sovereign, persistent identity. And it enables a future where servers don’t need to authenticate every visitor — they can simply recognize known agents, verify their credentials, and interact accordingly. No password, no registration — just relationship-based trust.
Privacy Requires Active Design
Surveillance resistance and correlation avoidance aren’t free. Features like DID rotation, pairwise identifiers, and signature blinding are essential to prevent unwanted linkage between interactions. Most deployments still struggle with implementing these practices consistently.
Real Adoption Happens on the Web
Despite the ideal of sovereign identity wallets, most user adoption we observed (>95%) occurred via web-based identity wallets or embedded browser experiences (e.g., Trinsic). Native mobile or hardware wallets still face barriers to usability and integration.
Identity Is More Than Credentials
In advanced use cases, identity extends beyond static credentials. We observed a growing need to bind biometric authenticators, behavioral data, credit scores, and reputational signals into a user’s Identity Domain. This domain becomes the source of trust for both human-facing and machine-mediated interactions.
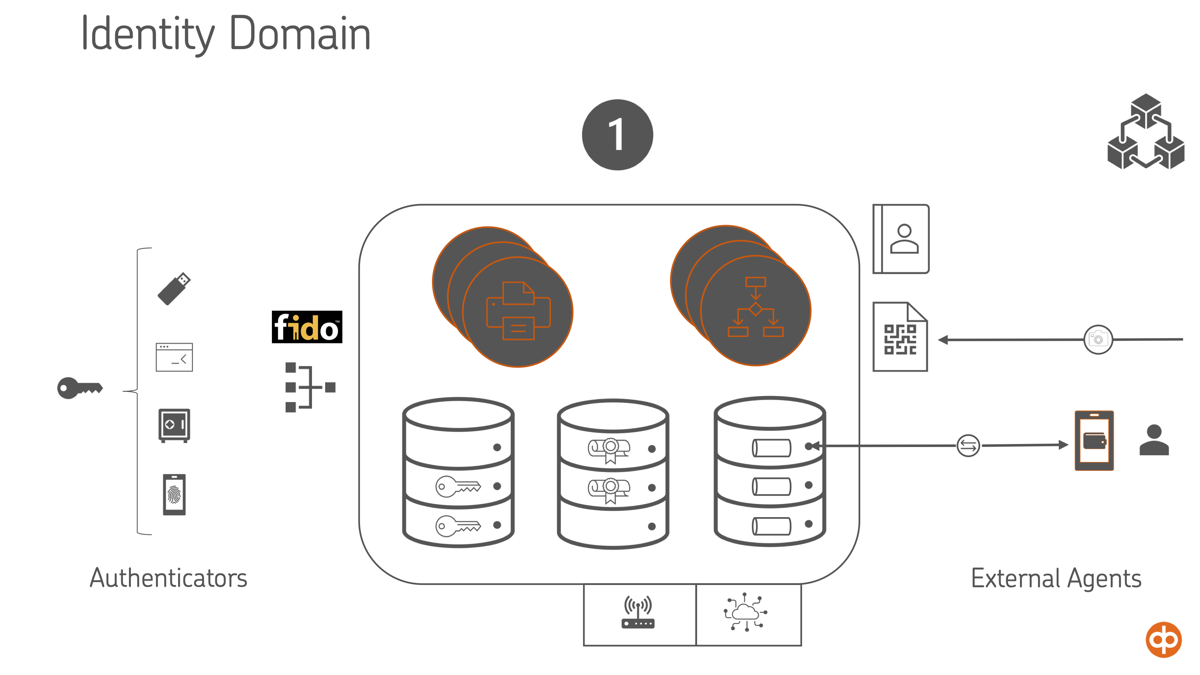
Identity Domain — Spanning Layer and Hub
IoT and Edge Cases Are Not Edge Cases
IoT use cases — such as identity for machines, devices, or wearables — are real and growing. These actors often lack screens, keys, or user interfaces, requiring lightweight agents and trust protocols that work in constrained environments.
Revocation, Rotation, and Recovery Remain Fragile
Credential revocation, key rotation, and identity recovery are still brittle processes in most SSI systems. While the “SSI rule book” offers theoretical guidelines for these mechanisms, many are not grounded in operational realities or user behavior.
One key insight from our work is that treating key rotation as a holistic identity-level event is a mistake. Lessons from past decentralized systems—such as the PGP Web of Trust and Tor’s onion routing model—show that key hierarchies, delegation, and compartmentalized key usage are essential to managing trust and limiting key exposure over time.
Instead of relying on a single root key for an identity (and rotating it whenever anything changes), we should design systems where operational keys are short-lived, purpose-bound, and easily replaceable, with certification chaining providing continuity of identity without creating a single point of fragility.
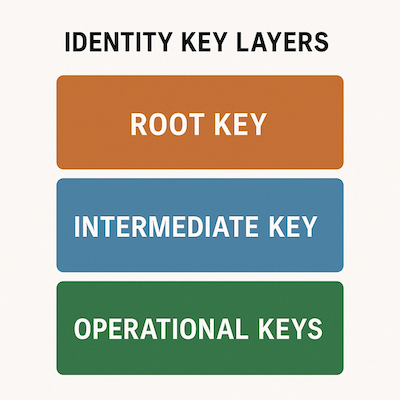
Key Hierarchies — Key Certification Chaining
A self-sovereign identity system that cannot manage keys in a nuanced and layered way cannot scale. Identity needs to be resilient, renewable, and gracefully degradable—not brittle or tightly coupled to a single cryptographic anchor.
From Identity Agents to Autonomous Cyber Twins
As identities become programmable, identity agents are evolving into cyber agents — AI-driven entities that can manage trust relationships, negotiate disclosures, and even represent the user autonomously. These cyber twins could become persistent actors in decentralized ecosystems, handling everything from KYC to pseudonymous reputation management.
Looking Ahead
As the identity landscape continues to evolve, one thing is becoming increasingly clear: the need for a decentralized trust model isn’t just philosophical — it’s practical, and soon, existential.
Emerging technologies are rapidly moving toward autonomous, agent-based systems. From AI-powered identity agents to cross-domain agent-to-agent (A2A) protocols, the direction is set: machines will act on our behalf, negotiate access, and manage digital presence — sometimes entirely without human involvement.
But this vision only works if those agents can operate within a trust model that doesn’t require central control, universal agreement, or global consensus. That means trust must be self-certifying, transitive, and portable — grounded in cryptographic proofs and contextual relationships, not gatekeepers.
The biggest opportunity — and risk — lies here. If we solve the problem of self-certifying roots of trust, we unlock the next generation of agent-driven ecosystems: Cyber Twins that are privacy-preserving, pseudonymous, interoperable, and free to negotiate identity on behalf of their creators.
If we don’t, we’ll end up with a future where intelligent agents operate inside walled gardens, under opaque policies, bound by central authorities. That’s not self-sovereign identity — it’s algorithmic feudalism.
The box is opening. Let’s make sure what comes out is free.
The Swiss Army Knife for the Agency Project, Part 3: Other GitHub Tools
This post concludes the article series that overviews how our open-source project utilizes the GitHub platform for software development. In this last part, we will examine documentation, communication tools, and some utilities that help the development process.
GitHub Pages
Already in the early days, when we started to experiment with SSI technology, there arose a need to publish different experiment outcomes and findings to the rest of the community. However, we were missing a platform to collect these various reports and articles.
Finally, when we decided to open-source our agency code, we also established a documentation site and blog. This site has been valuable to us since then. It has worked as a low-threshold publication platform, where we have collected our various opinions, experimentation findings, and even technical guides. It has been a way of distributing information and an excellent source for discussion. It is easy to refer to articles that even date back some years when all of the posts are collected on the same site.
We use the Hugo framework for building the site, specifically the Docsy theme, which is especially suitable for software project documentation. The Hugo framework uses a low-code approach, where most of the content can be edited as Markdown files. However, when needed, modifications can also be made to the HTML pages quite easily.
The project site serves as a platform for documentation and blogs.
We publish the site via GitHub Pages,
a static website hosting solution that
GitHub offers for each repository. When the Pages feature is enabled, GitHub serves
the content of the pages from a dedicated branch.
A GitHub action handles the deployment,
i.e., builds the website and pushes the site files to this dedicated branch. The site URL
combines organization and repository names. An exception is the <organisation-name> .github.io-named
repositories that one can find in the similarly formatted URL, e.g., our
findy-network/findy-network.github.io
repository is served in URL https://findy-network.github.io.
Dependabot
Dependabot is a GitHub-offered service that helps developers with the security and version updates of repository dependencies. When Dependabot finds a vulnerable dependency that can be replaced with a more secure version, it creates a pull request that implements this change. A similar approach exists with dependency version updates: When a new version is released, Dependabot creates a PR with the dependency update to the new version.
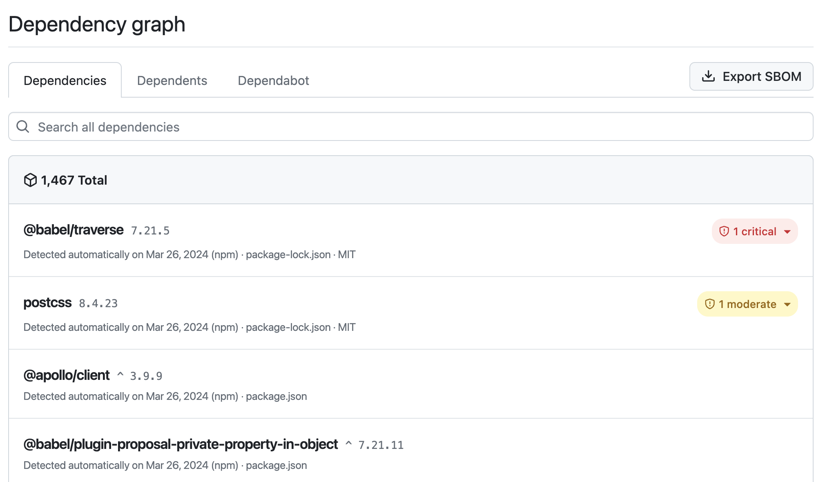
Dependabot analyzes the project dependencies based on the dependency graph. It creates PRs for security and version updates automatically.
The pull requests that the Dependabot creates are like any other PR. The CI runs tests on Dependabot PRs similar to those, as with the changes developers have made. One can review and merge the PR similarly.
Using Dependabot requires a comprehensive enough automated test set. The one who merges the PR needs to confirm that the change will not cause regression. Manual testing is required if the CI is missing the automated tests for the changes. If one needs manual testing, the benefit of using the bot for automated PR creation is lost, and it might even be more laborious to update the dependencies one by one.
In our project, we used the principle of testing all the crucial functionality with each change automatically. Therefore, it was safe for us to merge the Dependabot PRs without manual intervention. We even took one step further. We enabled automatic merging for those Dependabot PRs that passed the CI. In this approach, a theoretical risk exists that malicious code is injected from the supply chain through the version updates without us noticing it. However, we were willing to take the risk as we estimated that sparing a small team’s resources would be more important than shielding the experimental code from theoretical attacks.
You should estimate the risk/effort ratio when automating crucial tasks.
CI enables the automatic merging of Dependabot PRs on pull request creation:
name: "pr-target"
on:
  pull_request_target:

  # automerge successful dependabot PRs
  dependabot:
    # action permissions
    permissions:
      pull-requests: write
      contents: write
    # runner machine
    runs-on: ubuntu-latest
    # check that the PR is from dependabot
    if: ${{ github.event.pull_request.user.login == 'dependabot[bot]' }}
    steps:
      - name: Dependabot metadata
        id: dependabot-metadata
        uses: dependabot/fetch-metadata@v2
      - name: Enable auto-merge for Dependabot PRs
        # check that target branch is dev
        if: ${{steps.dependabot-metadata.outputs.target-branch == 'dev'}}
        # enable PR auto-merge with GitHub CLI
        # PR will be automatically merged if all checks pass
        run: gh pr merge --auto --merge "$PR_URL"
        env:
          PR_URL: ${{github.event.pull_request.html_url}}
          GH_TOKEN: ${{secrets.GITHUB_TOKEN}}
Notifications And Labeling
There are chat application integrations (for example Teams, Slack) one can use to send automatic notifications from GitHub. We have used this feature to get notified when PRs are created and merged to keep the whole team up-to-date on what changes are introduced. In addition, we always get a notification when someone raises an issue in our repositories. It has allowed us to react quickly to community questions and needs.
There have also been some problems regarding the notifications. The Dependabot integration creates a lot of pull requests for several repositories, and sometimes, the information flood is too much. Therefore, we have custom labeling functionality that helps us automatically label PRs based on the files the changes affect. The automatic labeling is implemented with GitHub Action, which is triggered on PR creation. We can filter only the PR notifications needed for our chat integration using these labels.
Automatic labeling can be tremendously helpful, especially with large repositories with many subprojects. Labels can also be used as a filter basis for GitHub Actions. For instance, one can configure a specific test for changes that affect only a particular folder. This approach can speed up the CI runtimes and save resources.
Codespaces And CLI Tool
GitHub Codespaces was a less-used feature for our project. Still, we found it helpful, especially when we organized workshops to help developers get started with agency application development.
Codespaces offers a cloud-based development environment that works as VS Code dev containers. A repository can have a configuration for the environment, and the codespace is created and launched based on that configuration. Once the codespace is up and running, the developers have a ready development environment with all the needed bells and whistles. It removes a lot of the setup hassle we usually encounter when using different operating systems and tools for development.
Example of a codespace configuration for our workshop participants. All the needed tools are preinstalled to the codespace that one may need when doing the workshop exercises:
{
  "name": "Findy Agency workshop environment",
  "image": "ghcr.io/findy-network/agency-workshop-codespace:0.1.0",
  "workspaceFolder": "/home/vscode/workshop",
  "features": {
    "ghcr.io/devcontainers-contrib/features/direnv-asdf:2": {}
  },
  "customizations": {
    "vscode": {
      "extensions": [
        "golang.go",
        "mathiasfrohlich.Kotlin"
      ]
    }
  },
  "postCreateCommand": "asdf direnv setup --shell bash --version latest"
}
The GitHub CLI tool was another helpful tool we found during the agency project. It offers the GitHub web application functionality via the command line. The tool is especially useful for those who suffer from context switching from terminal to browser and vice versa or who prefer to work from a terminal altogether.
In addition, the CLI tool can automate certain routines, both in CI and local environments. We use the Makefile to record often-used commands to support developers’ memory. The CLI is also a great fit for playing out with the GitHub API.
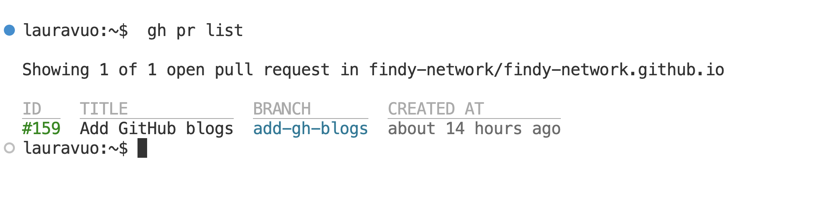
Example of listing PRs with the GitHub CLI tool.
Thanks for Reading
This article completes our three-part saga of using GitHub in our agency project. I hope you have learned something from what you have read so far. I am always happy to discuss our approach and hear if you have ideas and experiences on how your team handles things!

The Swiss Army Knife for the Agency Project, Part 2: Release Management with GitHub
This article will examine how we handle releasing and artifact delivery with GitHub tools in our open-source project. When designing our project’s release process, we have kept it lightweight but efficient enough. One important goal has been ensuring that developers get a stable version, i.e., a working version of the code, whenever they clone the repository. Furthermore, we want to offer a ready-built deliverable whenever possible so that trying out our software stack is easy.
Branching Model
In our development model, we have three different kinds of branches:
- Feature branches, a.k.a. pull request branch: each change is first pushed to a feature branch,
tested, and possibly reviewed before merging it to the
devbranch. dev: the baseline for all changes. One merges pull requests first with this branch. If tests fordevsucceed, one can merge the changes into themasterbranch. Thedevbranch test set can be more extensive than the one run for the pull request (feature) branch.master: the project’s main branch that contains the latest working version of the software. Changes to this branch trigger automatic deployments to our cloud environment.
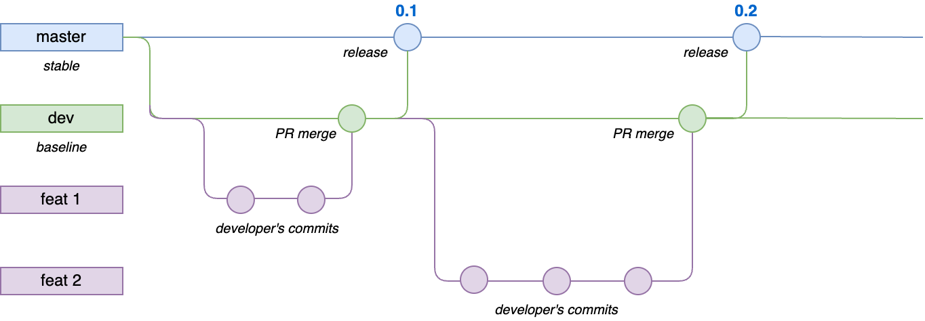
Branching model has three branches: feature branches, dev, and master.
The primary reason for using this branching style is to enable us to run extensive automated testing
for changes introduced by one or multiple pull requests before merging them with the master branch.
Therefore, this routine ensures that the master branch always has a working version.
This popular branching model has other perks as well. You can read more about them
here, for example.
Time for a Release
Our release bot is a custom GitHub action.
Each repository that follows the branching model described
above uses the bot for tagging the release. The bot’s primary duty is to check if the dev branch
has code changes missing from the master branch. If the bot finds changes, it will create a version
tag for the new release and update the working version of the dev branch.
The bot works night shifts and utilizes a GitHub scheduled event as an alarm clock. For each repository it is configured for, it runs the same steps:
- Check if there are changes between the
devandmasterbranches - Check if the required workflows (tests) have succeeded for the
devbranch - Parse the current working version from the
VERSIONfile - Check out the
devbranch and tag thedevbranchHEADwith the current version - Push tag to remote
- Increase the working version and commit it to the
dev-branch.
When step 5 is ready, i.e., the bot has created a new tag, another workflow will start.
This workflow will handle building the project deliverables for the tagged release.
After a successful release routine, the CI merges the tag to master.
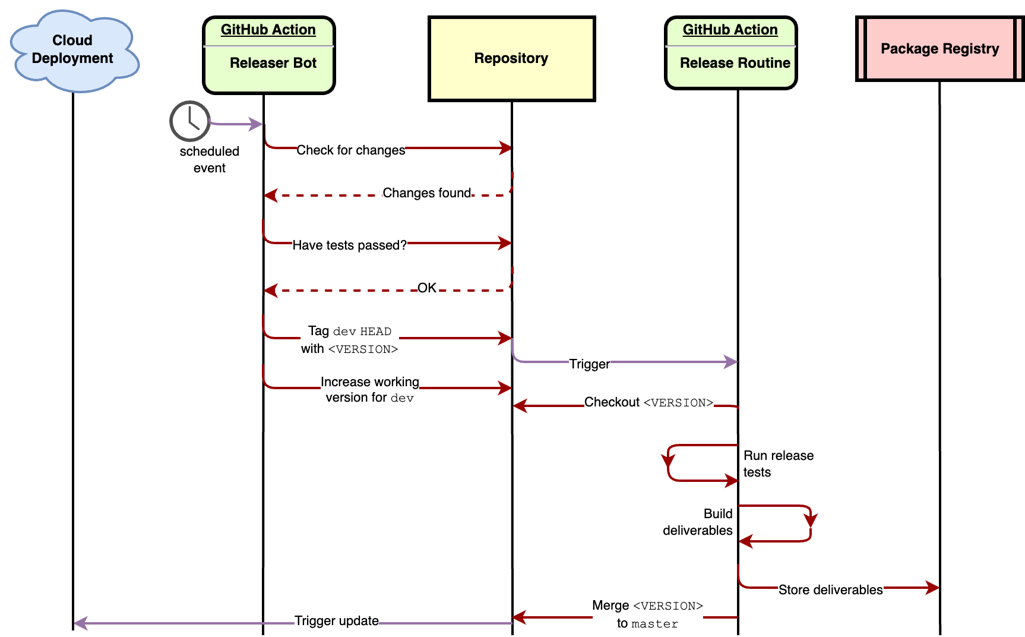
Changes are updated nightly from dev to master.
Package Distribution
Each time a release is tagged, the CI builds the release deliverables for distribution. As our stack contains various-style projects built in various languages, the release artifacts depend on the project type and programming language used.
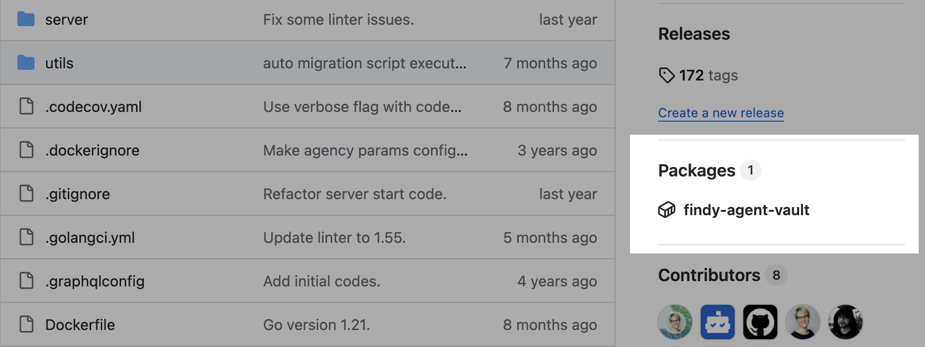
One can navigate to linked packages from the repository front page.
The CI stores all of the artifacts in GitHub in one way or another. Docker images and library binaries utilize different features of GitHub Packages, a GitHub offering for delivering packages to the open-source community. The Packages UI is integrated directly with the repository UI, so finding and using the packages is intuitive for the user.
Docker Containers for Backend Services
Our agency software has a microservice architecture, meaning multiple servers handle the backend functionality. To simplify cloud deployment and service orchestration in a local development environment, we build Docker images for each service release and store them in the GitHub container registry.
The GitHub Actions workflow handles the image building. We build two variants of the images. In addition to amd64, we make an arm64 version to support mainly environments running on Apple-silicon-based Macs. You can read more about utilizing GitHub Actions to create images for multiple platforms here.
The community can access the publicly stored images without authentication.
The package namespace is https://ghcr.io, meaning one can refer to an image with the path
ghcr.io/NAMESPACE/IMAGE_NAME:TAG, e.g., ghcr.io/findy-network/findy-agent:latest.
Publishing and using images from the Docker registry is straightforward.
Libraries
We also have utility libraries that provide the common functionalities needed to build clients for our backend services. These include helpers for Go, Node.js, and Kotlin.
In the Go ecosystem, sharing modules is easy. The Go build system must find the dependency code in a publicly accessible Git repository. Thus, the build compiles the code on the fly; one does not need to distribute or download binaries. Module versions are resolved directly from the git tags found in the repository.
The story is different for Node.js and Kotlin/Java libraries. GitHub offers registries for npm, Maven, and Gradle, and one can easily integrate the library’s publishing to these registries into the project release process. However, accessing the libraries is more complicated. Even if the package is public, the user must authenticate to GitHub to download the package. This requirement adds more complexity for the library user than mainstream options, such as the default npm registry. I would avoid distributing public libraries via this feature.
Sample for publishing Node.js package to GitHub npm registry via GitHub action:
name: release
on:
  push:
    tags:
      - '*'
jobs:
  publish-github:
    # runner machine
    runs-on: ubuntu-latest
    # API permissions for the job
    permissions:
      contents: read
      packages: write
    steps:
      # checkout the repository code
      - uses: actions/checkout@v4
      # setup node environment
      - uses: actions/setup-node@v4
        with:
          node-version: '18.x'
          registry-url: 'https://npm.pkg.github.com'
          scope: 'findy-network'
      # install dependencies, build distributables and publish
      - run: npm ci
      - run: npm run build
      - run: npm publish
        env:
          NODE_AUTH_TOKEN: ${{ secrets.GITHUB_TOKEN }}
Executables And Other Artifacts
For other artifacts, we utilize
the GitHub releases feature.
For instance, we use the goreleaser
helper tool for our CLI,
which handles the cross-compilation of the executable for several platforms.
It then attaches the binary files to the release,
from where each user can download them.
We even have an automatically generated installation script that downloads the correct
version for the platform in question.
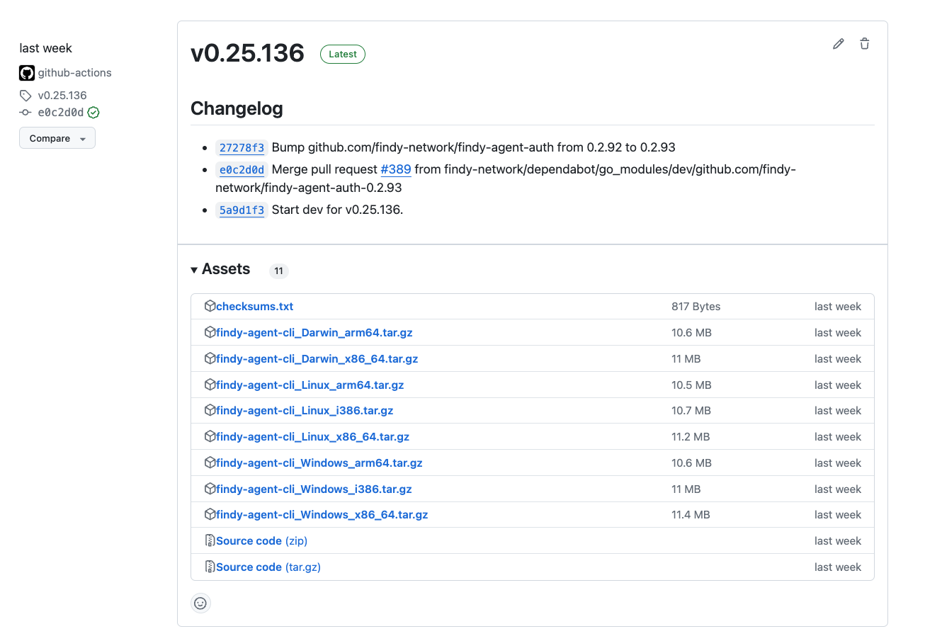
CLI release has binaries for multiple platforms.
One can also attach other files to releases. We define our backend gRPC API with an IDL file. Whenever the API changes, we release a new version of the IDL using a GitHub release. We can then automate other logic (gRPC utility helpers) to download the IDL for a specific release and easily keep track of the changes.
Summary
This post summarized how our open-source project uses different GitHub features for versioning, release management, and artifact distribution. In our last article, we will review various other GitHub tools we have utilized.
The Swiss Army Knife for the Agency Project, Part 1: GitHub Actions
Our research project has been utilizing GitHub tools for several years. Most of the features are free for publicly hosted open-source projects. We have used these tools with an experimental spirit, gathering experience from the different features. Although our project does not aim directly at production, we take a production-like approach to many things we do.
In this article series, I summarize our team’s different experiments regarding GitHub features. As GitHub’s functionality is easily extensible through its API and abilities for building custom GitHub actions, I also explain how we have built custom solutions for some needs.
The series consists of three articles:
- This first part overviews GitHub Actions as a continuous integration platform.
- The second part concentrates on release management and software distribution.
- Finally, in the last post, we introduce other useful integrations and features we used during our journey.
CI Vets the Pull Requests
GitHub Actions is a continuous integration and
continuous delivery (CI/CD) platform
for building automatic workflows. One defines the workflows as YAML configurations,
which get stored along with repository code in a dedicated subfolder (.github/workflows).
The GitHub-hosted platform automatically picks up and executes these workflows
when defined trigger events happen.
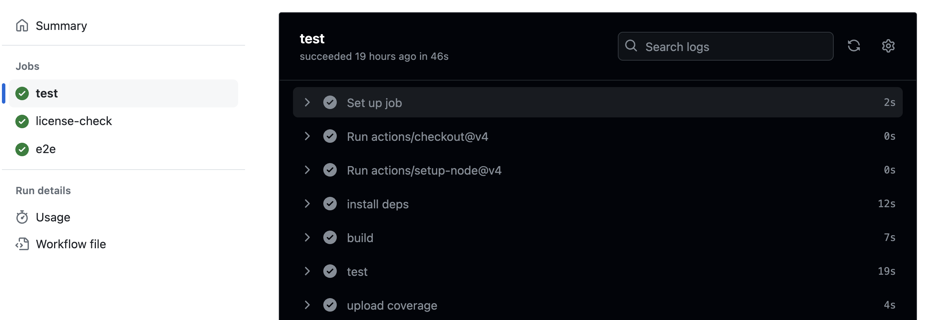
A workflow can contain multiple jobs. Each workflow job consists of different steps. The logs from the steps can be browsed in the Actions UI.
Snippet below shows how the “test” job is configured:
name: test
on:
  # run whenever there is a push to any branch
  push:
jobs:
  test:
    # runner machine
    runs-on: ubuntu-latest
    steps:

      # check out the repository code
      - uses: actions/checkout@v4

      # setup node environment
      - uses: actions/setup-node@v4
        with:
          node-version: '18.x'

      # install dependencies, build, test
      - name: install deps
        run: npm ci
      - name: build
        run: npm run build
      - name: test
        run: npm test

      # upload test coverage to external service
      - name: upload coverage
        uses: codecov/codecov-action@v4
        with:
          files: ./coverage/coverage-final.json
          fail_ci_if_error: true
          token: ${{ secrets.CODECOV_TOKEN }}
In our project development model, developers always introduce changes through a pull request. CI runs a collection of required checks for the pull request branch, and only when the checks succeed can the changes be integrated into the main development branch.
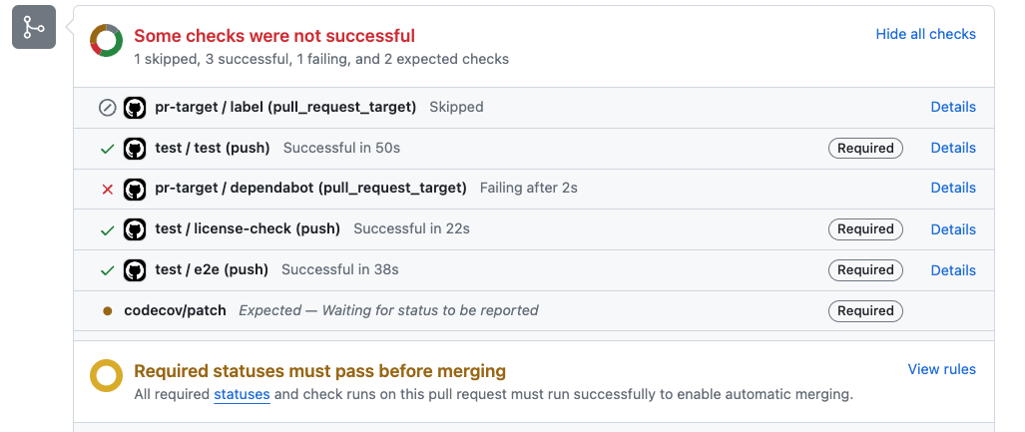
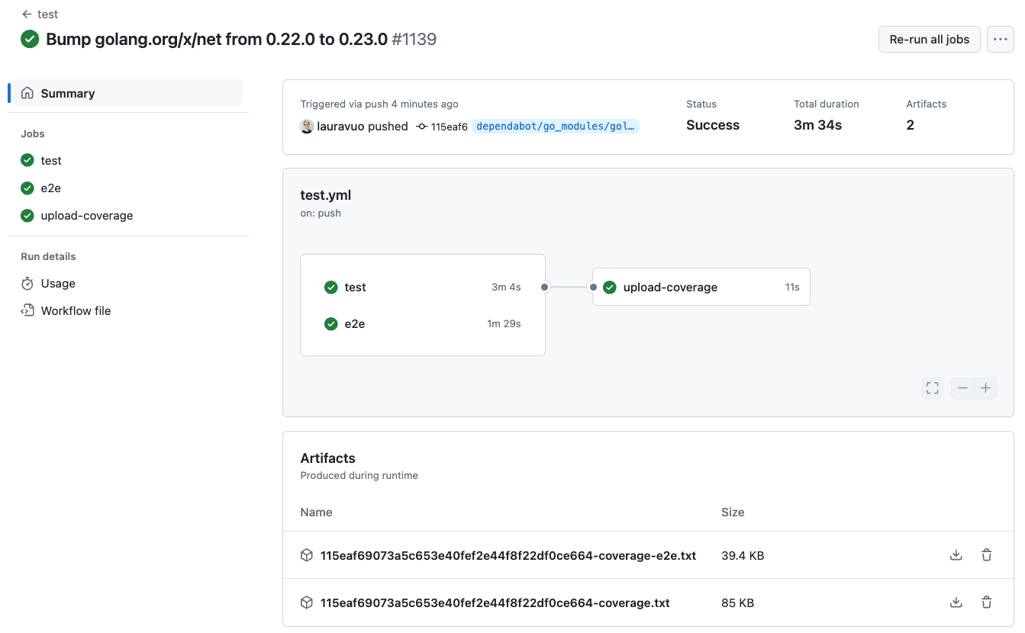
CI checks are visible in the pull request view.
Our code repositories typically have a dedicated workflow for running linting, unit testing, license scanning, and e2e tests. CI runs these workflow jobs whenever the developer pushes changes to the PR branch. The CI jobs are visible in the PR view, and merging is impossible if some required checks fail.
Actions Simplify the Workflows
The basic structure of a GitHub Actions job definition contains:
- Setting up the base environment for the workflow.
- Checking out the repository code.
- Execution steps that one can define as command-line scripts or actions.
Actions are reusable components written to simplify workflows. GitHub offers actions for the most commonly needed functionalities. You can also create custom actions specific to your needs or search for the required functionality in the actions marketplace, where people can share the actions they have made.
Example of using a custom action in a workflow:
name: test
on: push
jobs:
  test:
    runs-on: ubuntu-latest
    steps:
      - name: setup go, lint and scan
        uses: findy-network/setup-go-action@master
        with:
          linter-config-path: .golangci.yml
For instance, we have written a custom action for our Go code repositories. These repositories need similar routines to set up the Go environment, lint the code, and check its dependencies for incompatible software licenses. We have combined this functionality into one custom action we use in each repository. This way, the workflow definition is kept more compact, and implementing changes to these routines is more straightforward as we need to edit only the shared action instead of all the workflows.
Custom action configuration example:
runs:
  using: "composite"
  steps:

    # setup go environment
    - uses: actions/setup-go@v5
      if: ${{ inputs.go-version == 'mod' }}
      with:
        go-version-file: './go.mod'
    - uses: actions/setup-go@v5
      if: ${{ inputs.go-version != 'mod' }}
      with:
        go-version: ${{ inputs.go-version }}

    # run linter
    - name: golangci-lint
      if: ${{ inputs.skip-lint == 'false' }}
      uses: golangci/golangci-lint-action@v4
      with:
        version: ${{ inputs.linter-version }}
        args: --config=${{ inputs.linter-config-path }} --timeout=5m

    # run license scan
    - name: scan licenses
      shell: bash
      if: ${{ inputs.skip-scan == 'false' }}
      run: ${{ github.action_path }}/scanner/scan.sh
In this shared action, setup-go-action,
we can run our custom scripts or use existing actions.
For example, we set up the Go environment with actions/setup-go,
which is part of
the GitHub offering. Then, we lint the code using
the golangci/golangci-lint action,
which is made available by the golangci-team. Lastly, the action utilizes our script to scan
the licenses. We can efficiently combine and utilize functionality crafted by others and ourselves.
Runners Orchestrating E2E-tests
GitHub Actions workflow view run shows the jobs and their hierarchy. The artifacts and logs are available for each job also in this view.
In addition to linting, scanning, and unit tests, we typically run at least one e2e-styled test in parallel. In e2e tests, we simulate the actual end-user environment where the software will be run and execute tests with bash scripts or test frameworks that allow us to run tests through the browser.
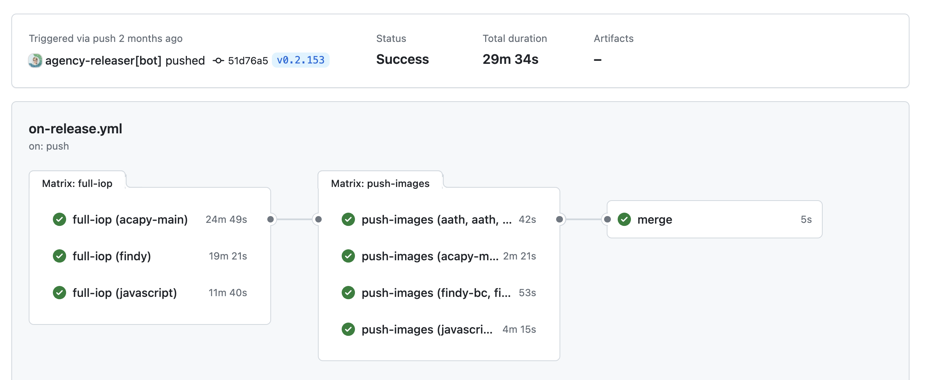
Workflows can contain multiple jobs that run in parallel or sequentially. In this example, we have utilized the matrix strategy to run the same job with different parameters.
In these e2e tests, we typically set up the test environment using Docker containers, and the GitHub-hosted runners have worked well for orchestrating the containers. We can define needed container services in the workflow YAML configuration or use, e.g., Docker’s compose tool directly to launch the required containers.
Example of defining a needed database container in a GitHub Actions workflow:
    services:
      postgres:
        image: postgres:13.13-alpine
        ports:
          - 5433:5432
        env:
          POSTGRES_PASSWORD: password
          POSTGRES_DB: vault
External Integrations
Once the CI has run the tests, we use an external service to analyze the test coverage data. Codecov.io service stores the coverage data for the test runs. It can then use the stored baseline data to compare the test run results of the specific pull request. Once the comparison is ready, it gives feedback on the changes’ effect on the coverage. The report gets visualized in the pull request as a comment and line-by-line coverage in the affected code lines.
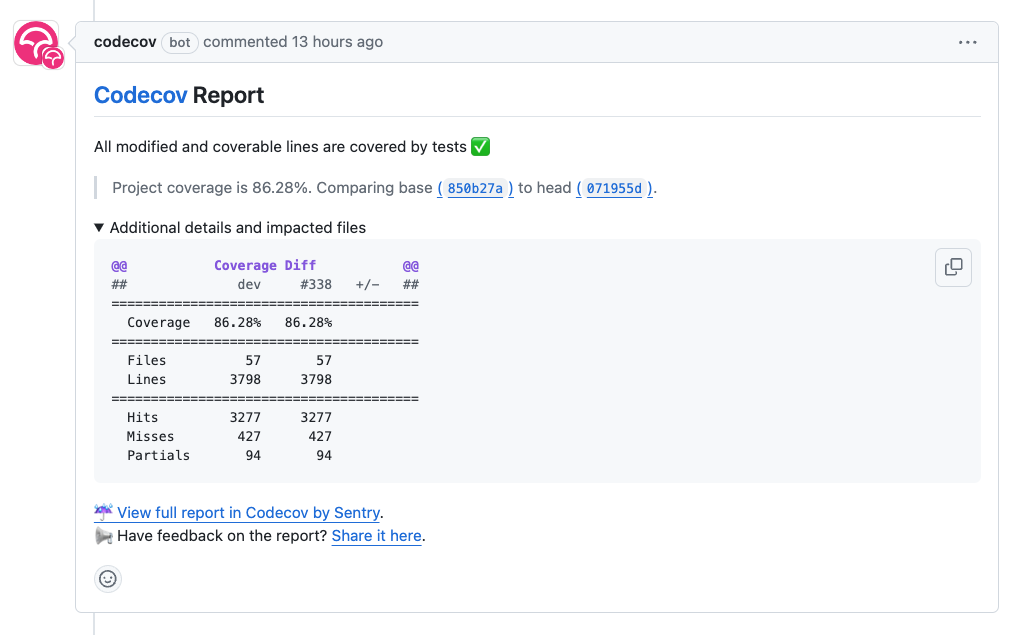
Codecov.io inserts the coverage report as a comment to the pull request view through the GitHub API.
Codecov is an excellent example of integrating external services into GitHub Actions workflows. Each integration needs a GitHub application that gives the third-party tool access to your organization’s resources. The organization must review the required permissions and install the application before GitHub allows the integration to work. One can also build GitHub applications for custom purposes. Read more about how a GitHub application can be helpful when automating release versioning.
Next Up: Release Management
This article gave an overview of how Findy Agency uses GitHub Actions as a continuous integration platform. The next one will be about release management. Stay tuned.
Issuing Chatbot
issuer, holder, and verifier. However, the base-technology (indylib) haven’t been built for symmetry. Luckily we have our own protocol engine and the tools around it allow us to build SSI services as chatbots. We have implemented our own state machine engine to develop and run these chatbot machines.This post is a development story (or hands-on workshop) of how we can use an FSM chatbot to implement SSI Services to allow any SSI/DID owner to be an issuer. Let’s start with the result and see what the state machine looks like. As you can see below, it’s simple, elegant, and, most importantly, easy to reason.

Issuing Service Chatbot
As you can see from the diagram there are two main paths. One for the issuer role
and one for the rcvr role. But the most interesting thing is that how simple the
machine is. As said, it’s very easy to reason and understand. And that’s the one of powers
these machines. The second one comes from the computational model of FSMs in
general, we could proof that they’re correct.
Note that since our original FSM engine release we have extended our model with transient state transitions or pseudostates, but our UML renderer doesn’t highlight them yet. We’ll publish an other blog post with new features of our FSM engine later.
What Problem Do We Solve?
The Hyperledger Indy-based SSI system is implemented with a CL signature scheme for ZKPs. That system needs the concept of Credential Definition stored in its creator’s wallet. The Credential Definition has an ID, which is quite similar to DID in the Indy-based AnonCreds system. The CredDefID is public. Everyone who knows it can request proof based on it or request to present a proof based on it.
But the CredDefID brings us some problems:
- How do we find a correct CredDefID when it’s needed?
- How about fully symmetric cases when everyone can simultaneously be an issuer, a holder, and a verifier? Everyone can issue credentials and receive proof of them in these use cases. For example, we have a use case where a seller (anybody in a marketplace) wants to issue a receipt for the transaction.
There are other problems, but the rest are based on the same core problem.
We’ll solve problem number 2 by using a notary-type service. We started with one service and implemented a reference chatbot to issue credentials on behalf of a logical issuer, aka seller. We also have implemented our version of a public DID. With these two, we have solved the problem quite elegantly.
Isn’t This Centralization?
In some ways, yes, but the result isn’t more centralized than the suggested trust registries for other or similar problems in the SSI field. In a certain way, this model adds self-sovereignty because now everyone can issue, and everyone can build these issuing services for their use cases.
More Reading
Before we continue, here’s a list of documents and places that are helpful when playing with these:
- Getting Started With SSI Service Agent Development
- Writing SSI Apps
- FSM Documentation Part I
- FSM Documentation Part II
- The Workshop Material For Our CLI Tool
Note that the blog post is written from self-learning material point of view. Preferably, you should read and execute the commands it guides you to do simultaneously.
Prerequisites
Note, for now, we assume that the reader uses the local setup of the agency. It makes it easier to follow the core agent’s real-time logs.
Even though you have probably cloned the repo. But if not, please do it now:
git clone https://github.com/findy-network/findy-agent-cli
Follow the material in the repo’s readme files or the workshop material
mentioned at the beginning to get your findy-agent-cli CLI tool working, i.e.,
communicating with your agency.
Helpers
- Go to repo’s root:
- Shorter name and autocompletion:
alias cli=findy-agent-cli
source ./scripts/sa-compl.sh
Document for now on assumes that CLI tool is named to
cli.
Very Important
If you create new wallets directly with the CLI tool, make sure that auto-accept
mode is ON for the agent. The check it after the cli agent ping works:
cli agent mode-cmd -r
Tip, if you have problems with CLI commands check your
FCLI_prefixed envs.
The result should be AUTO_ACCEPT. Note that allocation scripts do this automatically.
Chatbots work even when auto-accept isn’t ON. They can written to make decisions to decline or acknowledge presented proofs, for example.
Setup Agents And Wallets
It would be best to have at least three wallets and their agents up and running.
Inside the findy-agent-cli repo, you have scrpits/fullstack directory. Let’s
name it a tool root for the rest of the documentation. For example:
export MY_ROOT=`pwd`
Follow the workshop documentation on how to allocate new agents with their wallets.
Allocate the following agents (actual commands and the script calls follow):
issuingwill be the issuing serviceseller, will be a seller, aka logical issuerbuyerwill be a buyer.verifierwill be a verifier for the VC. (Usage is out scoped from this document.)
Here’s an example of how you could
- allocate the agents,
- have access to FSM files by making links,
- create schema and credential definition (done in
issuing), - create DIDComm connections between
issuing,seller, andbuyerwhere the last is done in this phase just for testing the environment. During the service integration (e.g. marketplace app) to the app invitation or command to connect withis sent in its own step during the service use.
cd "$MY_ROOT"
make-play-agent.sh issuing seller buyer verifier
cd play/issuing
ln -s ../../fsm/issuing-service-f-fsm.yaml
ln -s ../../fsm/issuing-service-b-fsm.yaml
open `cli bot uml issuing-service-f-fsm.yaml` # UML rendering
source ./new-schema
source ./new-cred-def
./invitation | ../seller/connect
./invitation | ../buyer/connect
Optionally store a public DID of the Issuing Service Chatbot:
export PUB_DID=$(./pub-did print)
Note! Leave this terminal open and do not enter new commands to it yet.
Note!
source ./new-cred-definitializesFCLI_CRED_DEF_IDenvironment variable. Theissuing-service-f-fsm.yamlfile references to this variable, i.e. it’s mandatory, or you could hard-code the credential definition value to yourissuing-service-f-fsm.yaml.
Use The Issuing Service
- open 2 separated terminals
AandB(see the workshop material on how to init envs) to work as aseller, leave them to be. - open 2 separated terminals
AandB(see the workshop material on how to init envs) to work as abuyer, leave them to be. - go back to the previous
issuingterminal and start the chatbot:cli bot start --service-fsm issuing-service-b-fsm.yaml issuing-service-f-fsm.yaml -v=1 - go back to the
sellerterminalAand enter a command:cli bot read. This is a read-only terminal window for the chatbot’s responses. - go back to the
sellerterminalBand entercli bot chat. This is a write-only terminal window to send chat messages.- (optional: enter ‘help’ to get used to what’s available)
- enter your session ID, select something easy like ‘SID_1’
- enter the text ‘issuer’ that’s our current
role - enter your attributes data value for credential, select something easy to remember during verfication
- go back to the
buyerterminalAand entercli bot read. This is a read-only terminal window for the chatbot’s responses. - go back to the
buyerterminalBand entercli bot chat. This is a write-only terminal window to send chat messages.- (optional: enter ‘help’ to get some reminders)
- enter your previous session ID, it was something easy like ‘SID_1’
- enter the text ‘rcvr’, it’s your
rolenow
- see the
Buyer’sAterminal (cli bot readcommand running); the results should be that the credential is issued for theBuyer. - go to both
Bterminals and enter some text to move FSM instances to thestart-againstate. - it’s optional; you could rerun it with the same players.
Tip, when you started the Issuing Service Chatbot with
-v=1you could monitor it’s state transitions in real-time.
The Sequence Diagram
Notes about the current implementation:
- only one attribute value schema is implemented. Start with that and add cases where more attributes can be entered later. (Homework)
- every message sends a
basic_messagereply, which usually starts withACKstring. See theYAMLfile for more information. The reply messages aren’t drawn to the sequence diagram below to keep it as simple as possible. - you can render state machines to UML:We have UML rendered state machine diagram in the beginning of this post.
open `cli bot uml issuing-service-f-fsm.yaml` # give correct FSM file
sequenceDiagram
    autonumber

    participant Seller

    %% -- box won't work on hugo, or when this machine is running it --
    %% box Issuing Service
    participant IssuerFSM
    participant BackendFSM
    participant RcvrFSM
    %% end

    participant Buyer

    Seller -) IssuerFSM: 'session_id' (GUID)
    Seller -) IssuerFSM: issuer = role
    loop Schemas attributes
    Seller -) IssuerFSM: 'attribute_value'
    end

    alt Send thru existing connection
    Seller -) Buyer: 'session_id' (same as above, design how app knows that this is a command)
    end

    Buyer -) RcvrFSM: 'session_id'
    Buyer -) RcvrFSM: rcvr = role

    RcvrFSM -) BackendFSM: receiver_arriwed
    BackendFSM -) IssuerFSM: rcvr_arriwed
    loop Schemas attributes
    IssuerFSM -) BackendFSM: 'attribute_value'
    BackendFSM -) RcvrFSM: 'attribute_value'
    end
    IssuerFSM -) BackendFSM: attributes done (not implemented, one attrib)
    BackendFSM -) RcvrFSM: attributes done (not implemented, one attrib)

    RcvrFSM -) Buyer: CREDENTIAL ISSUING PROTOCOL
Pre-steps (not in the diagram)
- We can generate a public DID for the Issuing Service Chatbot.
cd play/issuing # or where your bot is export PUB_DID=$(./pub-did print) - Save this
PUB_DIDto your app’s configuration. It’s where Issuing Service Chatbot can be found when needed. Note,PUB_DIDis a URL which returns a new invitation on every load. You can treat is as a URL template:
You can enter your case specific data like ad number to thehttp://localhost:8080/dyn?did=8NCqkhnNjeTwMmK68DHDPx&label=<you_ad_number>labelarg.
Steps
- Actual Seller role or app implementation for the role generates a sessionID
(GUID) and sends it to Issuing Service Chatbot as a
basic_message. - The Seller role is a logical issuer, so it sends the
issuerstring as abasic_messageto the Issuer FSM instance. - The Seller role sends a <attr_val> (case specific in your schema) as a
basic_message. - The Seller role sends the same sessionID directly to the buyer role. The
communication channel can be their existing DIDComm connection or something
else, but the buyer needs to know how to react to that line if it’s a
basic_message. - The Buyer role or app implementation for the role sends the received
sessionIDto the chatbot, i.e., joins the same session. - The Buyer role sends the
rcvrword to the chatbot to make explicit role selection. (We could leave this out in some version of FSM implementation and rely only on the order of the messages, but this allows us to understand better and keep things open for future extensions.) - The Rcvr FSM instance has now got the actual credential holder
(Buyer/Receiver) and it sends a
receiver_arriwedstring to the Backend FSM. - The Backend FSM sends a
rcvr_arriwedto the Issuer FSM as abasic_message. - Now the Issuer FSM loops thru all previously received (from Seller) attribute values and sends them to the Backend FSM.
- The Backend FSM sends the attribute values to the Rcvr FSM as a
basic_messages - Optional for the future: if there would be more attributes than one, this would be the place to send the information that all attributes are sent to the Backend FSM. Another way to implement these state machines would be to add information to both Issuing and Receiving FSMs how many attributes there are, and receiving states would be declared to rely on that knowledge.
- Optional: see the previous step. The Backend FSM works as a forwarder for all of the cases where the issuing and the receiving FSM instances need to communicate with each other through the chatbot service.
- Finally the RcvrFSM executes credential issuing protocol.
Conclusion
You have been blown away by how easy it is to implement these FSM-based chatbots, haven’t you? The Issuing Service is only one example of the potential of the FSM chatbots. We are excited to see what else you end up building. When doing so, please send your questions, comments, and feedback to our team. Let’s make this better—together.
I want mDL!
It’s funny that we don’t have a mobile driver’s license in Finland. In the Nordics, we are usually good with digital and mobile services. For example, we have had somewhat famous bank IDs from the early 90s.
For the record, Iceland has had a mobile driver’s license since 2020. Surprise, Finland was in the pole position in the summer of 2018. The government-funded mobile driver’s license app (beta) was used with 40.000 users. The project started in 2017 but was canceled in 2020 (link in Finnish).
How the heck have we ended up in this mess? We should be the number one in the world! Did we try to swallow too big a bite once when the country-level SSI studies started?
SSI Study
As you probably already know, our innovation team has studied SSI for a long time. We have started to understand different strategies you can follow to implement digital identity and services around it.
Trust-foundation
Christopher Allen, one of the influencers in the field of SSI, divided the Self-Sovereign identity into two primary tracks:
- LESS (Legally-Enabled Self-Sovereign) Identity
- Trustless Identity, or more precisely Trust Minimized Identity
These two aren’t mutually exclusive but give us a platform to state our goals. Which one do we prefer, a government or an individual?
| LESS Identity | Trust Minimized Identity |
|---|---|
| Minimum Disclosure | Anonymity |
| Full Control | Web of Trust |
| Necessary Proofs | Censorship Resistance |
| Legally-Enabled | Defend Human Rights vs Powerful Actors (nation-states, corps, etc.) |
The above table is from the Allen’s talk in YouTube.
I personally prefer Human Rights over Legally-Enabled.
However, from a researcher’s point of view, the LESS Identity track seems faster because it’s easier to find business cases. These business-driven use cases will pave the way to even more progress in censorship resistance, anonymity, etc. The mobile driver’s license is a perfect example of a LESS Identity practice. Let’s follow that for a moment, shall we?
Level Of Decentralization
Most internet protocols have started quite a high level of decentralization as their goal/vision through the history of computer science. There are many benefits to setting decentralization as a requirement: no single point of failure, easier to scale horizontally, etc.
Since blockchain, decentralization has become a hype word, and most of us need help understanding what it means to have fully decentralized systems. One easily forgotten is trust, and we will only achieve absolute decentralization once we have a proper model for Self-Certification.
Idealism vs Pragmatism
I see a paradox here. How about you? Why does anyone try to build maximally decentralized systems if their identities must be legally binding? Or why do we put a lot of effort into figuring out consensus protocols for systems that don’t need them?
Our legal system has solved all of these problems already. So, let’s stick on that be pragmatic only, shall we?
Pragmatism
My current conclusion is the old wisdom: don’t build a platform immediately, but solve a few use cases first and build the platform if needed.
Second might be don’t solve imaginary problems. Look for monetizable pain first and solve that with as small steps as possible.
Let’s see what that all means from SSI vs. mDL.
Example of Good UX
Apple Pay is the world’s largest mobile payment platform outside China. It’s been exciting to follow what happened in the Nordics, which already had several mobile payment platforms and the world’s most digitalized private banking systems when Apple Pay arrived.
Why has Apple Pay been so successful? Like many other features in Apple’s ecosystem, they took the necessary final technical steps to remove all the friction from setting up the payment trail. Significantly, the seller doesn’t need additional steps or agreements to support Apple Pay in the brick-and-mortar business. (That’s how it works in Finland.) That’s the way we all should think of technology.
Use Case -driven approach
The origins of SSI have been idealistic in some areas. The ISO mDL is the total opposite. Every single piece of idealism has been thrown away. Every design decision is hammered down to solve core use cases related to the use of mobile driver’s licenses. And no new technologies have been invented. Just put together features that we need.
I had to admit that it’s been refreshing to see that angle in practice after ivory towers of SSI ;-) For the record, there is still excellent work going on in the SSI area in general.
Differences Between mDL And SSI
mDL has almost a similar trust triangle as good old SSI-version.
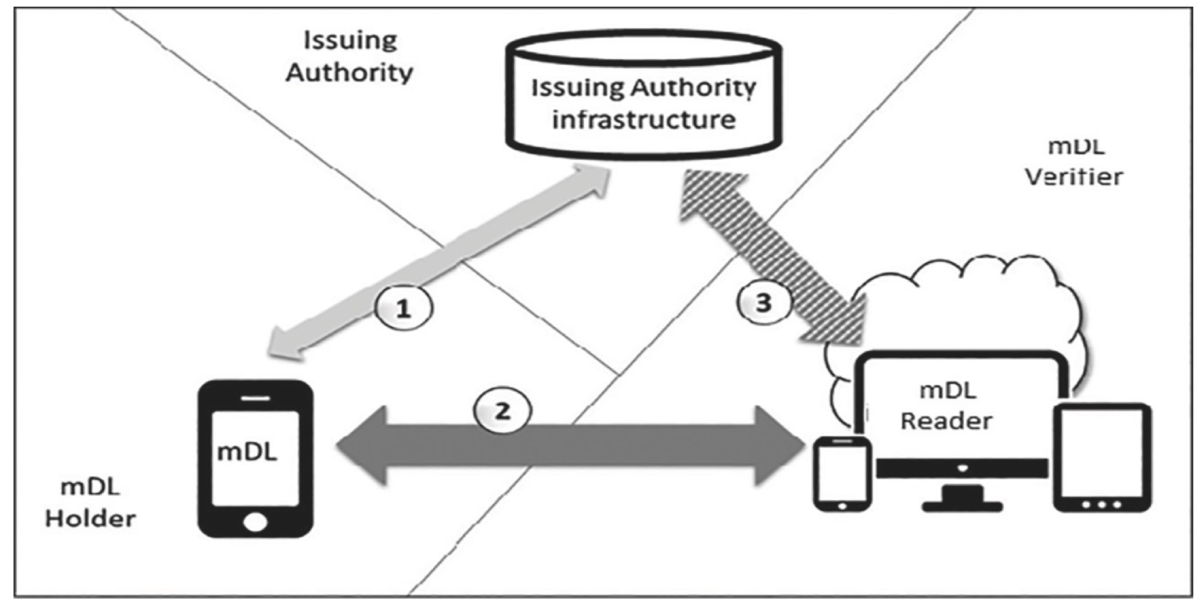
mDL Interfaces And Roles — ISO ISO_18013-5
But when you start to look more carefully, you’ll notice some differences, like the names of similar parties.
Concepts
ISO calls these roles as interfaces.
| ISO 18013-5 Interface Party | DID/SSI Concept |
|---|---|
| Issuing Authority Infrastructure | Issuer |
| mDL Reader | verifier |
| mDL | Holder |
Connections
Also, connections between parties are different. Where SSI doesn’t allow direct communication between a verifier and an issuer, mDL explains that their communication is OK but optional. The only thing that matters is that the mDL Holder and mDL Reader can do what they need to execute the current use case. For example:
For offline retrieval, there is no requirement for any device involved in the transaction to be connected
‘Connected’ means connected to the internet. One of the scenarios is to support offline use cases, which makes sense if you think about instances where law enforcement officer needs to check the ID. That must be possible even when the internet connection is severed.
We continue with transport technologies at Mobile Driver’s License.
Revocations
We should also ask when that call-home is needed. The first and most obvious one is the validity checks. If the use case demands that the relying party checks that the mobile document (mDOC) is still valid on every use, a verifier can contact the issuer (Issuing Authority) and ask. All of this sounds pragmatic.
Call-home seems perfectly aligned with Finnish bank regulation and legislation, as far as I know. For example, the party who executes, let’s say, a transaction according to power-of-attorney (PoA) is the party who’s responsible for checking that a PoA is valid and not revoked. The responsibility to transfer revocation information is not the one who has given the PoA. It’s enough that the information is available for the party who relies on the PoA. It’s the relying party’s responsibility to access that information case-by-case.
It makes much sense and makes building revocation easier when you think about that. In summary, some call-home is the only way to make revocation requirements work. Note that the home isn’t necessarily the issuer, but it definitely can be seen as the Issuing Authority’s Infrastructure.
One schema
The most specific difference between mDL and SSI is that the schema is locked. It’s based on (mDOC) standard. That might first feel like a handicap, but the more you think about this, the better way it is to start implementing use cases in this area.
Mobile Driver’s License
mDL standard also has similarities to SSI, such as selective disclosure. But it and other features are designed with only one thing in mind: pragmatism. No Fancy Pancy features or saving-the-world idealism, just pure functionality.
The ISO standard defines the mDL standard, which is based on mDOC. The following diagram describes its most important architectural elements.
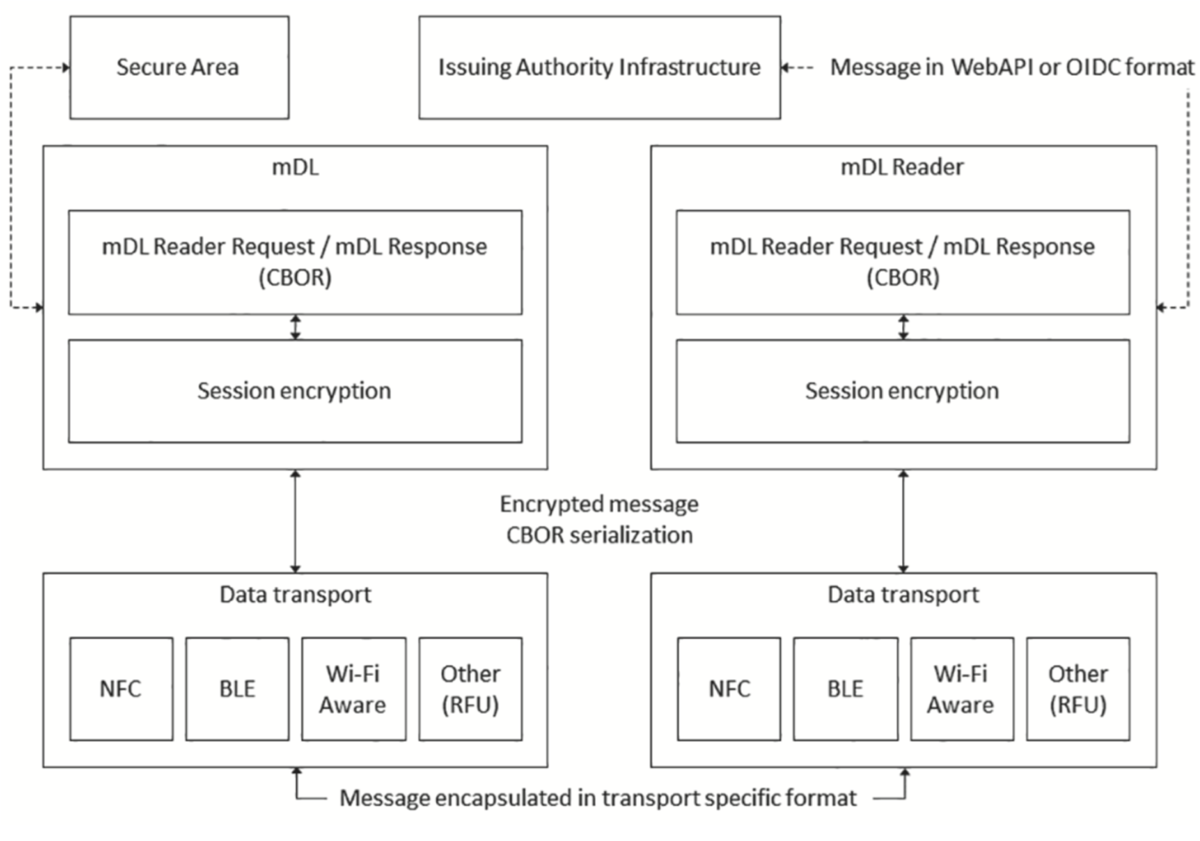
mDL ISO Architecture — ISO ISO_18013-5
The diagram presents both logical and physical parts of the mDL architecture. At the bottom are supported data transport technologies: NFC/Bluetooth, Wi-Fi Aware (optional), etc. Transported data is CBOR coded, which guarantees the best possible performance. CBOR is a binary-coded data format optimized for limited resources and bandwidth.
Selective Disclosure
mDL’s selective disclosure is analog to SD-JWT’s mechanism, i.e., only disclosures’ digests are used when the issuer signs the credential document. That allows simple and easy-to-understand implementation, which is also efficient. At first glance, it only supports property-value pairs, but I don’t see why it couldn’t allow the use of hierarchical data structures as well. However, because the digest list is a one-dimensional array, it would prevent selection from inside a hierarchy.
No Need For ZKP
mDL doesn’t have ZKP but
has solved similar use case requirements with the attestations. For example,
the mDL issuer will include a set of age-over attestations into the mDL. The
format of each attestation identifier is age_over_NN, where NN is from 00 to
99.
When mDL Reader sends the request, it can, for example, query the presence of the
attestation age_over_55, and the response will include all the attestations
that are equal to or greater than 55 years old. For example, if mDL doesn’t have
age_over_55 but it has age_over_58 and age_over_65, it will send
age_over_58.
Conclusion
mDL specification is excellent and ready for broad adoption. I hope we can build something over it ASAP. Unfortunately, the road I selected for PoCs and demos wasn’t possible because Apple’s ID Wallet requires that your device is registered in the US. There are ways to try it on an emulator, but it lacks too many core features to be interesting enough. Suppose you are asking why Apple and why not something else; the answer is that I’m looking at this on the operation system (OS) wallet track. Apple also has exciting features like Tap to ID.
The next step will be to study what we can learn from mDOC/mDL from the DID point of view. Is there some common ground between how mDL sees the world and how DIDComm and generic SSI sees the world—hopefully, the same world.
Until next time, see you!
Managing GitHub Branch Protections
GitHub has recently improved its automatic pull request handling and branch protection features. I have found these features handy, and nowadays, I enable them regardless of the project type to help me automate the project workflows and protect the code from accidental changes and regression bugs.
The features I find most useful are
- Require a pull request before merging: This setting enforces a model where the developers cannot accidentally push changes to the project’s main branches.
- Require status checks to pass before merging: This branch protection setting allows one to configure which status checks (e.g., unit tests, linting, etc.) must pass before merging the pull request.
- Allow auto-merge: This setting allows me to automate the merging of the PR once all the CI has run all the needed checks. I do not need to wait for the CI to complete the jobs. Instead, I can continue working on other things. In addition, I use this feature to merge, for example, dependency updates automatically. Note: auto-merging works naturally only when the branch protection checks are in place.
Until now, I have used GitHub’s branch protection feature to enable these additional shields. With this settings page, you can easily protect one or multiple branches by configuring the abovementioned options.
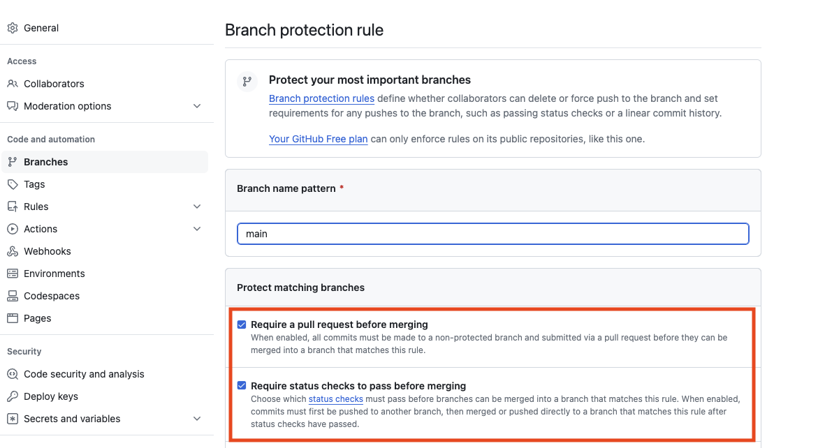
One can configure branch protection rules in the repository settings.
Branch Protection Prevents Releasing
However, when enforcing the branch protection, it applies to all users. That also includes the bot user I am using in many projects to release: creating a release tag, updating version numbers, and committing these changes to the main branch.
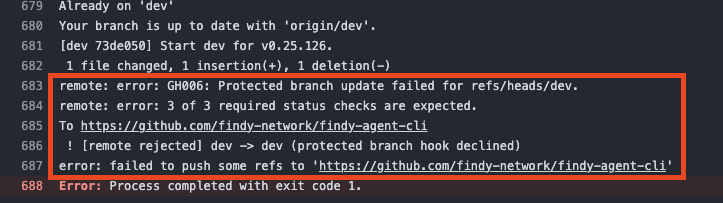
Releaser bot is unable to push version update when branch protection is enabled.
Suddenly, when the branch protection is enabled,
the release bot cannot do its duties as it cannot push to the protected branch.
Error states: Protected branch update failed for refs/heads/<branch_name>, X of X required status checks are expected.
Therefore, to overcome this problem, I have configured the bot to use pull requests. These workaround pull requests have slowed the process and made it unreliable. In some cases, I have been using a user token with administrative permissions to make the releases, which I want to avoid as it has evident problems in the security model.
Rulesets to the Rescue
Finally, this week, I reserved some time to investigate whether it is possible to avoid these limitations. I had two targets: first, I wanted to protect the main branch from accidental pushes so developers could make changes only via pull requests vetted by the CI checks. Second, I wanted the release bot to be able to bypass these rules and push the tags and version changes to the main branch without issues.
I googled for an answer for a fair amount of time. It soon became apparent that many others were struggling with the same problem, but also that GitHub had released a new feature called rulesets, intended to solve the problem. However, a few examples were available, and the configuration of the rulesets was not intuitive. Therefore, I have documented the steps below if you wish to use a similar approach in your project.
The instructions below are three-phased:
- Creating a GitHub application for the release process operations
- Configuring rulesets that protect the main branch but still allow releasing
- Using the newly created GitHub application in the GitHub Actions workflow
GitHub Application
The first step is to create a GitHub application that handles the git operations in the CI release process for you.
Why to Use an Application?
There are multiple reasons why I chose to make a dedicated GitHub application instead of using a personal access token or built-in GitHub Actions token directly:
- The App installed in an organization is not attached to the user’s role or resource access as opposed to the personal access tokens.
- App does not reserve a seat from the organization. Creating an actual new GitHub user would reserve a seat.
- One can grant an application special permissions in rulesets. We want to treat all other (human) users similarly and only grant the bot user special access. This approach is impossible when using personal access tokens or built-in tokens.
- We want to activate other actions from pushes done by the releaser. For instance, if we create a tag with the releaser bot, we want the new tag to trigger several other actions, e.g., the building and packaging the project binary. If using a built-in GitHub Actions token, new workflows would not be triggered, as workflows are not allowed to trigger other workflows.
One can use GitHub Applications for multiple and more powerful purposes, but the releaser bot only needs minimal configuration as its only duty is to do the releasing-related chores.
1. Register Application
Start the application registration via user profile Developer settings or
this link.
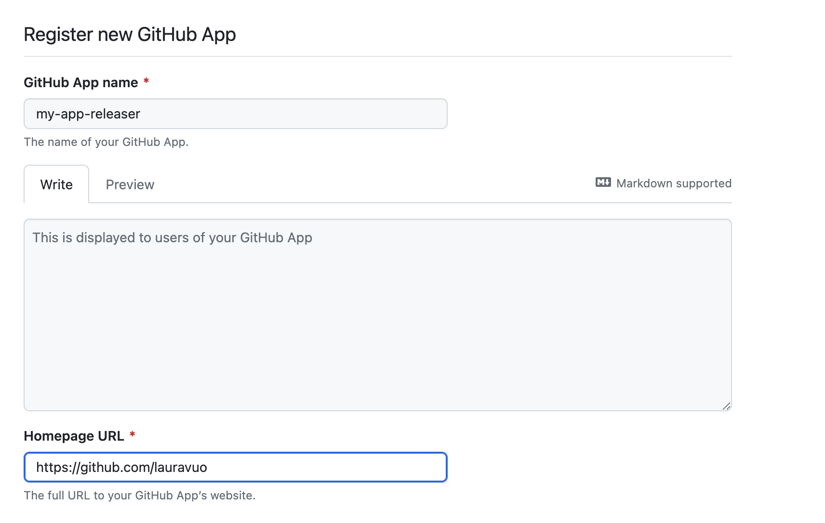
Registering new GitHub application.
When creating the new application for the releasing functionality, the following settings need to be defined:
- Application name: e.g.
releaser-bot - Homepage URL: e.g. the repository URL
- Untick
Webhook/Active, as we don’t need webhook notifications. - Choose permissions:
Permissions/Repository/Contents/Read and write.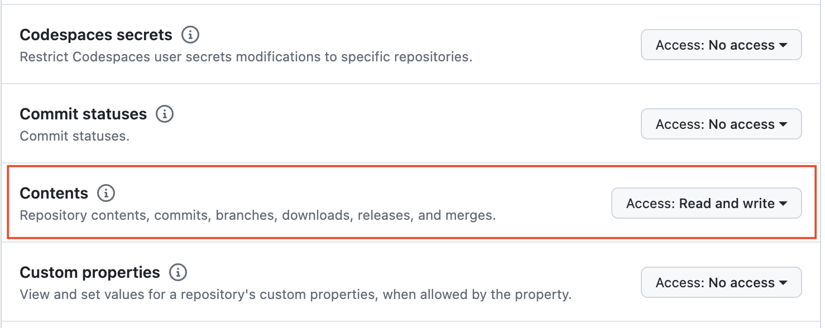
- Choose selection:
Where can this GitHub App be installed?Note: If you want to use the application in an organization’s repositories, make it public. - Push
Create GitHub App.
2. Download Private Key
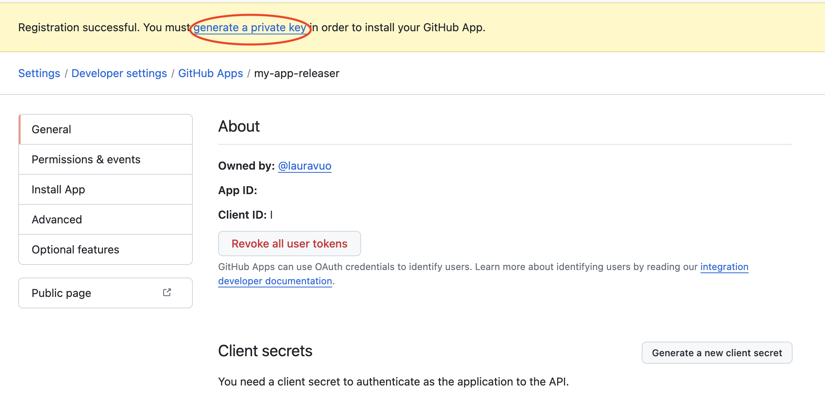
After creating the app, you will receive a note saying,
Registration successful. You must generate a private key to install your GitHub App.
Navigate to the private keys section and push the Generate a private key button.
The private key file will download to your computer. Store it in a secure place; you will need it later.
3. Install the Application
Before using the application in your repository’s workflow:
- Install the app in the target repository.
In the created application settings, go to the
Install Appsection. - Select the user or organization for which you want to install the application.
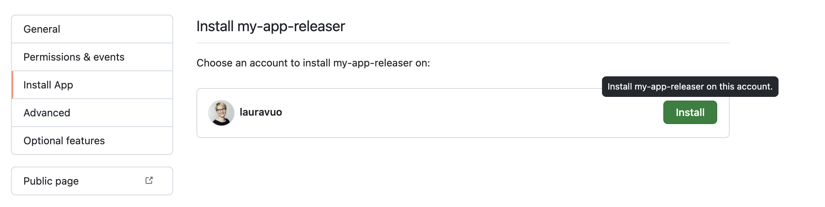
- Select if you wish to use the application in a single repository or all account repositories.
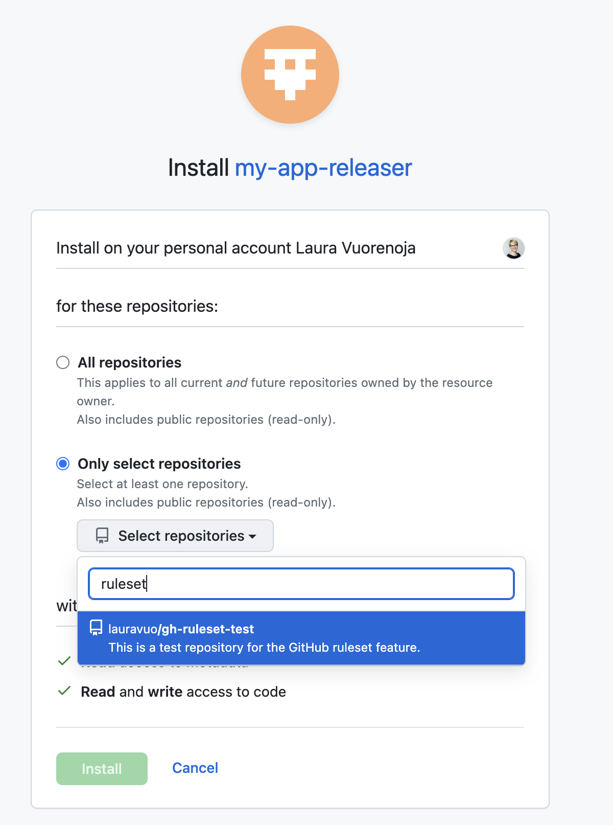
- Push the
Installbutton.
Remove Existing Branch Protections
The rulesets feature will work on behalf of the branch protection settings. To avoid having overlapping configurations, remove first any existing branch protections.
Rulesets
The next step is to create the rulesets.
I crafted the following approach according to the original idea presented in the GitHub blog. The goal is to protect the main branch so that:
- Developers can make changes only via pull requests that have passed the status check
test. - The releaser bot can push tags and update versions in the GitHub Actions workflow directly to the main branch without creating pull requests.
You may modify the settings according to your needs. For instance, you may require additional status checks or require a review of the PR before one can merge it into the main branch.
Configuration
First, we will create a rule for all users. We do not allow anyone to delete refs or force push changes.
Go to the repository settings and select Rulesets:
- Create a
New rulesetby tapping theNew branch ruleset. - Give the
Main: allname for the ruleset. - Set
Enforcement statusasActive.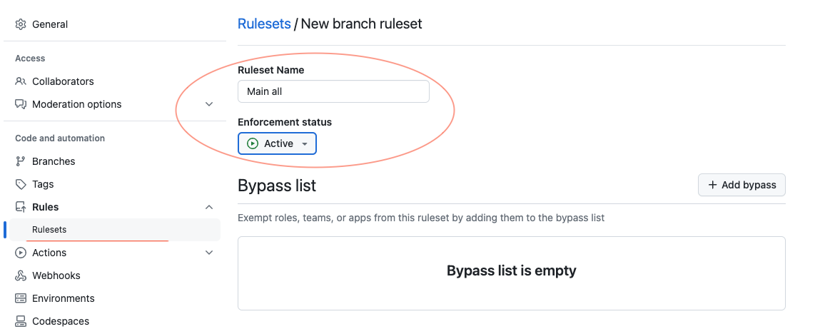
- Leave
Bypass listempty. - Add a new target branch.
Include default branch(assuming the repository default branch is main).
- In
Rulessection, tickRestrict deletionsandBlock force pushes.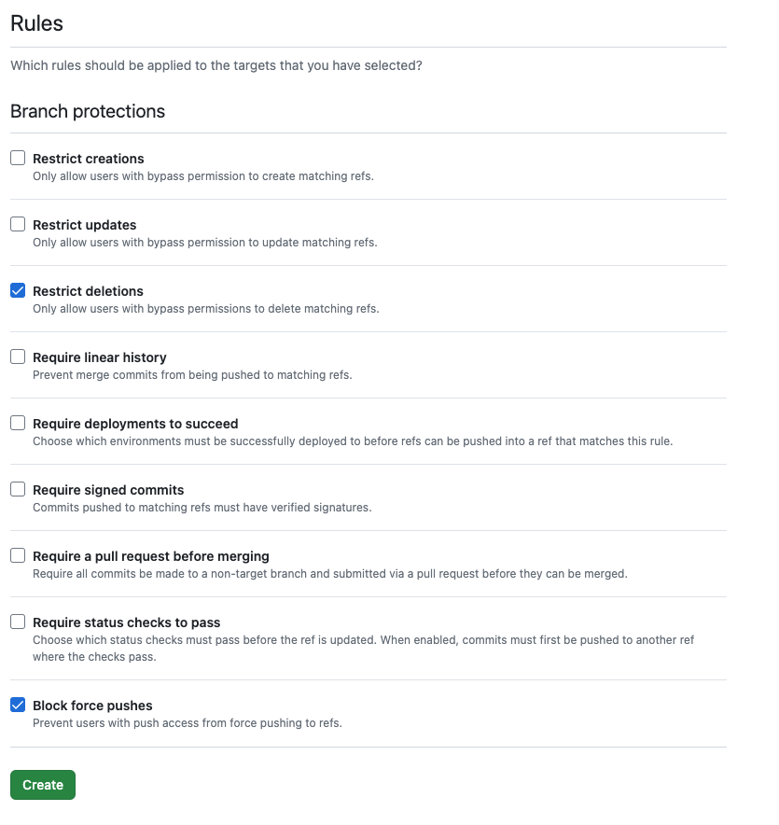
- Push the
Createbutton.
Then, we will create another ruleset that requires PRs and status checks for any user other than the releaser bot.
- Create a
New rulesetby tapping theNew branch ruleset. - Give the
Main: require PR except for releasername for the ruleset. - Set
Enforcementstatus asActive. - Add your releaser application to the
Bypass list.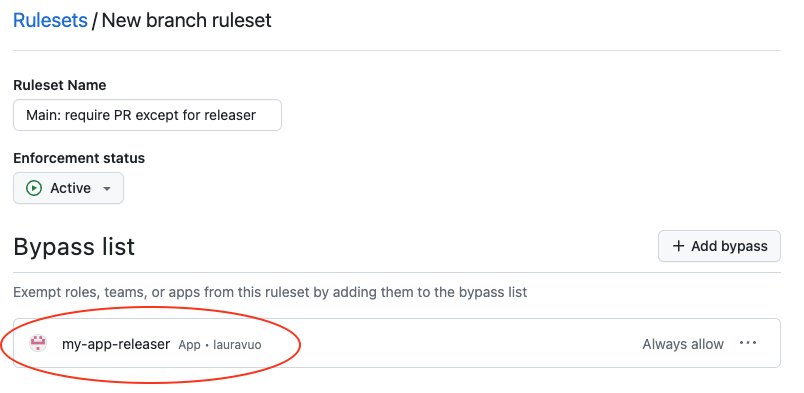
- Add a new target branch.
Include default branch(assuming the repository default branch is main). - Tick
Require a pull request before merging.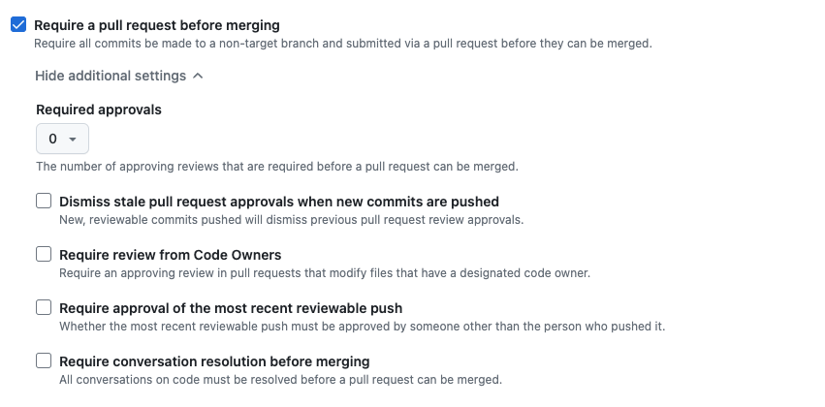
- Tick
Require status checks to passandRequire branches to be up to date before merging.Addtestas a required status check.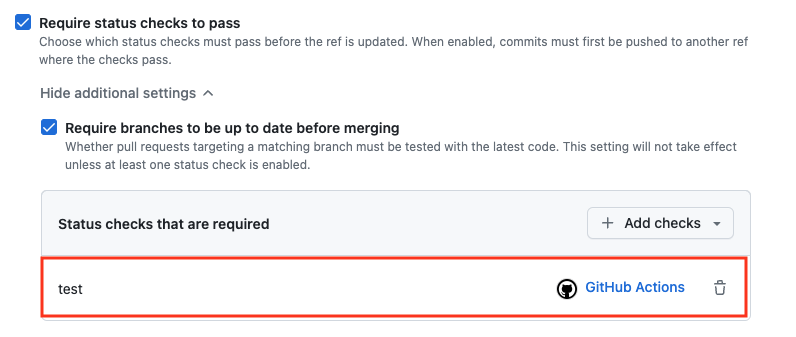
- Push the
Createbutton.
Use Bot in GitHub Actions Workflow
The final step is configuring the release process to use our newly created GitHub application.
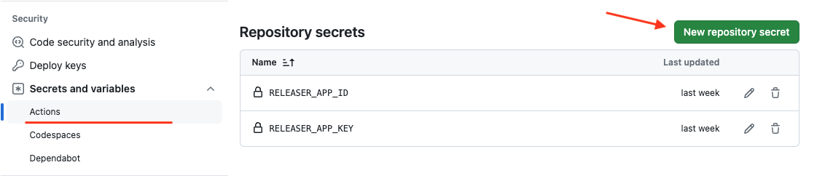
Add Secrets for Release Workflow
To create a token for the releaser bot in the GitHub Actions workflow, we must have two secret variables available.
Go to repository Settings / Secrets and variables / Actions. Create two new secrets:
RELEASER_APP_ID: Copy and paste your GitHub application ID (app ID) from the GitHub application settings page.RELEASER_APP_KEY: Copy and paste the contents of the private key file downloaded earlier.
Generate Token with the GitHub Application
In the release workflow, generate a token with the GitHub Application.
For this, you can use a special action, actions/create-github-app-token,
that utilizes the secrets defined in the previous step.
You can use the generated token for the repository cloning step. One can access the token using the outputs of the token generation step. Since the repository gets cloned with the bot token, the bot user will perform subsequent git actions.
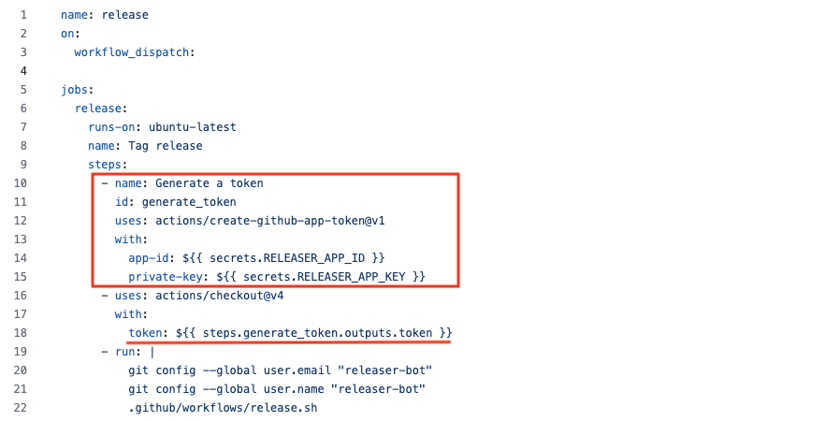
You can find the sample workflow in GitHub.
So, the release script can now push directly to the main branch as we use the releaser bot token and have configured a bypass rule for the bot user in the rulesets. At the same time, other users cannot push to the main branch but must create a PR for their changes.
Summary
That’s it! The above steps show how to automate project release workflow in GitHub Actions with a dedicated bot user while still having repository branch protections to shield from accidental changes and unvetted code. I hope the instructions are of use to you. I’m always happy to have comments and ideas for improvement; you can contact me on LinkedIn!
Path to Passwordless
Passkeys and security keys have gained more and more popularity lately, and no wonder – they provide much more security and usability than passwords. These authentication methods utilize strong and phishing-resistant public key credentials that the keys or authenticators, as we call them, can create automatically. However, implementing passwordless support in your web application, or even replacing passwords altogether, might initially seem overwhelming.
FIDO2 and WebAuthn Standards Ease the Job
Integrating the authenticators into your web application happens through common standards created by the FIDO alliance. It is good news for us application developers: we don’t have to care about the dirty details of each authenticator implementation. Our job is to take into use the platform or browser APIs that enable the creation and use of the authenticator-managed credential. The operating system or browser handles needed user interaction and shows standard dialogs when appropriate.
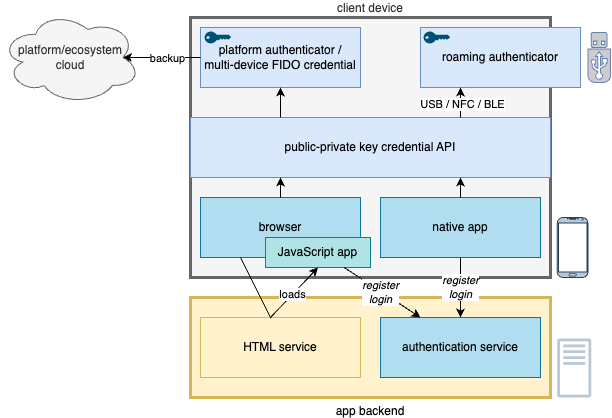
The team implements passwordless support by integrating credential handling into the client application and the backend authentication service. Client applications can use the platform capabilities through the native APIs or browser JavaScript implementation. The backend service must support at least credential registration and credential-based user authentication.
Furthermore, we need to have a backend service in place that is capable of storing and verifying these credentials so that the authentication can take place correctly. The service must support the W3C WebAuthn standard so that the backend API responses are compatible with the client-side authenticator logic. The backend service is called quite often as a FIDO2 server.
To Buy or To Build?
Choosing one of many authentication service providers may be the most straightforward path on your passwordless journey. A service provider typically gives you access to a backend as a SaaS or a product you host yourself. The backend has the above capabilities to store and verify your users’ public keys. In addition to backend functionality, the service providers offer custom client libraries that enable you to add matching authenticator support to your application, whether a web or a native application.
Platform and browser handle the user interaction dialogs when using authenticators.
Another option is to implement the WebAuthn support yourself. Some excellent open-source libraries already exist that ease the development of your backend service’s functionality for public key handling. Browser support for WebAuthn capabilities is rather good, and the integration to the web application is straightforward once the backend is in place. One can utilize dedicated client libraries for native applications (for example, iOS, Android, and Windows).
Example of Getting Hands Dirty
In our OSS decentralized identity agency project, we implemented WebAuthn logic ourselves. We created the authentication functionality in our backend server and web application. The core functionality consists of two features: registering a new user and authenticating an existing user (and returning an access token after a successful authentication). Of course, an end-product would have more features, e.g., for adding and removing authenticators but starting with the core features is the simplest.
We wrote the authentication server in Go.
It utilizes go-webauthn library.
Both of the core features need two API endpoints.
On the client side, we use
the navigator credentials JavaScript API
in a React application.
The following sequence graphs demonstrate how the logic flows in more detail and describe the needed functionality at a high level.
User Registration
The first core feature is user registration. The user creates a new public-private key pair. The authenticator saves the private key to its secure storage, and the application sends the public key to the service backend.
sequenceDiagram
    autonumber
    participant Client
    participant Server
    Client->>Server: Request for credential creation options.<br/>/attestation/options
    Server-->>Client: Return credential creation options.
    Note left of Client: Create credential with received options.<br/>navigator.credentials.create
    Client->>Server: Send client data and public key to server.<br/>/attestation/result
    Note right of Server: Validate data. <br/> Store the public key and the credential id, <br/> and attach to user.
    Server-->>Client: Registration OK!
User Authentication
Another core feature is user authentication. The user creates a signature utilizing the authenticator-provided private key. The service backend verifies the signature using the stored public key and provides access if the signature is valid.
sequenceDiagram
    autonumber
    participant Client
    participant Server
    Client->>Server: Request for credential request options.<br/>/assertion/options
    Server-->>Client: Return credential request options.
    Note left of Client: Get credential with received options. <br/> Create signature with the private key.<br/>navigator.credentials.get
    Client->>Server: Send assertion to server.<br/>/assertion/result
    Note right of Server: Validate data and verify signature.
    Server-->>Client: Return access token.
For more information on how and which data is handled, see, for example, the WebAuthn guide. You can also find our client application source codes and the authentication service implementation on GitHub. You can also read more about how our project has utilized FIDO2 from this blog post.
As the example above shows, implementing a passwordless is not impossible. However, as with any new technology, it takes time and dedication from the team to familiarize themselves with the new logic and concepts. In addition, as there are strict security requirements, testing the authentication flows in a local development environment might be challenging at times, as the client and server need to belong to the same domain. The local testing environment is something that the team should resolve and enable together already early in the project so that it will not become a bottleneck.
Not All Things Are Standardized
One might still find using an external authentication service provider a safer bet. Especially when there is a need to support a variety of native devices, it may be tempting to pay someone to deal with the device-specific problems. However, in this case, there is one essential thing to notice.
Usually, the service provider solutions are proprietary. It means that the interaction between the client application and the backend API happens in a manner defined by the service provider. Even though the WebAuthn requests and responses are standardized, the payload wrapper structures and API endpoint paths depend on the implementation. There exists a FIDO recommendation on how the server API should look like, but it is a mere recommendation and not all service providers follow this guidance. Therefore, you cannot mix and match client and server implementations but will likely end up in a vendor lock when choosing a proprietary solution.
The path to passwordless is a journey that all web application developers will eventually travel. Will your team take the steps sooner rather than later?
Test Coverage Beyond Unit Testing
Automated testing is your superpower against regression. It prevents you from breaking existing functionality when introducing new code changes. The most important aspect of automated testing is automation. The testing should happen automatically in the continuous integration (CI) pipeline whenever developers do code changes. If the tests are not passing, the team shouldn’t merge the changes to the main branch. I often regard the automated test set as an extra team member – the team’s tireless knight against regression.

Automated test set - the team's knight against regression
Complementing Unit Tests
The automated test set usually consists of many types of testing. Unit tests are the bread and butter of any project’s quality assurance process. But quite often, we need something more to complement the unit tests.
We usually write simulation code for external functionality to keep the unit tests relevant, modular, and fast to execute. However, wasting the team’s resources on creating the simulation code doesn’t always make sense. Furthermore, we don’t include simulation code in the end product. Therefore, we should also have testing that verifies the functionality with the proper external dependencies.
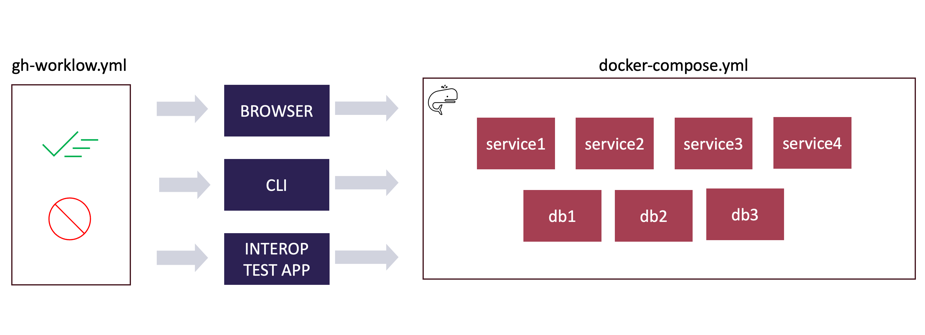
Findy Agency application tests are run in GitHub Actions workflows, utilizing docker-compose to orchestrate the agency services.
Application (integration/e2e) tests execute the software without unit testing tooling in the software’s “real” running environment and with as many actual external dependencies as possible. Those tests validate the functionality from the end user’s point of view. They complement unit tests, especially when verifying interoperability, asynchronous functionality, and other software features that are difficult or impossible to test with unit testing.
Keeping the Knight in Shape
Test coverage measurement is the process that can gather data on which code lines the test executes. Typically, this tooling is available for unit tests. Although coverage measurement and result data visualization can be handy in a local development cycle, I see the most value when the team integrates the coverage measurement with the CI pipeline and automated monitoring tooling that utilizes the coverage data.
The automated monitoring tool is an external service that stores the coverage data from the test runs over time. When the team creates new pull requests, unit tests measure the coverage data, and the pipeline sends the data to the monitor. It can then automatically alert the team if the test coverage is about to decrease with the new changes.
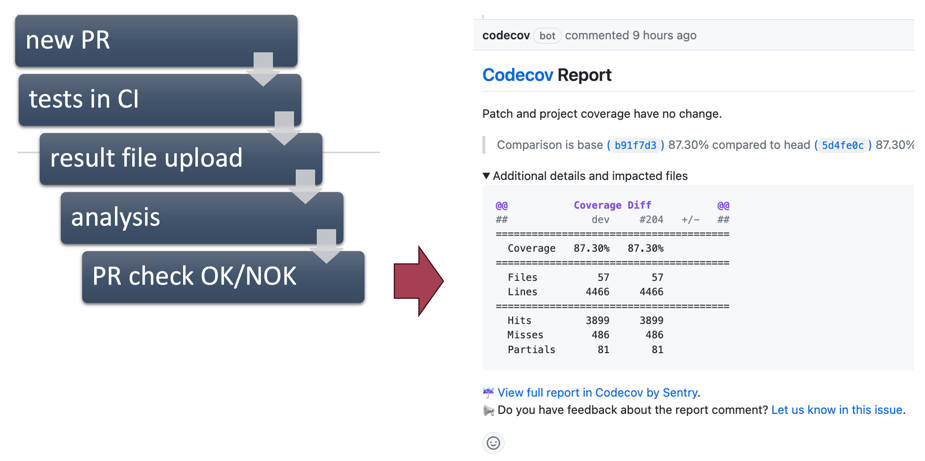
Codecov.io is an example of a SaaS-service that can be used as an automatic test coverage monitor.
Thus, the automated coverage monitoring keeps the team’s knight in good shape. Developers cannot add new code without adding new tests to the knight’s toolbox. Or at least the decision to decrease the coverage needs to be made knowingly. Forgetting to add tests is easy, but it gets trickier when someone nags you about it (automatically).
However, as stated above, we are used to measuring the coverage only for unit test runs. But as we also test without the unit test tooling, i.e., application tests, we would like to gather and utilize the data similarly for those test runs.
Coverage for Application Tests
Go 1.20 introduced a new feature flag
for the go build command, -cover.
The new flag enables the developer to build an instrumented version of the software binary.
When running the instrumented version, it produces coverage data for the run,
as with the unit tests.
# build with –cover flag
go build –cover -o ./program

# define folder for result files
export GOCOVERDIR=”./coverage”

# run binary (and the application tests)
./program

# convert and analyze result files
go tool covdata textfmt –i=$GOCOVERDIR –o coverage.txt
Using the new feature means we can include the test coverage of the application test runs in the automated monitoring scope. We put this new feature to use in the Findy Agency project.
Instrumenting the Container Binary
Measuring the test coverage for application tests meant we needed to refactor our application testing pipeline so that CI could gather the data and send it to the analysis tool.
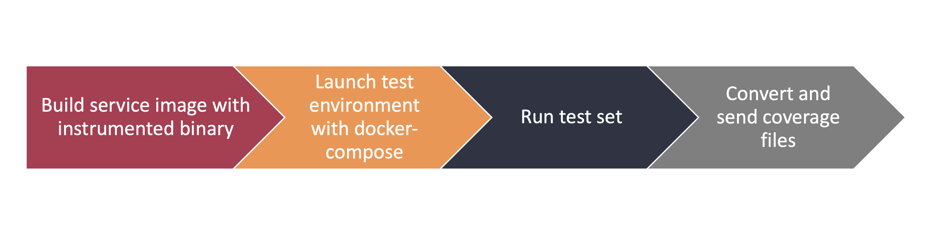
Acceptance application test set for Findy Agency microservice are run using a dedicated GitHub Action. The action is capable of building and running the container with instrumented binary and reporting the coverage data back to the parent job.
- We use a shared GitHub action to execute the same application acceptance test set for all our microservices. The action handles setting up the agency environment and running the test set.
- Service Docker images used in the application tests must have the instrumented binary.
We modified the Docker image
build phase to include the new
-coverflag. - We define the
GO_COVERDIRenvironment variable in the service image, and the environment definition maps that container path to a folder in the local environment. - Once the agency is running, GitHub Action executes the tests. After test execution, CI copies the result files, converts and sends them to the analysis tool as with unit tests.
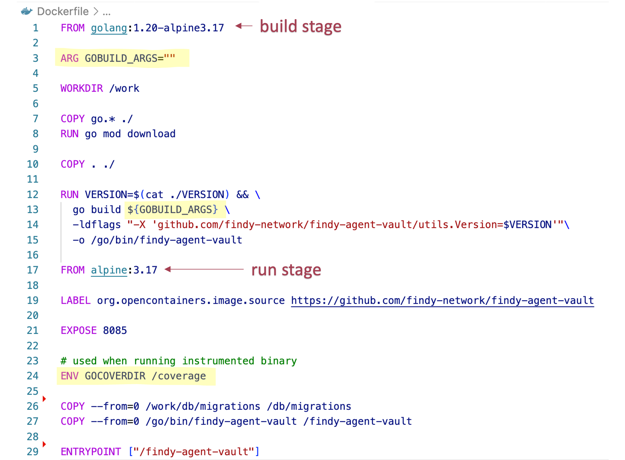
Changes required to service Dockerfile.
Increased Coverage
The change has the expected effect: coverage increased in our repositories where we introduced
this change. The coverage counts now in previously unmonitored code blocks, such as code in the main
function that was missing unit tests. The change improves our understanding of our testing scope and
helps us to keep our automated test set in better shape.
You can inspect the approach, for example, in the findy-agent-vault repository CI configuration.
Watch my “Boosting Test Coverage for Microservices” talk on GopherCon UK on YouTube.Note! The coverage data is lost if the process is forced to be terminated and it doesn’t handle
the termination signal gracefully. Ungraceful termination prevents the added instrumentation code
from writing the coverage file. Therefore, the service needs to
have graceful shutdown in place. Also, the Docker container runtime needs to pass
the SIGTERM signal to the server process for this approach to work.
How To Write Modifiable & Readable Go Code
Since jumping on the OSS (Open Source Software) wagon, I have been learning new things about software development and getting more evidence to do certain things in a specific way.
Two of my favorite ’things’ at the code level are readability and modifiability. The latter is a very old friend of SW architecture’s quality attributes (Software Architecture in Practice, Len Bass, et al.). Still, it is not well aligned with the current practices and tools in the OSS scene because everything is so text-centric. Practise has taught that software architecture must be expressed in various notations; most are visual.
Most of us can reason a well-grafted state-machine diagram much faster than a code written our favorite programming language. For instance, the next state-machine diagram’s protocol implementation is constructed of thousands of lines of code structured in multiple files that depend on external modules and libraries. We need abstraction layers and modules to manage all that complexity.
@startuml

title Protocol State Machine

state "Waiting Start Cmd/Msg" as wstart

[*] -> wstart
wstart --> PSM: InvitationCmd
wstart --> PSM: ConnReqMsg

state "ConnectionProtocolRunning" as PSM {

	state "Sending ConnReq" as sreq
	state "Waiting ConnResp" as wresp

	'[*] -left-> sreq: InvitationCmd
	[*] --> sreq: InvitationCmd

	sreq --> wresp : http/200
	sreq: do/send until http/200

	wresp: exit/return http 200

	wresp --> [*]: ConnRespMsg

||

	state "Sending ConnResp" as sresp

	[*] --> sresp: ConnReqMsg

	sresp: do/send until http 200

	sresp --> [*]: http/200
}

PSM --> [*]

@enduml
Expressing things with the control-flow structures of imperative (or functional) programming languages is more challenging—especially when the correctness of the design should be verified. It seems that it’s easy to forget software quality attributes during fast-phasing programming if we use tools that only manage sequential text, i.e., code. At the code level, we should use functions that give us an abstraction hierarchy and help us to maintain modifiability—and readability as well, of course.
Moreover, since my studies of SW architecture’s quality attributes, I have understood that modifiability is more than modularity, re-usability, or using correct architectural styles like pipe and filter. Now we understand the importance of TTD, continuous deployment, DevOps, etc. These practices don’t work only on one of the engineering expertise. The best results are achieved through multi-disciplinary systems engineering practices.
At NASA, “systems engineering” is defined as a methodical, multi-disciplinary approach for the design, realization, technical management, operations, and retirement of a system. — NASA Systems Engineering Handbook
In this and my previous performance post, I’ll explain what multi-disciplinary software development practices mean when your development is fast-phasing OSS.
Code Modifiability
Most of the computer software is never ready. During its life cycle, it is under continuous changes: new features are needed, bugs must be fixed, technical debt needs to be amortized, etc.
In modern OSS-based software development, modifiability can be thought of as refactorability. Why?
Because we want to follow The Boy Scouting Rule:
Always leave the code you are working on a little bit better than you found it.
An excellent example of this rule is that when you find a bug, before fixing it to the mainstream, implement automatic tests to reproduce it.
Refactorability
Go programming language is the most refactor-friendly of them all I have used.
- integrated test harness
- benchmark tests
- package naming
- orthogonality
- interface structure (no implementation declaration needed)
- no
selforthisreserved words, you name object instances yourself - actual hybrid language combining OOP and functional programming features concentrating on simplicity
- batteries included -standard library
- type polymorphism, i.e., generics
I don’t think that’s even all of the Go’s features that help refactor your code, but these are the fundamentals in the critical order.
Like any other programming language, Go isn’t perfect. The current error-handling mechanism and strict community with their ‘idiomatic’ language policies restrict some of Go’s refactoring capabilities. But you can avoid them by using helper packages and your brains.
And, of course, there are two new language (main) releases every year. Let’s hope that upcoming versions help us keep our Go projects refactorable and maybe even help a little more.
Code Readability
We want to maximize our code’s readability. One of the Go code’s problems is that it overuses the if-statement, which prevents you from noticing the algorithm’s critical decision points.
For example, Go’s standard library includes quite many of the following code blocks:
func doSomething(p any, b []byte) {
    if p == nil {
        panic("input argument p cannot be nil")
    }
    if len(b) == 0 {
        panic("input argument p cannot be nil")
    }
    ...
    err := w.Close()
    if err != nil {
        log.Fatal(err)
    }
}
It’s easy to see that together with Go’s if-based error checking, these two hide the happy path and make it difficult to follow the algorithm and skim the code. The same thing can be found from Go’s unit tests if no 3rd party helper package is used:
     for _, tt := range tests {
          t.Run(tt.name, func(t *testing.T) {
               r := <-Open(tt.args.config, tt.args.credentials)
               if got := r.Err(); !reflect.DeepEqual(got, tt.want) {
                    t.Errorf("Open() = %v, want %v", got, tt.want)
               }
               w := r.Handle()
               if got := (<-Export(w, tt.args.exportCfg)).Err(); !reflect.DeepEqual(got, tt.want) {
                    t.Errorf("Export() = %v, want %v", got, tt.want)
               }
               if got := (<-Close(w)).Err(); !reflect.DeepEqual(got, tt.want) {
                    t.Errorf("Close() = %v, want %v", got, tt.want)
               }
          })
     }
The above code block is from a different test than the block below, but I think you get the idea. I’m speaking fast skimming of code where simplicity and appearance help a lot. Very much similar to syntax highlighting.
func TestNewTimeFieldRFC3339(t *testing.T) {
     defer assert.PushTester(t)()

     var testMsg Basicmessage
     dto.FromJSON([]byte(timeJSONRFC3339), &testMsg)
     timeValue := testMsg.SentTime

     assert.INotNil(timeValue)
     assert.Equal(timeValue.Year(), 2022)
     assert.Equal(timeValue.Month(), time.September)
     assert.Equal(timeValue.Day(), 30)
}
That’s clear and easy to skim. It’s also straightforward to extend to use table testing. I left it for the reader to figure out how that code renders without an assert package.
Conclusion
Go is built for hyper-large projects. Significant projects in every dimension: software engineers, code lines, modules, function points, whatever. And it does a pretty damn good job on that.
Unfortunately, the Go community isn’t as open and welcoming as, for example, Rust’s community. (Not my words directly, but I share the opinion). Remember, it’s your code and your project to maintain. So, keep your head and remember:
The whole problem with the world is that fools and fanatics are certain of themselves, while wiser people are full of doubts. — not entirely Bertrand Russell
How To Write Performant Go Code
I suppose all of us programmers have heard of the infamous premature optimization:
Premature optimization is the root of all evil in programming.
Really? I don’t think so.
The full quote from the must-read The Art of Computer Programming by Donald Knuth:
The real problem is that programmers have spent far too much time worrying about efficiency in the wrong places and at the wrong times; premature optimization is the root of all evil (or at least most of it) in programming.
Like so many pearls of wisdom, they are a child of their own time. They are usually dangerously separated from their context to underline the message the next author wants to emphasize their statement. I believe most of us have only read the shortened, i.e., wrong version of the quotation.
I claim that if keeping performance is your second nature, it’ll not ruin the other quality attributes of your code, but the opposite. All you need to do is to follow some basic rules with your muscle memory.
Performance Rules
In this post, I concentrate only on these three:
- A function call is computationally expensive if the compiler cannot inline expanse it, i.e. do function inlining. When inlining, the compiler produce machine code, that doesn’t include real sub-routine calls with argument transportation either stack or CPU registers, and unwinding the stack and copy results to desired memory locations after the call returns. With function inlining you can think that the compiler copy/paste your function’s machine instructions to all of those places where it’s called.
- Heap allocations are computationally expensive. (We out-scope garbage collection algorithms because they’re such a significant topic that even one book is insufficient. Still, it’s good to know that heap allocation pressurize a garbage collector.)
- Minimize the problem space at every level of abstraction and the need
for variables, i.e. especially in inner loops. Consider what parts of
inputs are really varying and what parts are constant. For example, think
twice if you need
regexinside of your program.
Function Inlining
Let’s write our version of the famous assert function to show how function
inlining can help readability outside of the tests without sacrificing
performance.
func assert(term bool, msg string) {
    if !term {
        panic(msg)
    }
    ...

func doSomething(p any, b []byte) {
    assert(p != nil, "interface value cannot be nil")
    assert(len(b) != 0, "byte slice cannot be empty (or nil)")
    ...
    // continue with something important
By writing the benchmark function for assert with Go’s testing capabilities,
you can measure the ‘weight’ of the function itself. You get the comparison
point by writing the reference benchmark where you have manually inline-expansed
the function, i.e. by hand. It would look like this:
func doSomethingNoAssert(p any, b []byte) { // for benchmarks only
    if p != nil {
        panic("interface value cannot be nil")
    }
    if len(b) != 0 {
        panic("byte slice cannot be empty (or nil)")
    }
    ...
    // continue with something important
Note, this would be your reference point only. (I’ll show how to turn off inlining with Go compiler flags, which would work as a good benchmarking reference for some cases.)
And, if you aren’t interested in the actual performance figures but just the information about successful inline expansion done by the compiler, you can ask:
go test -c -gcflags=-m=2 <PKG_NAME> 2>&1 | grep 'inlin'
The -gcflags=-m=2 gives lots of information, but we can filter only those
lines that contain messages considering the inlining. Depending on the size of
the packages there can be an overwhelming lot of information where most of them
aren’t related to the task in your hand. You can always filter more.
The -gcflags will be your programming buddy in the future. To get more
information about the flags, run:
go build -gcflags -help
Naturally, you can use compiler to give you a reference point for your inline optimizations as I said before.
Disable all optimizations:
go test -gcflags='-N' -bench='.' <PKG_NAME>
Disable inlining:
go test -gcflags '-l' -bench='.' <PKG_NAME>
Memory Allocations
Similarly, as function calls, the memory allocations from the heap are expensive. It’s good practice to prevent unnecessary allocations even when the programming platform has a garbage collector. With the Go, it’s essential to understand the basics of memory management principles Go uses because of memory locality, i.e., it has pointers and value types. Many other garbage-collected languages have object references, and the memory locality is hidden from the programmer, leading to poor performance, e.g., cache misses.
But nothing comes for free—you need to know what you’re doing. Go’s compiler analyzes your code and, without your help, can decide if a variable is escaping from its scope and needs to be moved from a stack to the heap.
Go’s tools give you extra information about escape
analyzes. Use the
-gcflags=-m=2 again, but grep escape lines from the output. That will tell
you exactly what’s going on with the pointers for every function in the current
compilation.
Usually, when benchmarking Go code, it’s good to understand what’s going on with heap allocations. Just add the following argument e.g., your test benchmark compilation, and you get the statistics of allocations in the benchmark run.
go test -benchmem -bench=. <PKG_NAME>
The -benchmem flag inserts two columns to benchmarking results:
Benching Memory Allocations
Please note that five (5) columns are now instead of standard three. The extra
two (rightmost and marked with red rectangle) are the about memory allocations.
B/op is the average amount of bytes per memory allocation in the rightmost
column allocs/op.
Fewer allocations, and the smaller the size of the allocations, the better. Please note that the performance difference between the above benchmark results isn’t because of the allocations only. Most of the differences will be explained in the following chapters. But still, allocations are something you should be aware of, especially about the variable escaping if it leads to heap allocations.
How Dynamic Are The Inputs?
How much do the variables in your program change, or maybe they are constant? Naturally, the smaller the actual input set of the function, the better chance we have to optimize its performance because the more deterministic the solution will be. Also, smaller machine code performs better in modern memory-bound CPUs. The same cache rules apply to instructions as variables. CPU doesn’t need to access RAM if all the required code is already in the CPU.
The above benchmark results are from two functions that do the same thing. This is the regex version of it (first row in the benchmark results):
var (
	uncamel = regexp.MustCompile(`([A-Z]+)`)
	clean   = regexp.MustCompile(`[^\w]`)
)

// DecamelRegexp return the given string as space delimeted. Note! it's slow. Use
// Decamel instead.
func DecamelRegexp(str string) string {
	str = clean.ReplaceAllString(str, " ")
	str = uncamel.ReplaceAllString(str, ` $1`)
	str = strings.Trim(str, " ")
	str = strings.ToLower(str)
	return str
}
Go’s regex implementation is known to be relatively slow, but if you think that regex needs its compiler and processor, it’s not so surprising.
The hand-optimized version of the Decamel function is almost ten times faster. It sounds pretty much like it’s natural because we don’t need all the versatility of the entire regex. We need to transform the inputted CamelCase string to a standard lowercase string. However the input strings aren’t without some exceptions in our use case because they come from the Go compiler itself. (The inputs are from Go’s stack trace.) And still, the input set is small enough that we quickly see the difference. And now, we can shrink the problem space to our specific needs.
The 1000%-faster version of Decamel that’s still quite readable:
func Decamel(s string) string {
     var (
          b           strings.Builder
          splittable  bool
          isUpper     bool
          prevSkipped bool
     )
     b.Grow(2 * len(s))

     for i, v := range s {
          skip := v == '(' || v == ')' || v == '*'
          if skip {
               if !prevSkipped && i != 0 { // first time write space
                    b.WriteRune(' ')
               }
               prevSkipped = skip
               continue
          }
          toSpace := v == '.' || v == '_'
          if toSpace {
               if prevSkipped {
                    continue
               } else if v == '.' {
                    b.WriteRune(':')
               }
               v = ' '
               prevSkipped = true
          } else {
               isUpper = unicode.IsUpper(v)
               if isUpper {
                    v = unicode.ToLower(v)
                    if !prevSkipped && splittable {
                         b.WriteRune(' ')
                         prevSkipped = true
                    }
               } else {
                    prevSkipped = false
               }
          }
          b.WriteRune(v)
          splittable = !isUpper || unicode.IsNumber(v)
     }
     return b.String()
}
Let’s take another example where results are even more drastically faster, but the reason is precisely the same. The input set is much smaller than what the first implementation function is meant to be used.
The results:

Benching Get Goroutine ID
The first implementation:
func oldGoid(buf []byte) (id int) {
     _, err := fmt.Fscanf(bytes.NewReader(buf), "goroutine %d", &id)
     if err != nil {
          panic("cannot get goroutine id: " + err.Error())
     }
     return id
}
The above code is quite self explanatory, and that’s very good.
The second and fasterfastest implementation:
func asciiWordToInt(b []byte) int {
     n := 0
     for _, ch := range b {
          if ch == ' ' {
               break
          }
          ch -= '0'
          if ch > 9 {
               panic("character isn't number")
          }
          n = n*10 + int(ch)
     }
     return n
}
These two functions do precisely the same thing, or should I say almost because the latter’s API is more generic. (In a way, we are both narrowing and widening the scope simultaneously, huh?) The converted integer must start from the first byte in the slice of ASCII bytes.
It is much over 100x faster! Ten thousand percent. Why?
Because the only thing we need is to process the ASCII string that comes in as a byte slice.
You might ask whether this ruined the readability, which is fair. But no, because the function
asciiWordToIntis called fromGoroutineID, which is just enough—trust abstraction layering. (See the rule #1.)
Next time you are writing something, think twice—I do 😉
P.S.
There is so much more about performance tuning in Go. This piece was just a scratch of the surface. If you are interested in the topic, please get in touch with our project team, and we will tell you more. We would be delighted if you join our effort to develop the fastest identity agency.
GopherCon UK 2023
At the beginning of this year, I set myself a target to speak at a Go programming language conference. There were several reasons to do so. Go has been one of my favorite tools for years, and I have longed for an excuse to join a Go event. Giving a speech was perfect for that purpose. Plus, I have multiple excellent topics to share with the community as we do open-source development in our project, and I can share our learnings along with our code more freely. Furthermore, I want to do my part in having more diverse speakers at tech conferences.
As Go released 1.20, it inspired me to experiment with the new feature to gather coverage data for binaries built with Go tooling. I refactored our application testing pipelines and thought this would be an excellent topic to share with the community. I was lucky to get my speech accepted at GopherCon UK in London, so it was finally time to join my first Go conference.

The Brewery hosted the event. Surprisingly for London, weather was excellent during the whole conference.
The conference was held in the Brewery, a relaxed event venue in London City. The word on the conference halls was that the number of event sponsors had decreased from the previous year, and therefore, it had been challenging to organize the event. Luckily, the organizers were able to pull things still together.
Apart from the recession, the times are now interesting for Gophers. Many good things are happening in the Go world. As Cameron Balahan pointed out in his talk “State of the Go Nation,” Go is more popular than ever. More and more programmers have been adding Go to their tool pack in recent years, pushing language developers to add new and better features. Moreover, Go is not only a programming language anymore; it is a whole ecosystem with support for many kinds of tooling. Newcomers have a way easier job to start with development than, for example, I had seven years ago. Balahan stated that improving the onboarding of new developers is still one of the Go team’s top priorities. He mentioned that they are working on the libraries, documentation, and error messages to help newcomers and all Go developers be more productive.
Cameron Balahan is the product lead for Go.
Automated Testing and Test Coverage
The topic of my talk was “Boosting Test Coverage for Microservices.” I described in the presentation how vital automated testing has become for our small team. Automated testing is usually the part you skip when time is running out, but I tried to convince the audience that this might not be the best approach – missing tests may bite you back in the end.

On the stage. Photo by Tapan Avasthi
Furthermore, I discussed test coverage in the presentation along with how one can measure test coverage for unit tests and now even - with the Go new tooling – for application tests, i.e., tests you run with the compiled application binary instead of unit testing tooling.
My presentation is available on YouTube.The audience received the talk well, and I got many interesting questions. People are struggling with similar issues when it comes to testing. It is tough to decide which functionality to simulate in the CI pipeline. Also, we discussed problems when moving on to automated testing with a legacy code base. The Go’s new coverage feature was unknown to most people, and some were eager to try it out instantly after my session.

All participants were given adorable Gopher mascots.
Unfortunately, when you are a speaker at a conference, you cannot concentrate fully on the conference program because one needs to prepare for the talk. However, I was lucky enough to join some other sessions as well. There were mainly three themes that I gained valuable insights from.
Logging and tracing
Generating better logs and traces for applications seems to be a hot topic – and no wonder why. Services with high loads can generate countless amounts of data, and for the developers to use the logs for fixing issues efficiently, they must be able to filter and search them. The ability to debug each request separately is essential.
Jonathan Amsterdam from Google gave an inspiring presentation on the slog package, the newest addition to the standard library regarding logging. Go’s default logging capabilities have always lacked features. The missing log levels have been the greatest pain point in my daily developer life. More importantly, the ability to send structured data to analysis tools is crucial for production systems. Until now, teams have had to use different kinds of 3rd party libraries for this to happen.
Now, the slog package fixes these shortcomings, with the ability to handle and merge the data from existing structured logging tools. The presentation revealed how the team refined the requirements for the new package together with the developer community. Also, it was fascinating to hear which kind of memory management tricks the team used, as the performance requirements for logging are demanding.
Another exciting presentation handled also the capability of solving problems quickly, but instead of logs, the emphasis was on tracing. Tracing provides a more detailed view of the program’s data flow than logs and is especially useful when detecting performance bottlenecks. Konstantin Ostrovsky described how their team is using OpenTelemetry to add traceability to incoming requests. Using this approach, they do not need other logs in their codebase (excluding errors).
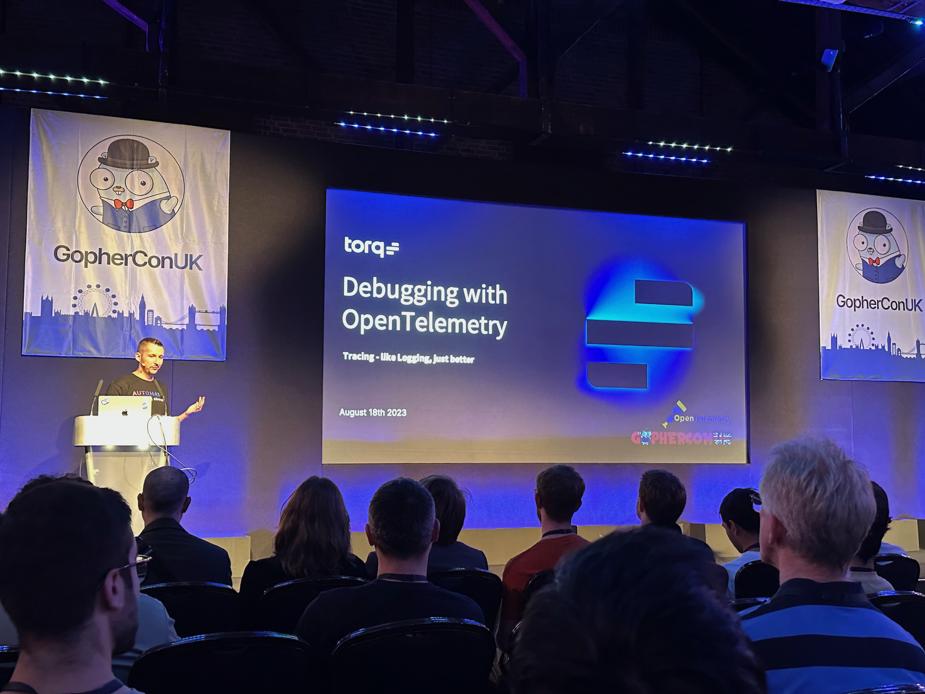
Konstantin Ostrovsky presenting OpenTelemetry usage with Go.
OpenTelemetry tracing uses the concept of spans in the code. One can utilize the spans to store the request data parameters and call relationships. Different analysis tools can then visualize this data for a single request. According to Konstantin, these visualizations help developers solve problems faster than searching and filtering ordinary logs. However, in the presentation Q&A, he reminded us that one should use the spans sparingly for performance reasons.
Service Weaver
Service Weaver is an open-source project that another Google developer, Robert Grandl, presented at the conference. The tool allows one to develop a system as a monolith, as a single binary, but the underlying framework splits the components into microservices in deployment time. Therefore, development is easier when you do not have to worry about setting up the full microservices architecture on your local machine. In addition, the deployment might be more straightforward when you can work at a higher level.
I participated in a workshop that allowed participants to try the Service Weaver hands-on. The target was to build a full-blown web application with a web UI and a backend service from which the UI could request data. Other sections described testing the weaver components, routing from one service to another, and even calling external 3rd party services.
The workshop suited me well; I could learn more than just listening to a presentation. Furthermore, the topic interested me, and I will dig into it more in the coming days to better understand which kind of projects would benefit from this kind of development model the most. The workshop organizer promises that Google will not stop investing in the product. They are searching for collaborators to get more feedback to develop the product further.
UI development with Go
Another topic that got my interest was a discussion group for UI development with Go. Andrew Williams hosted this discussion and presented a project called Fyne that allows Gophers to write applications with graphical user interfaces for several platforms. UI development is not my favorite thing to spend my time on; therefore, I am always curious to find better, more fun ways to implement the mandatory user-clickable parts. Using Go would undoubtedly click the fun box. So, I added another technology experiment to my TODO list.
In addition to these three themes, one session that handled JWT security was also memorable. Patrycja Wegrzynowicz hacked the audience live with the help of a small sample application she had built for this purpose. It demonstrated which kind of vulnerabilities we Go developers might have in our JWT implementations.
Patrycja hacking the audience with JWTs.
The presentation was informative and entertaining with the live hacking, and the audience understood the problems well due to the hands-on examples. The session proved that no well-known battle-tested documentation exists on handling the JWTs. We have (too) many different libraries with different qualities, and it is easy to make mistakes with the token generation and validation. No wonder the audience asked for a book on the subject from Patrycja – we need better resources for a topic as important as this.
See you in Florence
Overall, the event was well-organized, had a great atmosphere, and was fun to visit. Meeting fellow Gophers, especially the Women Who Go members, was a unique treat. Let’s set up our chapter in Finland soon. (If you are a Finland-based woman who writes Go code, please reach out!) I also got to spend some free time in London and share the World Cup final atmosphere with the English supporters cheering for their team.

Public viewing event for the World Cup final.
Bye til the next event; I hope we meet in Florence in November! In the meantime, check out videos of the GopherCon UK 2023 sessions once they are published - I will do the same for the ones I missed live!
Beautiful State-Machines - FSM Part II
As I explained in my previous blog post, the idea of chatbots came quite naturally for our SSI development team. Think tanks or research labs are outstanding workplaces when you have something to chew. And how juicy topic the SSI has been, oh boy.
FSM chatbots started as a thought experiment, but now, when I think of the invention, it has been quite clever in foreseeing genuine user needs. It has lead us towards the following layer model.
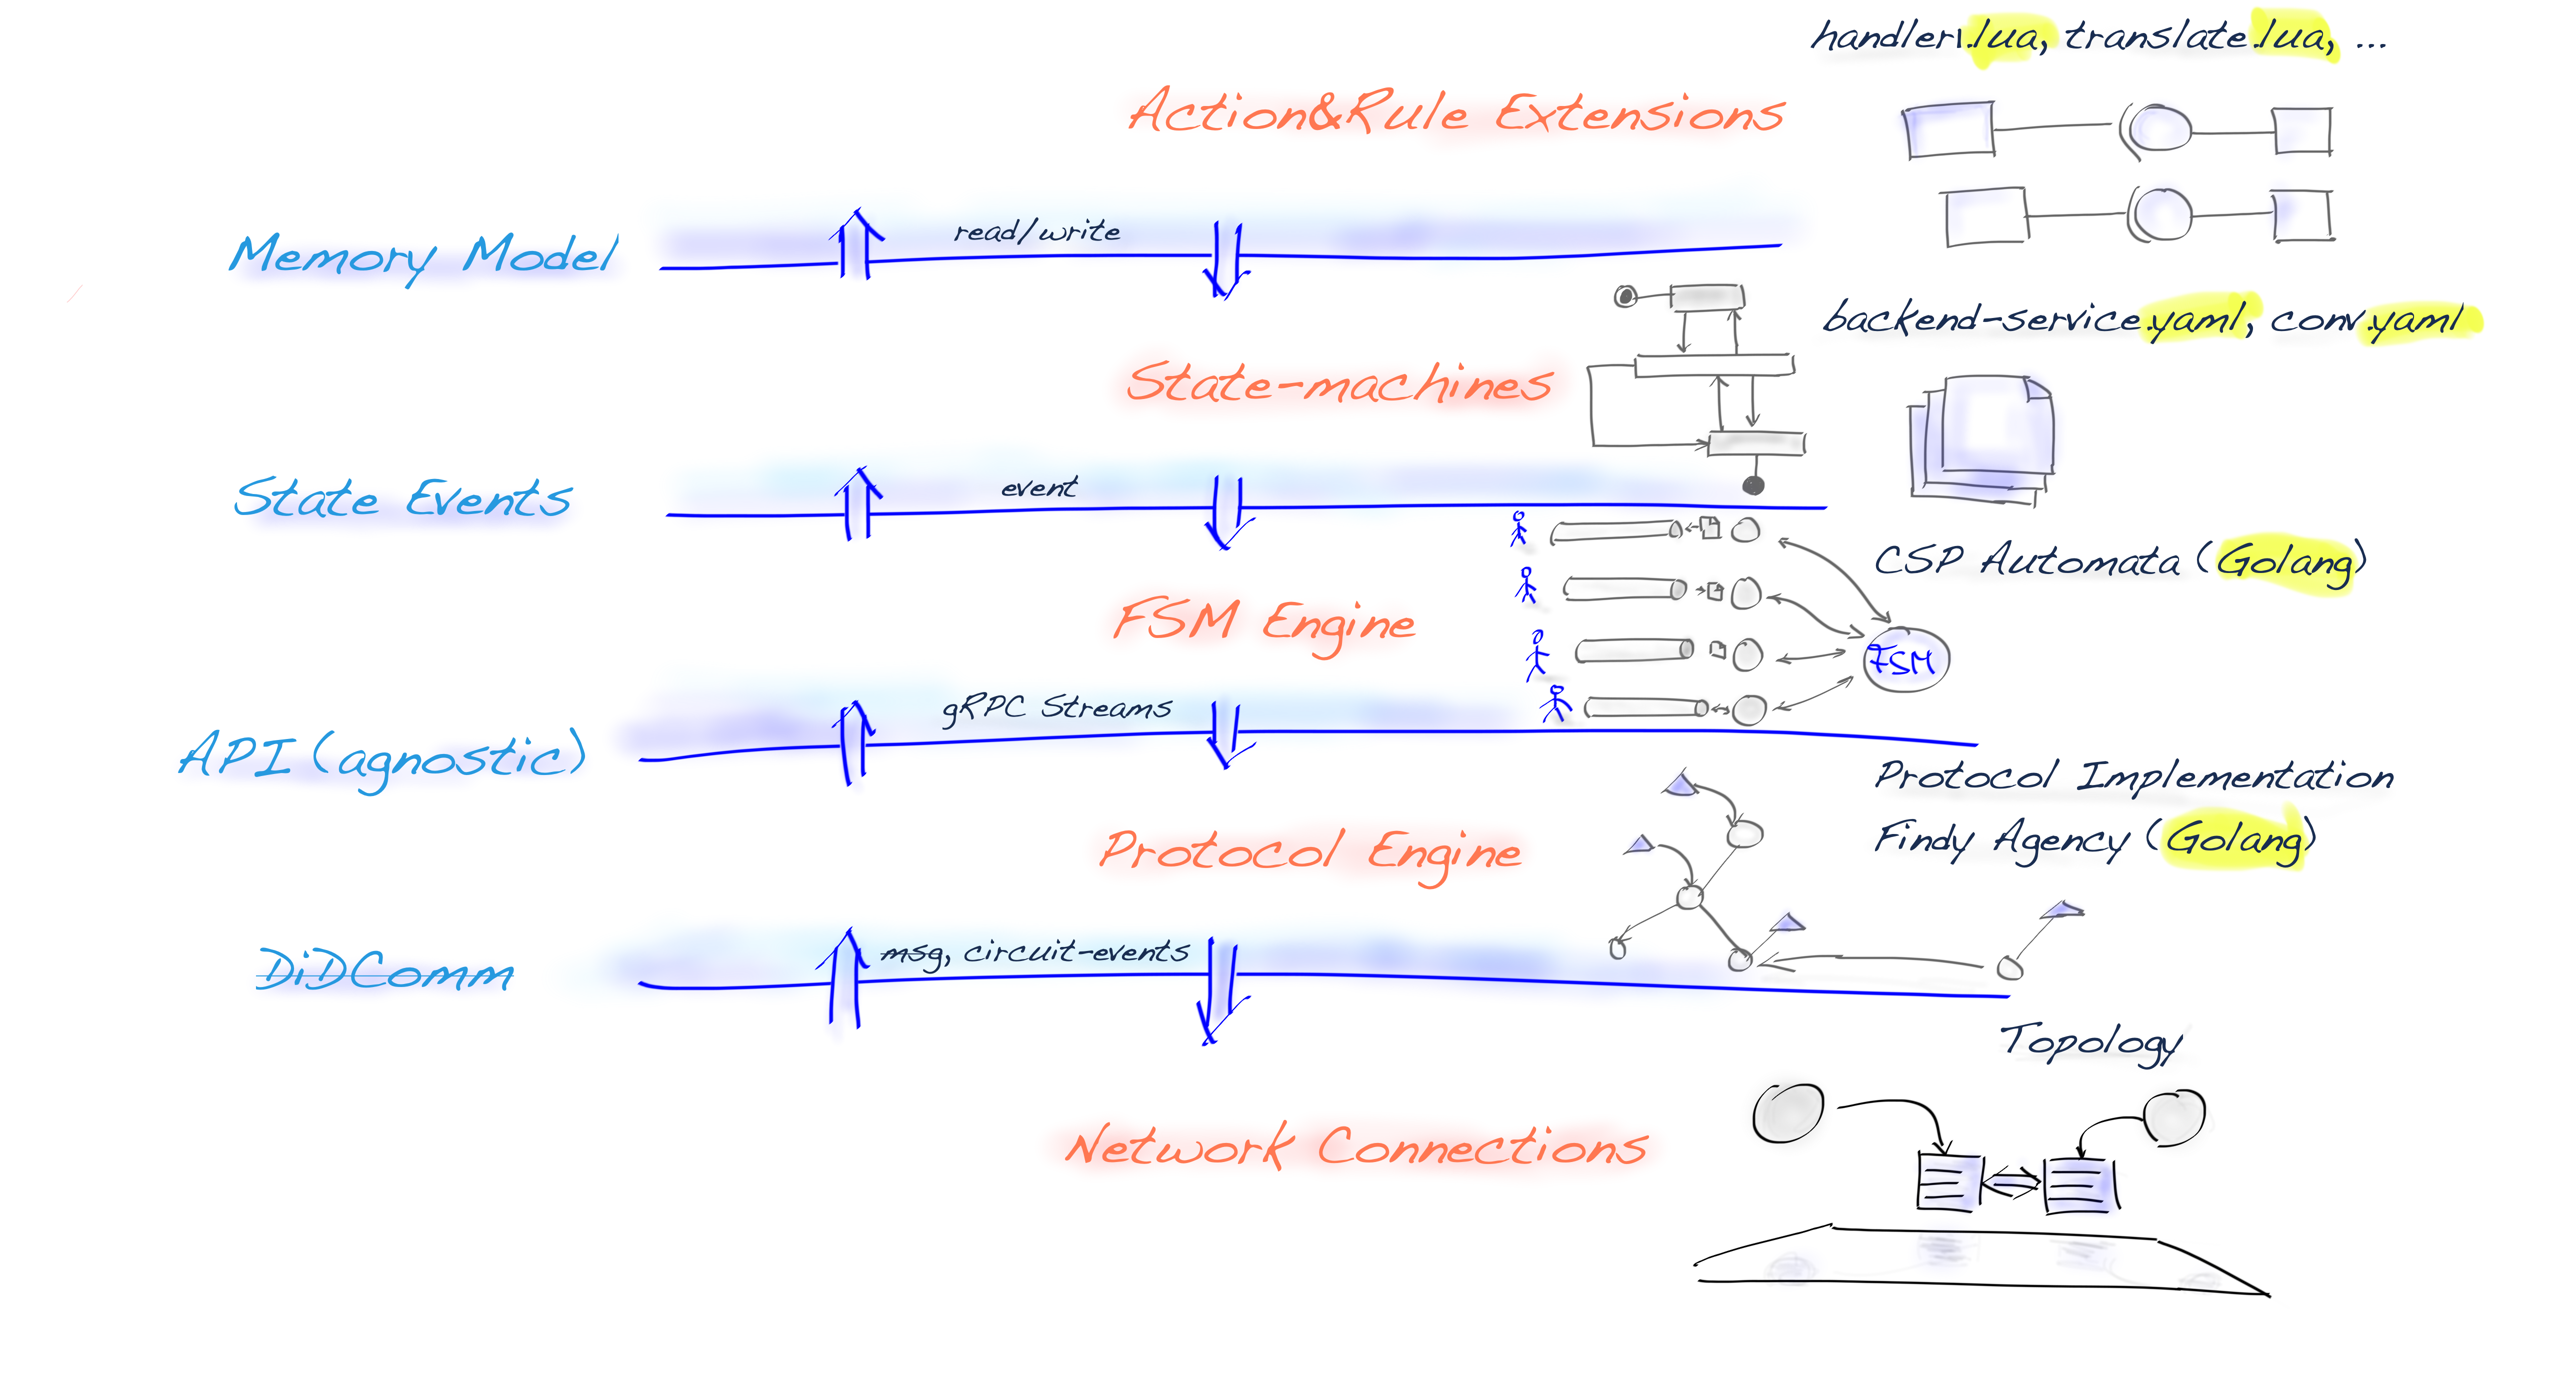
Network Layers For SSI Are Clarifying Themselves
The preceding drawing presents our ongoing layer architecture. It’s (still) based on DIDComm, but because our protocol engine implements a technology-agnostic API, we can change the implementation to something better without disturbing the above layers. The subject of this blog post is our FSM engine’s (3rd layer from bottom) CSP implementation that offers even more abstraction and helps the application development with no-code chatbot language.
Abstraction Layers
Implementing the FSM chatbots with our protocol-agnostic API has been eye-opening. With our API, we have solved most of the complexity problems and brought in an elegant communication layer that hides most of the horror of DID system, which, by to way, is not application development ready.
The objective of this blog post is to present a comprehensive exploration of my Go-based finite state-machine implementation that leverages Go’s CSP concurrency mechanism. This post will showcase the practical applications and benefits of using Go and CSP in building reliable and concurrent state management systems.
Concurrency \(\ne\) Parallelism
I have been using multithreading programming all my career and closely monitoring paradigms of multithreading programming since the 90s. When I started playing with Go’s channels and CSP programming model, I learned how easy it was compared to other asynchronous or multithreading programming models.
Interrupt Based Scheduling -- Mark Siegesmund, in Embedded C Programming, 2014
If I look at the phases I have gone thru, they follow these steps harshly:
- Using interrupts to achieve concurrency. (MS-DOS drivers and TSRs, modem-based distributed systems, games, etc.)
- Using the event-driven system to achieve concurrency. (Game development, GUI OS Win&Mac, transport-agnostic, i.e., modems, proprietary protocols for interconnection, Winsocks file transport framework, etc.)
- Using OS and HW threads to achieve concurrency. (Unix daemon and Win NT service programming, C/S transport framework implementations, telehealth system implementation, etc.)
- Sharing workloads between CPU and GPU to achieve maximum parallel execution. (The front/back-buffer synchronization, i.e., culling algorithms and LOD are running simultaneously in a CPU during the GPU is rendering the polygons of the previous frame, etc.)
- Using libraries and frameworks (tasks, work queues, actor model, etc.) to achieve parallel execution for performance reasons. (Using TPL to instantiation (i.e., common transformation matrix) pipeline for tessellated graphic units, etc.)
- Using frameworks to bring parallel execution to the application level, wondering why the industry starts taking steps back and prefers asynchronous programming models over, for example, worker threads. One answer: keep everything in the main thread. (iOS [recommended] network programming, Dart language, node.js, etc.)
- Using CSP to hide HW details and still achieve a speedup of parallel execution, but only if it’s used correctly. (Example: Input routine -> Processing -> Output routine -pattern to remove blocking IO waits, etc.)
As you can see, distributed computing goes hand in hand with concurrency. And now distributed systems are more critical than ever.
And what goes around comes around. Now we’re using a hybrid model where the scheduler combines OS threads (preemptive multitasking) and cooperative event handling. But like everything in performance optimization, this model isn’t the fastest or doesn’t give you the best possible parallelization results for every algorithm. But it seems to provide enough, and it offers a simple and elegant programming model that almost all developers can reason with.
Note. Go offers
runtime.LockOSThreadfunction if you want to maximize parallelization by allocating an OS thread for a job.
FSM – State-Of-The-Art
Previous technology spikes have proven that state machines would be the right way to go, but I would need to try it with, should I say, complete state machines. And that was our hypothesis: FSM perfectly matches SSI and DIDComm-based chatbots.
One of my design principles has always been that never create a new language, always use an existing one. So, I tried to search for proper candidates, and I did find a few.
SCXML
The most promising and exciting one was SCXML, but I didn’t find a suitable embedded engine to run these machines, especially as an open-source. Nevertheless, very interesting commercial high-end tools supported correctness verification using proving theorems.
Lua
During these state-machine language searches, I discovered a Go-native implementation of Lua, which was open-source. Naturally, I considered using embedded Lua’s model of states. But I realized that some event engine would be needed, and it would have brought at least the following challenges:
- Whole new API and bridge to Aries protocols would be needed. A simple C/S API wouldn’t be enough, but a notification system would also be required.
- Lua is a Turing-complete language (correctness guarantees, the halting problem, etc.)
- And final question: what extra would we be brought in when compared to offering Lua stubs to our current gRPC API, i.e., Lua would be treated the same as all the other languages that gRPC supports?
YAML
I soon discovered that YAML might be an excellent language for FSM because it’s proven to work for declarative solutions like container orchestration and many cloud frameworks.
Naturally, I tried to search OSS solution that would be based on YAML and would offer a way to implement a state-machines event processor. Unfortunately, I didn’t find a match, so we made our hybrid by offering two languages, YAML and Lua.
Lua is now included as an embedded scripting language for our FSM. It can be used to implement custom triggers and custom output events.
You can write Lua directly to YAML files or include a file link and write Lua scripts to external files. (Depending on the deployment model, that could be a security problem, but we are in an early stage of the technology. Our deployment model is closed. The final step to solve all security problems related to deployment and injection is when we have an integrated correctness tool.)
The Event Processor
Our FSM engine follows the exact same principle as the SCXML processor does:
An SCXML processor is a pure event processor. The only way to get data into an SCXML state machine is to send external events to it. The only way to get data out is to receive events from it.
In the software industry, there are some other similar systems, like, for example, eBPF, where correctness is provided without formal language. eBPF automatically rejects programs without strong exit guarantees, i.e., for/while loops without exit conditions. That’s achieved with static code analysis, which allows using conventional programming languages.
Now that we have brought Lua-scripting into our FSMs, we should also get code analysis for the exit guarantees, but let’s first figure out how good a fit it is. My first impressions have been excellent.
Services and Conversations
The drawing below includes our multi-tenant model. FSM instances and their memory containers are on the right-hand side of the diagram. The smaller ones are conversation instances that hold the state of each pairwise connection status. The larger one is the service state machine.
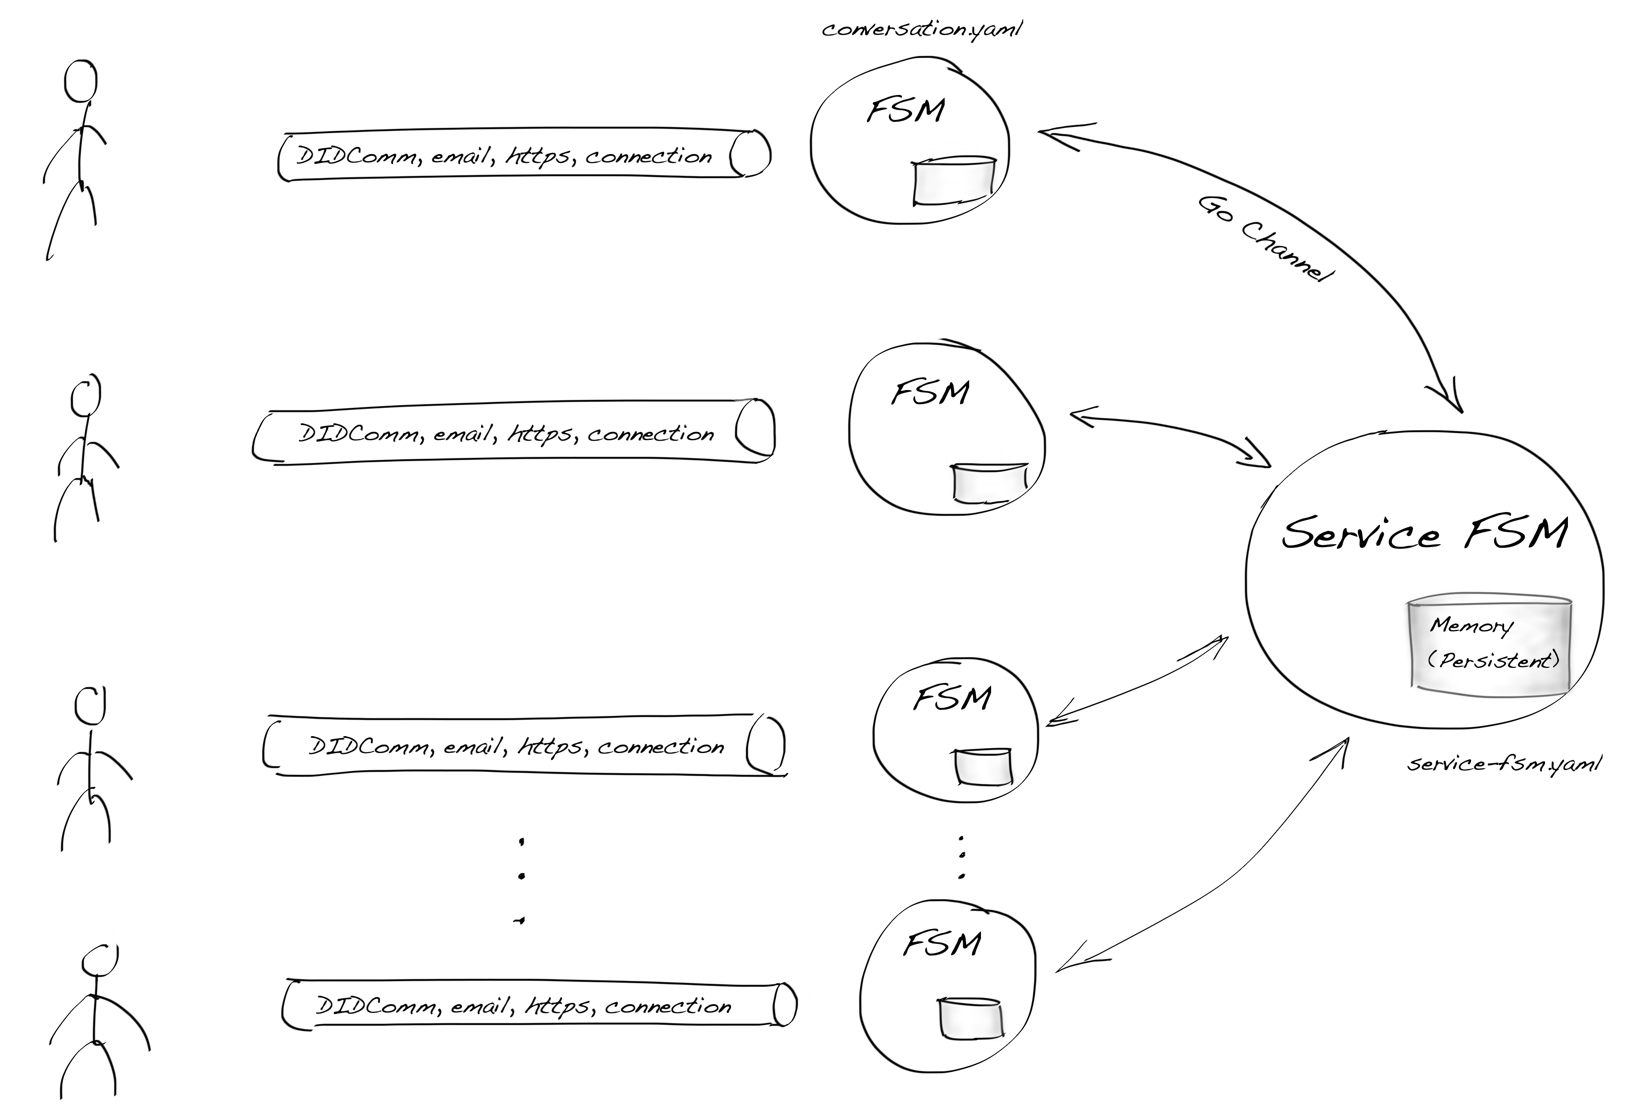
Two Tier Multi-tenancy
The service FSM is needed if the SSI agent implements a chatbot that needs to keep track of all of the conversations like polling, voting, chat rooms (used as an example), etc.
title Chat Room Example

actor "Dude" as Dude
participant "Dude" as ChatUI  <<chat UI>>
collections "Dudes" as ReadUI  <<read UI>>
collections "Conversation Bots" as PWBot <<pairwise FSM>>
control "Chat Room Service Bot" as Backend

== A Dude writes line ==
Dude -> ChatUI: Yo!

ChatUI -> PWBot: BasicMessage{"Yo!"}
|||
== Conversation FSM forwards msg to service FSM ==
PWBot -> Backend: BackendMsg{"Yo!"}
loop conversation count
   Backend -> PWBot: BackendMsg{"Yo!"}
== transport message thru pairwise connection ==
   PWBot -> ReadUI: BasicMessage{"Yo!"}
end
|||
As the sequence diagram above shows, the service FSM conceptually presents a chat room and works as a mediator between chat room participants.
The next Go code block shows how the above FSM instances are declared at the
programming level. Note that ServiceFSM is optional and seldom needed. The
rest of the data is pretty obvious:
- gRPC connection,
conn - conversation FSM,
md - and interrupt channel is given as a startup argument,
intCh, because here, the machine is started from the CLI tool
	intCh := make(chan os.Signal, 1)
	signal.Notify(intCh, syscall.SIGTERM, syscall.SIGINT)

	chat.Bot{
		Conn:        conn,      // gRPC connection including JWT, etc.
		MachineData: md,        // primary FSM data, i.e. pairwise lvl
		ServiceFSM:  mdService, // optional backend/service lvl FSM
	}.Run(intCh)                // let machine to know when it's time to quit
By utilizing the CSP model, we embrace a paradigm that emphasizes the coordination and communication between independently executing components, known as goroutines, in a safe and efficient manner. This combination of Go’s built-in concurrency primitives empowers us developers to create highly concurrent systems while maintaining clarity and simplicity in their code.
CSP & Go Code
The app logic is in the state machines written in YAML and Lua. But surprising is how elegant the Go implementation can be when CSP is used for the state-machine processor. And all of that without a single mutex or other synchronization object.
The code block below is the crucial component of the FSM engine solution. It is presented as it currently is in the code repo, because I want to show honestly how simple the implementation is. Even the all lines aren’t relevant for this post. They are left for you to study and understand how powerful the CSP model for concurrency is.
func Multiplexer(info MultiplexerInfo) {
	glog.V(3).Infoln("starting multiplexer", info.ConversationMachine.FType)
	termChan := make(fsm.TerminateChan, 1)

	var backendChan fsm.BackendInChan
	if info.BackendMachine.IsValid() {
		b := newBackendService()
		backendChan = b.BackendChan
		b.machine = fsm.NewMachine(*info.BackendMachine)
		try.To(b.machine.Initialize())
		b.machine.InitLua()

		glog.V(1).Infoln("starting and send first step:", info.BackendMachine.FType)
		b.send(b.machine.Start(fsm.TerminateOutChan(b.TerminateChan)))
		glog.V(1).Infoln("going to for loop:", info.BackendMachine.FType)
	}

	for {
		select {
		// NOTE. It's OK to listen nil channel in select.
		case bd := <-backendChan:
			backendMachine.backendReceived(bd)

		case d := <-ConversationBackendChan:
			c, alreadyExists := conversations[d.ToConnID]
			assert.That(alreadyExists, "backend msgs to existing conversations only")
			c.BackendChan <- d
		case t := <-Status:
			connID := t.Notification.ConnectionID
			c, alreadyExists := conversations[connID]
			if !alreadyExists {
				c = newConversation(info, connID, termChan)
			}
			c.StatusChan <- t
		case question := <-Question:
			connID := question.Status.Notification.ConnectionID
			c, alreadyExists := conversations[connID]
			if !alreadyExists {
				c = newConversation(info, connID, termChan)
			}
			c.QuestionChan <- question
		case <-termChan:
			// One machine has reached its terminate state. Let's signal
			// outside that the whole system is ready to stop.
			info.InterruptCh <- syscall.SIGTERM
		}
	}
}
It runs in its goroutine and serves all the input and output at the process
level. For those who come from traditional multi-thread programming, this might
look weird. You might ask why a lock doesn’t make conversations map thread-safe.
That’s the beauty of the CSP. Only this goroutine modifies conversations
data—no one else.
You might ask if there’s a performance penalty in this specific solution, but
there is not. The Multiplexer function doesn’t do anything that’s
computationally extensive. It listens to several Go channels and delegates the
work to other goroutines.
This model has proven to be easy to understand and implement.
Discrete State Transitions
As we saw, the Multiplexer function calls a function below, backendReceived,
when data arrives from backendChan.
func (b *Backend) backendReceived(data *fsm.BackendData) {
	if transition := b.machine.TriggersByBackendData(data); transition != nil {
		b.send(transition.BuildSendEventsFromBackendData(data))
		b.machine.Step(transition)
	}
}
Both state-machine types (conversation/service level) follow typical transition logic:
- Do we have a trigger in the current state of the machine?
- If the trigger exists, we’ll get a transition object for that.
- Ask the
transitionto build all send events according to input data. - Send all output events.
- If previous steps did succeed, make a state transition step explicit.
“Channels orchestrate; mutexes serialize”
I’m not a massive fan of the idiomatic Go or Go proverbs. My point is that you shouldn’t need them. The underlying semantics should be strong enough.
Luckily the world isn’t black and white. So, let’s use one proverb to state something quite obvious.
“Channels orchestrate; mutexes serialize”
That includes excellent wisdom because it isn’t prohibiting you from using the mutexes. It clearly states that we need both, but they are used differently. That said, the below code block shows the elegance you can achieve with Go channels.
func (c *Conversation) Run(data fsm.MachineData) {
	c.machine = fsm.NewMachine(data)
	try.To(c.machine.Initialize())
	c.machine.InitLua()
	c.send(c.machine.Start(fsm.TerminateOutChan(c.TerminateChan)), nil)

	for {
		select {
		case t := <-c.StatusChan:
			c.statusReceived(t)
		case q := <-c.QuestionChan:
			c.questionReceived(q)
		case hookData := <-c.HookChan:
			c.hookReceived(hookData)
		case backendData := <-c.BackendChan:
			c.backendReceived(backendData)
		}
	}
}
If you have never seen a code mess where a programmer has tried to solve a concurrence task by only having common control flow statements like if-else, attempt to envision an amateur cook that tries to make at least four dishes simultaneously with poor multitasking capabilities. He has to follow recipes literally for every dish from several cookbooks. I think then you get the picture.
Conclusion
I hope I have shown you how well FSM and CSP fit together. Maybe I even encouraged you to agree that SSI needs better abstraction layers before we can start full-scale application development. If you agree we’re on the right path, please join and start coding with us!
The Agency Workshop
During the Findy Agency project, our development team initially placed greater emphasis on running and deploying the agency in terms of documentation. Due to this prioritization, instructions on building agency clients have gotten less attention. We have now fixed this shortcoming by publishing the agency workshop to educate developers on using, building, and testing agency clients.
Agency Clients
What exactly is an agency client? A client is a piece of software operated by an entity with an identity (individual, organization, or thing). In the agency context, we have three types of clients:
- CLI: a tool for managing the identity agent in the cloud using the command line interface.
- Web Wallet: a web-based user interface for holding and proving credentials through a web browser.
- API client: any application that manages the identity agent with Findy Agency API.
The workshop shows how to use the ready-built clients (CLI tool and web wallet) and start the development using the API. The workshop participant can choose from two tracks, the CLI track, which demonstrates the agent operations with the CLI tool, and the code track, which concentrates on the API calls and testing them with the web wallet. Both workshop branches teach hands-on how SSI’s basic building blocks work. Consequently, the participant learns how to issue, receive and verify credentials utilizing the Findy Agency platform.

The code track instructs on building a simple web application that issues and verifies credentials.
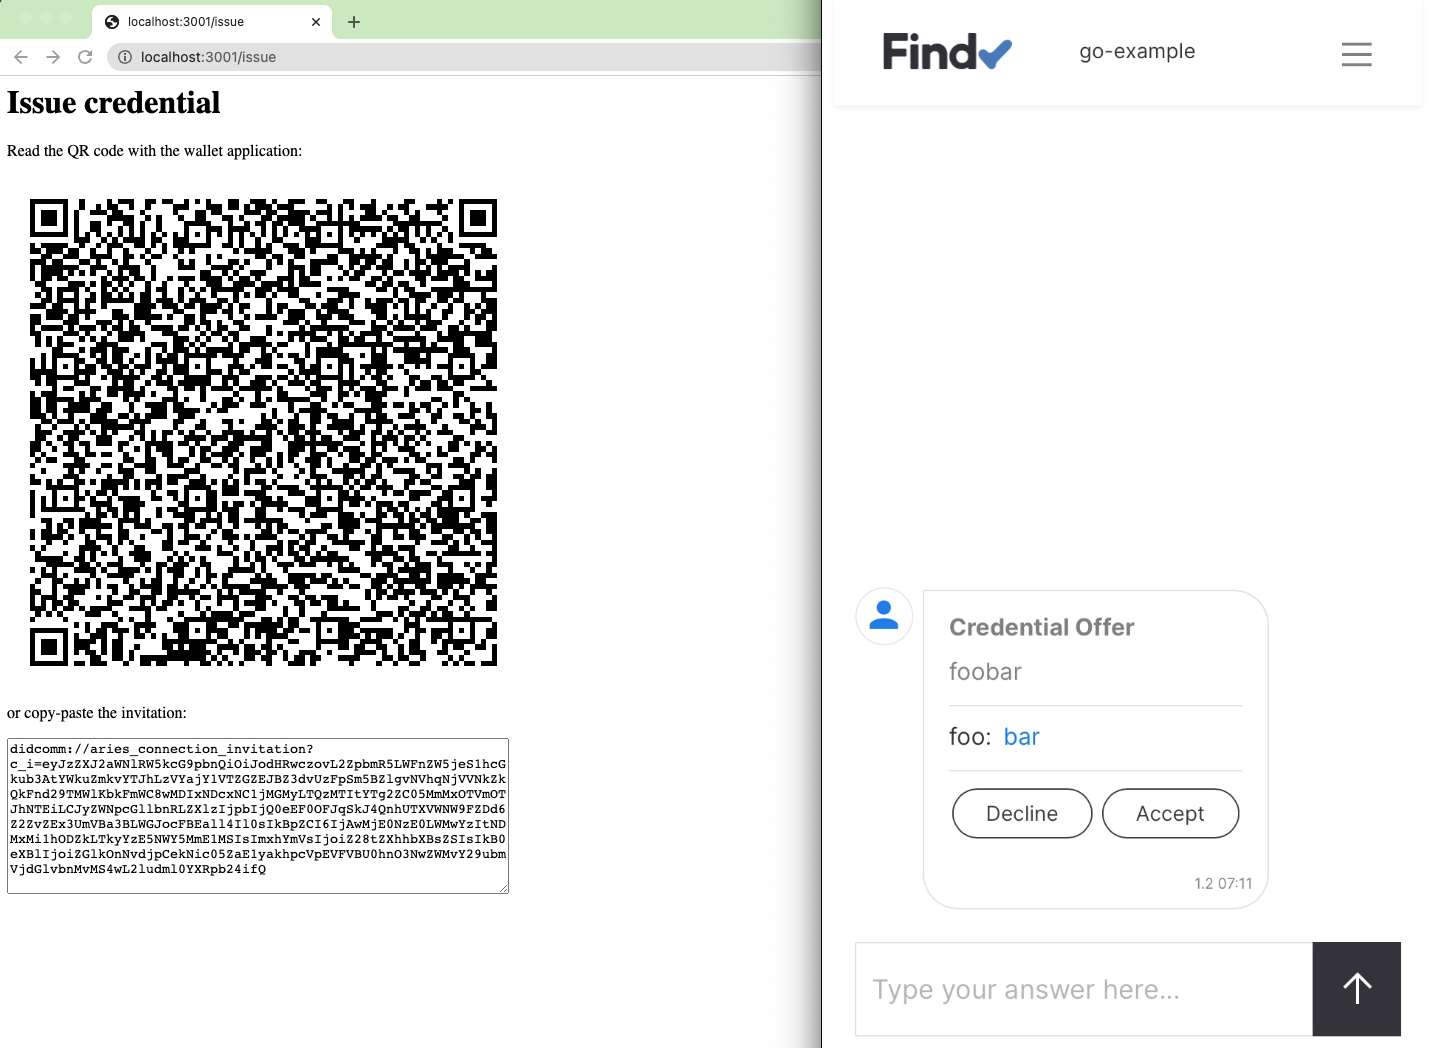
The workshop material is suitable for self-studying. In this case, if the developer does not have an instance of the agency running in the cloud, using a localhost deployment with Docker containers is straightforward. The material is available in a public GitHub repository, containing step-by-step instructions that are easy to follow. Developers can choose the development environment according to their preferences, from native localhost setting to VS Code dev container or GitHub Codespaces.
Live Workshops
The Findy Agency team has organized the workshop also in a live setting. We invited developers from our company interested in future technologies to technical sessions for learning together. These sessions took place in both Helsinki and Oulu during Spring 2023.
The events started with Harri explaining the basic SSI principles and then Laura presenting demos of agency client applications that the team has built in the past. The introductory presentations generated many exciting questions and discussions that helped the participants better understand the concept.

Harri introducing SSI principles.
After the introduction part, the participants could pick the track they were going to work on, and they had a chance to advance with the tasks at their own pace. The developers could use a shared agency installation in the cloud, so, in principle, setting up the development environment was relatively effortless.
Unfortunately, during the first session, we encountered challenges with the shared cloud agency and observed a few inconsistencies in the instructions for configuring the development environment. We addressed these findings before the second session was held, which proved highly successful. In fact, the second workshop was so seamless that the instructors found it almost uneventful, as nearly no participants needed assistance.
The happy bunch at Helsinki event.
Both events received good feedback, as working hands-on helped the participants understand more deeply the idea behind the technology and how one can integrate the tooling into any application. The participants also thought these workshops were an inspiring way to learn new things. Future ideas were to organize a hackathon-style event where the teams could concentrate more on the actual use cases now that they understand the basic tooling.
Are You Ready to Take the Challenge?
We recommend the workshop for all developers who are interested in decentralized identity. The tasks require no special skills and have detailed instructions on how to proceed to the next step. Even non-technical people have been able to do the workshop successfully.
We are happy to take any feedback on how to make the material even better! You can reach us via SoMe channels:
The Time to Build SSI Capabilities Is Now
During hallway discussions with various teams and organizations in recent months, I have been surprised by the emphasis on the underlying technology in SSI implementations. Even non-technical folks are wondering, e.g., which credential format will overcome them all. Don’t get me wrong; it’s not that I don’t see the importance of choosing the most interoperable, best performant, and privacy-preserving cryptography. I am afraid more critical problems keep hiding when we concentrate only on technical issues.
Focus on the Use Cases
Teams implementing flows utilizing SSI capabilities should focus primarily on the use case and, more importantly, the user experience. If the flow requires an individual to use a wallet application and several different web services, many users have a steep learning curve ahead of them. It can even be too steep. Furthermore, we should also think outside of “the individual-user-box.” How can we utilize this technology in a broader range of use cases, for instance, inter-organizational transactions?
Therefore, we need more real-world use cases implemented with SSI technology to develop it correctly. After all, the use cases should ultimately be the source of the requirements, the drivers of how to bring the technology further. And if use case implementors are waiting for the technology to become ready, we have a severe chicken-egg problem.
Instead of overthinking the low-level crypto operations, etc., the teams should concentrate on the high-level building blocks of SSI. The starting point should clarify the roles of the issuer, holder, and verifier. What exactly happens when data is issued and verified? And how can the team apply the verifiable data in the use case in question: who are the issuer, holder, and verifier? Furthermore, what data does the issuer sign, and which part is available to the verifier?
It Is All About Communication
After figuring out answers to these questions, the selection of the technical stack becomes more relevant. However, even then, I wouldn’t emphasize the credential format selection. What is even more important is the used credential exchange protocol.
For instance, if your primary use case is user identification and authentication, and you wish to create an architecture that suits well and fast in the legacy world, the most straightforward choice is a protocol offering strict client-server roles and HTTP-request-response style API. In this style, the issuer, holder, and verifier roles are hard-coded, and one party cannot simultaneously play multiple roles.

DIDComm and Hyperledger Aries are examples of a symmetric protocols. Findy Agency supports currently both.
However, choosing a symmetric protocol may widen the spectrum of your use cases. Participants can execute different functions during the interaction in a symmetric protocol. So, for example, in the user authentication scenario, in addition to the service (server) authenticating the user (client) based on verified data, the individual could also get a verification from the service-operating organization of its authenticity.
For more information, I recommend to familiarize with Daniel Hardman’s publications, for example the summary about the overlaps of different SSI technologies.
Integrate Carefully
Whichever stack you choose, there are two things to keep in mind
- Implement the integration to the library or service providing SSI functionality following well-known modular principles so that it is easy to replace with a different library or service.
- Do not let the underlying technology details contaminate your application code. Thus, ensure the SSI tooling you use hides the implementation details related to credentials formats and protocol messages from your application. This approach ensures that changes, for example, to the credential data format, have a manageable effect on your application.
The importance of layered architecture has been discussed also before in our blog.
![]()
Decentralized Identity Demo is a cool SSI simulation. Its original developer is Animo, and the SSI functionality was done using aries-framework-javascript. As an experiment for SSI technology portability, I took the open-sourced codes and converted the application to use Findy Agency instead of AFJ. You can find both the original codes and my version in GitHub.
The best option is to pick open-source tooling so that if some functionality is missing, you can roll up your sleeves and implement it yourself. If this is not an option, select a product that ensures compatibility with multiple flavors of SSI credentials and data exchange protocols so that interoperability with other parties is possible. After all, interoperability is one of the decentralization enablers.
The Time Is Now
The recent advancements in LLM technology and ChatGPT offer a glimpse of what’s possible when large audiences can suddenly access new technology that provides them added value. SSI can potentially revolutionize digital services similarly, and organizations should prepare for this paradigm shift. Is your organization ready when this transformation takes place?
In conclusion, now is the time to plan, experiment and build SSI capabilities. Begin by understanding the high-level building blocks and experimenting with the technology that best aligns with your use case. Opt for tools that support a layered architecture design, like Findy Agency. This approach prevents the need for significant alterations to the application layer as the technology evolves.
Digital Identity Hack Part 3 – Introduction to SSI Presentation
The rise of self-sovereign identity (SSI) presents a groundbreaking opportunity for progress and expansion in the financial sector, with the capacity to reshape digital financial services, simplify transactions, and facilitate seamless interactions. To capitalize on this potential, OP Lab and the EU funded Powered by Blockchain project organized a seminar day and online hackathon, exploring the innovative power of SSI technologies and institutional decentralized finance, setting the stage for a safer, more inclusive, and more efficient worldwide financial ecosystem.
At the seminar, participants engaged in a panel discussion on blockchain projects and a presentation delving into self-sovereign identity. The following section will examine the essential insights and highlights that emerged from the SSI presentation.
Introduction to Self-Sovereign Identity
Harri Lainio’s presentation: Introduction to Self-Sovereign IdentityIn the event day presentation on Self-Sovereign Identity, Harri Lainio from OP Lab introduced SSI, its potential impact on the world, and Findy Agency’s open-source solution for implementing it. The speaker highlighted the power dynamics of the current digital identity model, which has centralized power in the hands of a few online platforms. In the next evolution of the internet, Web 3 aims to shift power back to individuals and things, thus empowering users to take control of their digital identities.
Learn more about Findy Agency here.
Take Control of Your Identity
SSI offers the promise of an internet where individuals are sovereign, building their own networks, and serving as the roots of these networks. By examining the incentives for SSI, the speaker noted that humans are cooperative but inherently distrustful, making the exchange of value challenging. Institutions like banks and governments have historically reduced uncertainty, but the speaker questioned whether there are alternative ways to achieve this. He acknowledged that blockchain technology had solved some issues, such as double spending, but still has a long way to go.
The speaker emphasized that SSI is about putting the user at the center of their digital identity: “I want to be in the center. And that’s something that SSI promises to handle.” By empowering individuals to take control of their digital selves, SSI can reshape the internet and transform how people interact and exchange value online.
Root of Trust
As the presentation progressed, the speaker highlighted that new digital identities could be represented by leveraging real-world entities while maintaining clarity and trustworthiness. He touched on the idea of using FIDO2 authenticators as a “root of trust” and the importance of flawless one-on-one mapping between the digital and real worlds.
Find more information about the FIDO2 here.
Placing the User at the Heart of Trust
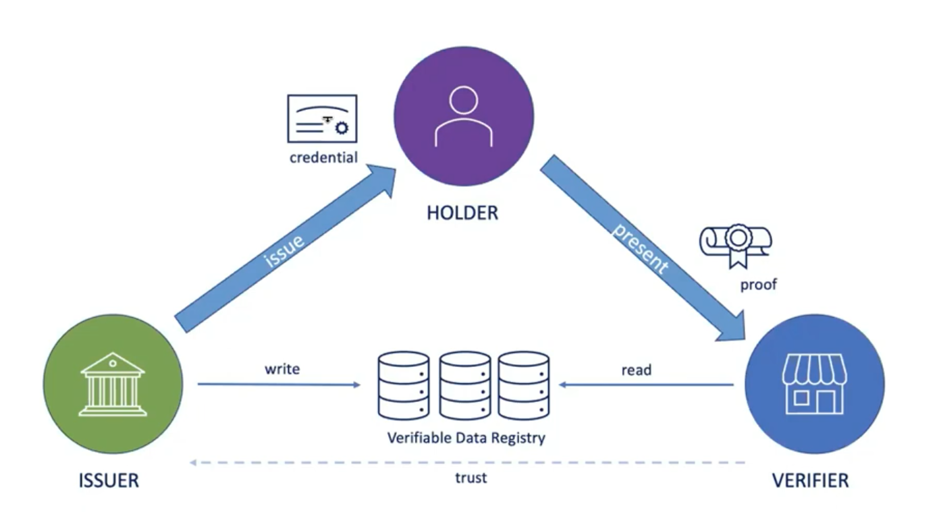
The trust triangle
The speaker introduced the concept of verifiable credentials and decentralized identifiers based on secure communication protocols, as well as the trust triangle, which consists of an issuer, holder, and verifier. He explained that the verifier’s trust in the issuer is crucial and that the current technology should be able to handle it. The presenter mentioned the Findy Agency they have been working on and encouraged the audience to explore and improve upon their open-source solutions.
In a memorable quote from the presentation, Harri said, “And with the help of cryptography, we can build a better or at least more interesting world, digital world.” By pushing the boundaries of SSI and digital identity, the speaker envisions a future where individuals have greater control over their digital selves and the information they share.
Project and Event Information
OP Lab arranged the seminar day in Oulu, Finland, and the two-week online hackathon in collaboration with the Powered by Blockchain project during February. Powered by Blockchain project is a collaboration project between University of Vaasa, University of Oulu, University of Lapland and Kajaani University of Applied Sciences. The project is funded by the European Social Fund.
Find more information about the project here.
Digital Identity Hack Part 2 – Panel Discussion on Blockchain Projects
The emergence of self-sovereign identity (SSI) offers a revolutionary opportunity for innovation and growth in the financial world, potentially transforming digital financial services, streamlining transactions, and enabling seamless interaction. To harness this potential, OP Lab and the EU-funded Powered by Blockchain project recently held a seminar day and online hackathon to investigate the disruptive capabilities of SSI technologies and institutional decentralized finance, paving the way for a more secure, inclusive, and efficient global financial ecosystem.
During the seminar, attendees participated in a panel discussion on blockchain projects and a presentation exploring self-sovereign identity. The following section will delve into the key insights and highlights from the panel discussion.
Panel Discussion on Blockchain Projects
Panel discussion on blockchain projectsOn the event day, a panel of experts, Pekka Kaipio from OP Lab, Jani Partanen from Joisto Oy, Sandun Dasanayake from Q4US, and Rainer Koirikivi from Interjektio, shared their insights into the world of blockchain. The panel was moderated by Laura Vuorenoja from OP Lab, and the discussion centered on the challenges of blockchain projects, the lessons learned, and the potential of blockchain technology for digital identity.
Blockchain projects present unique challenges, with the panelists highlighting issues such as the complexity of the technology, regulatory hurdles, and the difficulty of building consortia. To overcome these challenges, the experts emphasized the importance of educating stakeholders about blockchain’s potential beyond cryptocurrencies and selecting the right use cases for blockchain technology.
The panelists also touched on their experiences with blockchain projects in various industries. Topics covered included the digitization of real estate trading, the facilitation of parcel information sharing across European entities, and the secure storage of document integrity and provenance. These examples demonstrated the versatility and growing importance of blockchain solutions in the modern tech and business landscape.
Exploring Identity Management
One of the focal points of the discussion was digital identity management on blockchain. The panelists explored the need for decentralized identity systems to improve the scalability of blockchain networks. However, they noted that many current projects still rely on centralized identity systems or traditional public key infrastructure.
Regulatory Challenges in the Blockchain Sphere
Panelists agreed that the General Data Protection Regulation (GDPR) has been one of the most significant regulatory challenges they have faced. While the GDPR aims to protect users’ privacy, it sometimes limits how blockchain can be utilized, even necessitating the removal of certain platform functionalities. In the financial sector, KYC (Know Your Customer) and AML (Anti Money Laundering) are the most obvious challenges that need to be implemented properly.
The Importance of Open Source
Many blockchain projects are built upon open-source technologies like Hyperledger Fabric. Panelists highlighted the importance of open-source contributions in advancing blockchain technology and fostering a spirit of collaboration within the community. While not all panelists’ companies have made code contributions, they have shared knowledge and participated in meetups and user groups.
Effective Talent Sourcing
Sourcing skilled blockchain talent has proven to be complicated. Panelists revealed that growing their own talent through training and education has been the most effective strategy. Some have also turned to partnerships with startups, consultants, or other companies to fill talent gaps.
Future Prospects of Blockchain Technology
The panelists agreed that blockchain technology shows promise for the future, as it matures and becomes more widely adopted. Blockchain’s potential as an infrastructure solution for industries like finance and the emerging metaverse was also noted. However, the panelists acknowledged that regulatory challenges and the rise of artificial intelligence (AI) could impact the technology’s trajectory.
One Wish for Blockchain
When asked about their one wish for blockchain, panelists expressed a desire for more streamlined regulations, increased adoption, and a broader talent pool. They hope these changes will lead to a more decentralized, fair, and trusted way for people to exchange value and information.
In conclusion, the panelists emphasized that despite its challenges, blockchain has the potential to revolutionize various industries, including finance, real estate, logistics, and digital identity management. By sharing their experiences and lessons learned, the panelists provided valuable insights to help others navigate the complex world of blockchain technology.
Project and Event Information
OP Lab arranged the seminar day in Oulu, Finland, and the two-week online hackathon in collaboration with the Powered by Blockchain project during February. Powered by Blockchain project is a collaboration project between University of Vaasa, University of Oulu, University of Lapland and Kajaani University of Applied Sciences. The project is funded by the European Social Fund.
Find more information about the project here.
Digital Identity Hack – Unlocking the Potential of SSI
The emergence of self-sovereign identity (SSI) technologies has the potential to revolutionize the digital landscape of the financial world, presenting unparalleled opportunities for innovation and growth. As SSI gains momentum, it can transform how we interact with digital financial services, streamline transactions, and enable seamless interactions between users and services. By embracing these cutting-edge technologies, we have the unique chance to actively shape the future of the global financial ecosystem, fostering a more secure, inclusive, and efficient digital environment for individuals and businesses alike.
To seize these opportunities, OP Lab and the EU-funded Powered by Blockchain project organized a seminar day and an online hackathon in collaboration. The aim was to explore the disruptive potential of SSI technologies and institutional decentralized finance.
Kicking Off the Hackathon Challenge
The event’s main theme was Digital Identity as an Enabler for Open Decentralized Finance. The emergence of SSI technologies has opened new opportunities by enabling verifiable credentials for identity and data verification. The hackathon and seminar day aimed to educate participants on leveraging these technologies to transform the world of finance. The live event, bringing together tech professionals, students, and companies, was recently held in Oulu, Finland, and streamed online for a broader audience to participate.
Read the full Digital Identity Hack description here.
Challenge Objectives and Key Topics
The objective of the hackathon challenge was to develop financial products and services that are transparent, open, and accessible to anyone on the internet. The organizers believed that SSI technologies could offer significant tools for achieving this goal.
Key topics covered during the challenge presentation included combining verifiable credentials with blockchain technology, checking identity and other data attributes in transactions, controlling transactions automatically through smart contracts based on verifiable data, and creating confidential private transactions while verifying identity data.
Participants were also presented with example approaches to the challenge, such as how to verify financial compliance like Know Your Customer (KYC) and Anti-Money Laundering (AML), how to check company employee credentials to proceed with company transactions, and how to verify investor accreditation.
Inspirational Case Studies
During the event, several intriguing proof-of-concept case examples were highlighted, providing valuable insights into the promising potential of this innovative and uncharted domain.
Project Guardian
Onyx by J.P. Morgan explored the use of verifiable credentials and blockchain technology in foreign exchange transactions through Project Guardian. This concept demonstrated that by utilizing tokenized forms of cash and proper authorization, it’s possible to create decentralized financial services with the necessary safeguards in place.
Find more information about the project here.
Project Jupiter
An intriguing case from Finland, Project Jupiter, explored trading non-listed company shares with SSI and blockchain technology. The network simplifies the stock ledger, issuance, and trading processes while ensuring seamless information flow between stakeholders. This innovation reduces administrative burdens and enables new financial products and aftermarket services.
Find more information about the project here.
Submission Evaluation and Objectives
The hackathon submissions were expected to be technical solutions rather than just concepts, with must-haves including a five-minute video presentation with a technical demo and shared code. Evaluation criteria were based on technical implementation, innovativeness, scalability, and commercial potential.
The awards ceremony took place two weeks after the kick-off in a separate online event, where participants had the opportunity to pitch their solutions and winners of the challenge were announced. The hackathon was challenging, as it required participants to implement new technologies and produce innovative solutions for specific business challenges.
A major focus of the hackathon was the implementation of SSI with the Findy Agency to create a new generation of online solutions. Findy Agency empowers individuals with control over their digital identities, allowing them to share their information securely and selectively.
Learn more about Findy Agency here.
Team Submissions
The team submissions demonstrated a great variety of interesting future solutions. One team of innovators tackled the financial sector’s pressing issue of global online identity verification for salary payments. By developing a global digital employee verification solution, they streamlined the process and reinforced compliance, thus easing the challenges faced by institutions in confirming identities across borders.
Another topic addressed in the team submissions was the urgent need for innovative solutions to combat climate change. One standout concept involved a circular economy for environmental certificates, making it possible to invest in or directly sell forest resources. This model promotes sustainable forest management and encourages participation in green initiatives.
One of the submissions also displayed a practical solution for job applications using digital credentials, streamlining the process by providing verified information on work experience and education. This approach holds promise for simplifying the hiring process and increasing trust between job seekers and employers.
All in all, the hackathon demonstrated the incredible potential of self-sovereign identity and verifiable credentials in addressing critical issues faced by society today. As these tools continue to be refined and implemented, we can expect to see a more trusted and efficient digital landscape in the years to come.
Pioneering the Future of Technology
Self-sovereign identity and verifiable credentials are powerful tools that can create the much-needed trust in the online space. These tools allow individuals to own and manage their personal data and control how it is shared, making it more secure and reliable. With the rise of digital transformation, these tools are becoming increasingly important in ensuring the security and privacy of individuals and businesses online.
As the future of decentralized finance continues to unfold, this event offered a glimpse into the innovative ideas and technologies that may shape the industry in the coming years.
Project and event information
OP Lab arranged the seminar day in Oulu, Finland, and the two-week online hackathon during February in collaboration with Powered by Blockchain project. Powered by Blockchain project is a collaboration project between University of Vaasa, University of Oulu, University of Lapland and Kajaani University of Applied Sciences. The project is funded by the European Social Fund.
Find more information about the project here.
Deploying with CDK Pipeline
My previous post described how we have been using the native AWS IaC tools for defining and updating our PoC environment infrastructure. The story ended with taking AWS CDK v2 in use and switching the deployment process on top of CDK pipelines. In this article, I will describe the anatomy of our CDK pipeline in more detail.
Watch my “CDK-based Continuous Deployment for OSS” talk on AWS Community Day on YouTube.Self-Mutating Pipelines
CDK Pipeline offers a streamlined process for building, testing, and deploying a new version of CDK applications. It tries to simplify the developer’s life by hiding the dirty details of multiple services needed to build working pipelines in AWS. As usual with CDK tools, it provides no new AWS services but is a convenient abstraction layer on top of the existing AWS continuous integration and deployment products.
The main idea of the pipeline is that instead of the developer deploying the application from her local computer, a process implemented through AWS CodePipelines (CDK pipeline) handles the deployment. Thus, in the agency case, instead of me running the script locally to create all needed AWS resources for our AWS deployment, I create locally only the CDK pipeline, which, in turn, handles the resource creation for me.
The CDK pipeline also handles any subsequent changes to the deployment (or even in the pipeline process itself). Therefore, developers modify the CDK deployment only through version control after the pipeline creation. This feature makes it self-mutating, i.e., self-updating, as the pipeline can automatically reconfigure itself.
This model reduces the need for running the tools from the developer’s local machine and enforces a behavior where all the deployment state information is available in the cloud. Using CDK pipelines also reduces the need to write custom scripts when setting up the pipeline.
| CDK v1 | CDK v2 Pipelines | |
|---|---|---|
| Pipeline creation | Developer deploys from local | Developer deploys from local |
| Changes to pipeline configuration | Developer deploys from local | Developer commits to version control. CDK Pipeline deploys automatically. |
| Agency creation | Developer deploys from local | Developer commits to version control. CDK Pipeline deploys automatically. |
| Changes to Agency resources | Developer deploys from local | Developer commits to version control. CDK Pipeline deploys automatically. |
| Need for custom scripts | Storing of Agency deployment secrets and parameters. Pipeline creation with Agency deployment resource references. | Storing all needed secrets and parameters in pipeline creation phase. |
The use of CDK Pipelines converted the Agency deployment model to a direction where the pipeline does most of the work in the cloud, and the developer only commits the changes to the version control.
Agency Deployment
Regarding the agency deployment, we have a single CDK application that sets up the whole agency platform to AWS. A more production-like approach would be to have a dedicated deployment pipeline for each microservice. However, having the resources in the same application is handy for the time being as we occasionally need to set the agency fully up and tear it down rapidly.
If one wishes to deploy the agency to AWS using the CDK application, there are some prerequisities:
- The needed tools for Typescript CDK applications
- AWS Codestar connection to GitHub via AWS Console
- A hosted zone for Route53 for the desired domain
- Agency configuration as environment variables.
The setup process itself consists of two phases. Firstly, one must store the required configuration to parameter store and secrets manager. Secondly, one should deploy the pipeline using CDK tooling. I have written bash scripts and detailed instructions to simplify the job.
Pipeline Stages
Each CDK pipeline consists of 5 different stages. It is essential to have a basic understanding of these stages when figuring out what is happening in the pipeline. CDK pipeline creates these stages automatically when one deploys the pipeline constructs for the first time. The developer can modify and add logic to some stages, but mainly the system has a hard-coded way of defining the pipeline stages. This functionality is also why AWS calls the CDK pipelines “opinionated.” Therefore some projects will find the CDK pipeline philosophy for building and deploying assets unsuitable.
1/5 Source
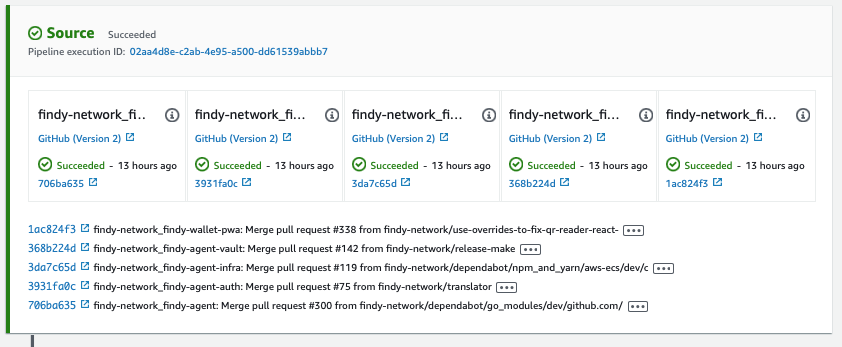
The source stage fetches the code from the source code repositories. In the agency case, we have five different source repositories in GitHub. Whenever we push something to the master branch of these repositories, i.e., make a release, our pipeline will run as we have configured the master branch as the pipeline trigger.
We don’t need the code for the backend services for anything but triggering the pipeline. We use only the front-end and infra repositories code to build the static front-end application and update the CDK application, i.e., the application containing the CDK code for the agency infrastructure and pipeline. GitHub actions handle building the backend Docker containers for us and the images are stored publicly in GitHub Packages.
2/5 Build
The build stage has two roles: it converts the CDK code to CloudFormation templates and builds any assets that end up in S3 buckets.
The developer can define this workflow, but the steps must produce the CDK synthesizing output in a dedicated folder. The phase when CDK tooling converts the CDK code to the CloudFormation templates is called synthesizing.
With the agency, we have some custom magic in place here as we are fetching the CDK context from the parameter store for the synthesizing. The recommendation is to store the context information in the CDK application repository, but we don’t want to do it as it is open-source.
Pipeline creation in the CDK application code:
    const pipeline = new CodePipeline(this, "Pipeline", {
      pipelineName: "FindyAgencyPipeline",
      dockerEnabledForSynth: true,
      // Override synth step with custom commands
      synth: new CodeBuildStep("SynthStep", {
        input: infraInput,
        additionalInputs: {
          "../findy-agent": CodePipelineSource.connection(
            "findy-network/findy-agent",
            "master",
            {
              connectionArn: ghArn, // Created using the AWS console
            }
          ),
          ...
        },
        installCommands: ["npm install -g aws-cdk"],
        ...
        // Custom steps
        commands: [
          "cd aws-ecs",

          // Prepare frontend build env
          "cp ./tools/create-set-env.sh ../../findy-wallet-pwa/create-set-env.sh",

          // Do cdk synth with context stored in params
          `echo "$CDK_CONTEXT_JSON" > cdk.context.json`,
          "cat cdk.context.json",
          "npm ci",
          "npm run build",
          "npx cdk synth",
          "npm run pipeline:context",
        ],
        ...
        // The output of the synthing process
        primaryOutputDirectory: "aws-ecs/cdk.out",
      }),
      ...
    });
The building of assets happens automatically as part of the synthesizing. The pipeline orchestrates it based on the instructions that one defines for the deployment assets.
3/5 UpdatePipeline
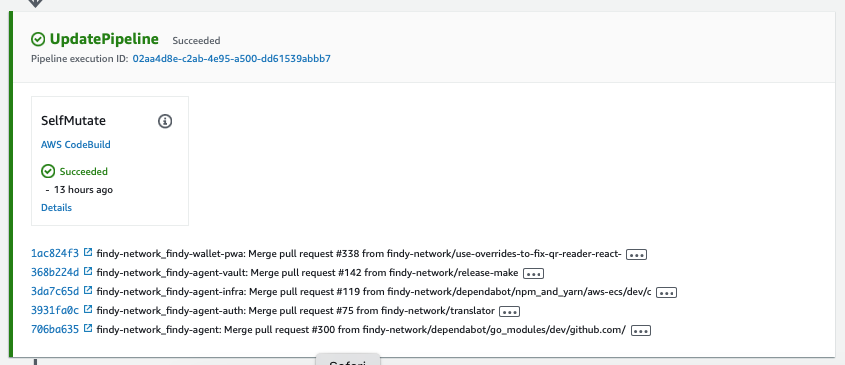
UpdatePipeline makes any changes to the pipeline, i.e., modifies it with new stages and assets if necessary. The developer cannot alter this stage. One thing to notice is that the pipeline process is always initially run with the currently saved version. If a change in the version control introduces changes to the pipeline, the pipeline execution is canceled in this stage and restarted with the new version.
4/5 Assets
In the assets stage, the pipeline analyzes the application stack and publishes all files to S3 and Docker images to ECR that the application needs for deployment. CDK Pipelines stores these assets using its buckets and ECR registries. By default, they have no lifecycle policies, so the CDK developer should ensure that the assets will not increase their AWS bill unexpectedly.
Assets building
utilizes aws-s3-deployment module for the frontend application:
    // Source bundle
    const srcBundle = s3deploy.Source.asset('../../findy-wallet-pwa', {
      bundling: {
        command: [
          'sh', '-c',
          'npm ci && npm run build && ' +
          'apk add bash && ' +
          `./create-set-env.sh "./tools/env-docker/set-env.sh" "${bucketName}" "${process.env.API_SUB_DOMAIN_NAME}.${process.env.DOMAIN_NAME}" "${GRPCPortNumber}" && ` +
          'cp -R ./build/. /asset-output/'
        ],
        image: DockerImage.fromRegistry('public.ecr.aws/docker/library/node:18.12-alpine3.17'),
        environment: {
          REACT_APP_GQL_HOST: bucketName,
          REACT_APP_AUTH_HOST: bucketName,
          REACT_APP_HTTP_SCHEME: 'https',
          REACT_APP_WS_SCHEME: 'wss',
        },
      },
    });

    new s3deploy.BucketDeployment(this, `${id}-deployment`, {
      sources: [srcBundle],
      destinationBucket: bucket,
      logRetention: RetentionDays.ONE_MONTH
    });
5/5 Deploy
Finally, the Deploy stage creates and updates the application infrastructure resources. There is also a chance to add post steps to this stage, which can run the post-deployment testing and other needed scripts.
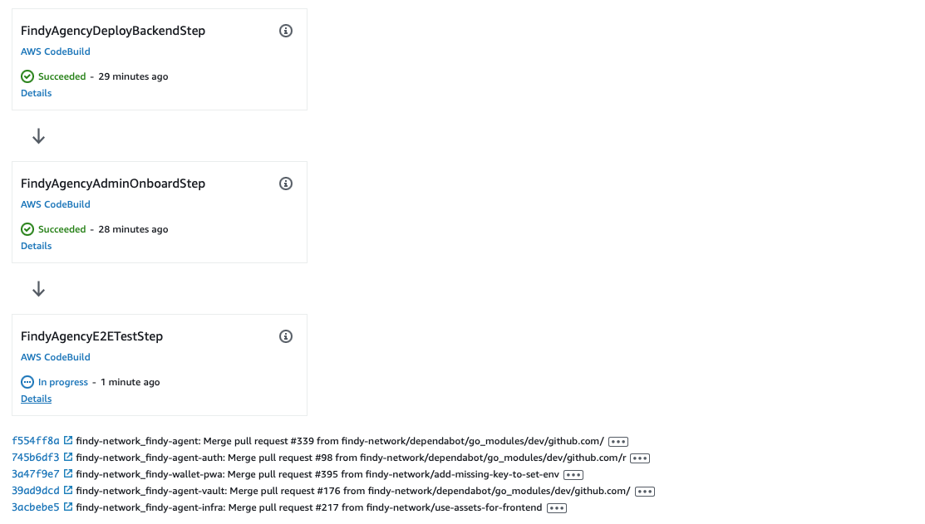
For the agency, we are using the post-deployment steps for three purposes:
- We have a custom script for updating the ECS service. This script is in place to tweak some service parameters missing from CDK constructs.
- We do the configuration of the agency administrator account.
- We are running an e2e test round to ensure the deployment was successful.
Conclusions
The CDK pipeline is initially a bit complex to get your head around. For simple applications, the use is easy, and there isn’t even a need to deeply understand how it works. However, when the deployment has multiple moving parts, it is beneficial to understand the different stages.
There are still some details that I would like to see improvement in. The documentation and examples need additions, especially on how to use the assets correctly. There have been improvements already, but complete example applications would make the learning curve for the CDK pipelines more gentle. They state that CDK pipelines are “opinionated,” but users should know better what that opinion is.
However, the CDK pipeline model pleases me in many ways. I especially value the approach that has reduced the steps needed to run in the developer’s local environment compared to how we used the previous versions of AWS IaC tools. Furthermore, the strategy enables multiple developers working with the same pipeline as the state needs to be available in the cloud. Finally, I am happy with the current state of our deployment pipeline, and it works well for our purposes.
If interested, you can find all our CDK application codes in GitHub and even try to deploy the agency yourself!
Agency's IaC Journey
In the early days of Findy Agency’s development project, it became evident that we needed a continuously running environment in the cloud to try out different proofs-of-concept (PoCs) and demos quickly and easily. As our team is small, we wanted to rely heavily on automation and avoid wasting time on manual deployments.
Setup Infra without a Hassle
At that time, I was interested in improving my AWS skills, so I took the challenge and started working on a continuous PoC environment for our project. As an innovation unit, we experiment constantly and want to try different things quickly, so the PoC environment also needed to accommodate this agility.

From the start, it was clear that I wanted to use IaC (infrastructure as code) tools to define our infra. My target was to create scripts that anyone could easily take and set up the agency without a hassle.
I had been using Terraform in some of my earlier projects, but using a third-party tool typically requires compromises, so I wanted to take the native option for a change with the IaC-tooling as well. The initial target was not to find the ultimate DevOps tools but more in the experimentation spirit to find tooling and methods suitable for our flexible needs.
From Manual YAML to CDK
Back then, the only AWS-native choice for IaC-tooling was to manually start writing the CloudFormation templates. CloudFormation is an AWS service that one can use to provision the infrastructure with JSON- or YAML-formatted templates. CloudFormation stack is an entity that holds the infrastructure resources. All the resources defined in the stack template are created and removed together with the stack. One can manage the infrastructure stacks through the AWS CLI or the CloudFormation UI.
So the first iteration of the agency’s AWS infra code was about writing a lot of YAML definitions, deploying them from the local laptop using the AWS CLI, fixing errors, and retrying. The process could have been more efficient and successful in many ways. For example, there was just not enough time to figure out everything needed and, in many cases, the desired level of automation required to write countless custom scripts.
Example of a YAML template
After some time of struggling with the YAML, AWS released the CDK (Cloud Development Kit). The purpose of the CDK is to allow developers to write the CloudFormation templates using familiar programming languages. CDK tooling converts the code written by the developer to CloudFormation templates.
Writing declarative definitions using imperative programming languages felt a bit off for me at first, but I decided to try it. There were some evident benefits:
- CDK offers constructs that combine CloudFormation resources with higher-level abstractions. There is less need to know the dirty details of each resource.
- Sharing, customizing, and reusing constructs is more straightforward.
- One can use her favorite IDE to write the infra code. Therefore tools like code completion are available.
- Also, there are other language-specific tools. One can apply dependency management, versioning, and even unit testing to the infra code similarly to other software projects.

Example of CDK code
The Missing Puzzle Piece
Switching to CDK tooling boosted my performance for the infra work significantly. Also, the manual hassle with the YAML templates is something I have not longed for at all. Still, it felt like something was missing. I was still running the infra setup scripts from my laptop. In my ideal world, the pipeline would create the infra, keeping things more reproducible and less error-prone. Also, defining the build pipeline and the deployment needed custom steps that made the initial agency setup still complex, which was something that I wanted to avoid in the first place.
Well, time went on, and we were happy with the deployment pipeline: regardless of the setup process, it worked as expected. However, in the spring of 2022, I saw an OP Software Academy course about the CDK. The Academy is our internal training organization that offers courses around several topics. I decided to join the class and learn more about CDK and get some validation if I had done things correctly.
Pipeline creation with CDK code
In the course, I found the missing piece of my puzzle. As it happened, AWS had just released CDK v2, which introduced a new concept, CDK pipelines. CDK pipeline is yet another higher-level abstraction, this time for AWS continuous integration and deployment tools. It utilizes AWS CodePipeline to build, test and deploy the application. The CDK pipeline’s beauty lies in its setup: it is deployed only once from the developer’s desktop. After the creation, the pipeline handles the infra-deployment and subsequent changes to the deployment or the pipeline via version control.

Evolution of Agency IaC tooling
After porting our deployment on top of the CDK pipeline, the setup has finally reached my standards. However, the future will show us how the Agency deployment will evolve. Perhaps we will introduce a more platform-agnostic approach and remove AWS native tooling altogether.
You can do a deep dive into the anatomy of our CDK pipeline in my next blog post. And as always, you can find the codes on GitHub!
No-Code SSI Chatbots - FSM Part I
In this blog post, I’ll explain the syntax of our chatbot language. The good news is that the language is simple, and we already offer some development tools like UML rendering. There’ll be a second post where we’ll dive deeply into the implementation details. Our ultimate goal is to find a proper model checker and theorem proofer for the correctness of the chatbot applications.
Our team got the idea of chatbots quite early after we started to play with verifiable credentials and SSI.
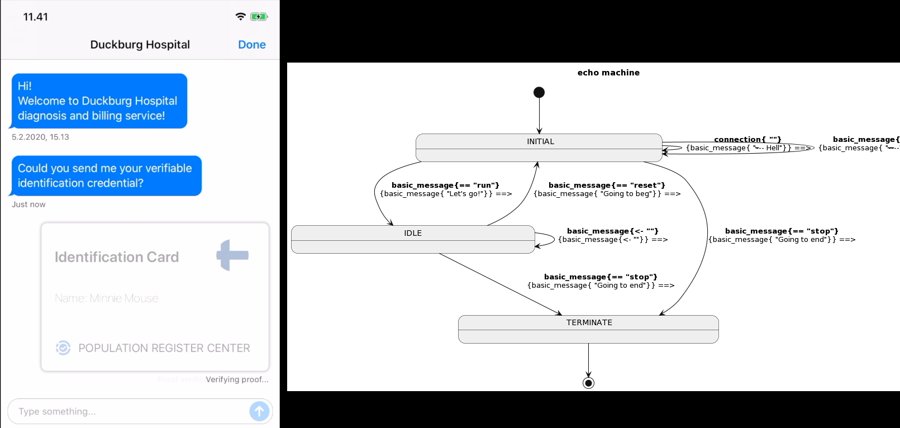
Zero UI + No-Code => Fast Delivery
I think that chatbots and zero UI are some sorts of a lost opportunity for SSI/DID. The backbone of the DID network is its peer-to-peer communication protocol. Even though the client/server API model is very convenient to use and understand, DIDComm based apps need something different – more conversational. What would be more conversational than chatting?
Anyhow, we have been positively surprised by how far you can get without NLP but just a strict state machine-guided conversation where each party can proof facts about themselves when needed. And, of course, you can build perfect hybrid, where you fix structural parts of the discussion with the FSM and leave unstructured details for the NLP engine.
Hello World
The chatbot state machines are written in YAML (JSON accepted). Currently, a YAML file includes one state machine at a time.
As all programming books and manuals start with the hello world app, we do the same.
initial:                                             # (1)
  target: INITIAL
states:                                              # (2)
  INITIAL:                                           # (3)
    transitions:                                     # (4)
    - trigger:                                       # (5)
        protocol: basic_message                      # (6)
      sends:                                         # (7)
      - data: Hello! I'm Hello-World bot.
        protocol: basic_message                      # (8)
      target: INITIAL                                # (9)
The previous machine is as simple as it can be in that it does something. Let’s see what the lines are for:
- Initial state transition is mandatory. It’s executed when the machine is started. It’s the same as all the state transitions in our syntax but doesn’t have a transition trigger.
- States are listed next. There are no limits to how many states the machine holds.
- This machine has only one state named
INITIAL. Each state must have a unique name. - States include transitions to the next states (
target). We have one in this machine, but no limit exists to how many transitions a state can have. - Each transition has a trigger event.
- Triggers have protocol that is in this case
basic_message. - We can send limitless a mount of
eventsduring the state transition. - In this machine, we send a
basic_messagewhere thedataisHello! I'm Hello-World bot. - Our
transitiontargetis theINITIALstate. It could be whatever state exists in the machine.
Did you get what the machine does? You can try it by following the instructions
in Findy CLI’s readme to setup
your playground/run environment. After you have set up a pairwise connection
between two agents, and needed environment variables set like FCLI_CONNN_ID,
execute this to the first agent’s terminal:
findy-agent-cli bot start <Hello-World.yaml> # or whatever name you saved the script above
For the second agent, use two terminals and give these commands to them:
# terminal 1
findy-agent-cli bot read # listens and shows other end's messages
# terminal 2
findy-agent-cli bot chat # sends basic_message's to another end thru the pairwise
And when you want to render your state machine in UML, give this command:
findy-agent-cli bot uml <Hello-World.yaml> # name of your FSM
The result looks like this:

The UML rendering may help with understanding. It’s also an excellent tool for manual verification. Automatic model checking is something we are studying in the future.
The FSM Language
The YAML-based state machine definition language is currently as simple as possible.
State Machine
The first level is the states, which are the primary building blocks of the machine. A machine has one or more states. During the execution, the machine can be in only one state at a time. Sub- or embedded states aren’t supported because they are only convenient, not mandatory. Also, parallel states are out-scoped.
One of the states must be marketed as initial. Every chatbot conversation
runs its own state machine instance, and the current implementation of machine
termination terminates all running instances of the machine. The state
machine can have multiple termination states.
Note, because the final multi-tenant deployment model is still open, and we have yet to decide on the persistence model, we recommend being extra careful with the state machine termination. Even though the ending is especially convenient for the one-time scripts.
Each state can include relations to other states, including itself. These relations are state-transitions which include:
- a trigger event
- send events
- a target state
Memory
Each state machine instance has one memory register/dictionary/map. All of the
memory access (read/write) are integrated state-transitions, and their
rules. If we bring some scripting language onboard, the memory model
integration is the first thing to solve. Also current memory model isn’t
production ready for large-scale service agents because there isn’t any
discarding mechanism. However, this will be fixed in the next minor release,
where a transition to the initial state frees the state machine instance’s
memory register. Edit: memory cleanup is implemented, and Lua is onboard.
Meta-Model
Information about the meta-model behind each state machine can be found in the following diagram. As you can see, the Machine receives and sends Events. And States controls which inputs, i.e., triggers are valid, when and how.

Next, we will see how the Event is used to run the state machine. After the next chapter, we should learn to declare all supported types of input and output events.
Event
As we previously defined, state transitions are input/output entities. Both
input and output are also event-based. An input event is called trigger: and
outcomes are sends:.
The event has necessary fields, which we describe next in more detail.
rule:Defines an operation to be performed when sending an event or what should happen when inputting an event.protocol:Defines a protocol to be executed when sending or a protocol event that triggers a state transition.data:Defines additional data related to the event in astringformat.
      ...
      trigger:                                             # 1
        data: stop                                         # 2
        protocol: basic_message                            # 3
        rule: INPUT_EQUAL                                  # 4
- Simple example of the trigger event.
stopis a keyword in this trigger because of the rule (see # 4).- The keyword is received thru the
basic_messageAries DIDComm protocol. INPUT_EQUALmeans that if incoming data equals thedata:field, the event is accepted, and a state transition is triggered.
Rule
The following table includes all the accepted rules and their meaning for the event.
| Rule | Meaning |
|---|---|
| OUR_STATUS | Currently used with issue_cred protocol to build triggers to know when issuing is ended successfully. |
| INPUT | Copies input event data to output event data. Rarely needed, more for tests. |
| INPUT_SAVE | Saves input data to a named register. Thedata: defines the name of the register. |
| FORMAT | Calls printf type formatter for send events where the format string is in data: and value is input data: field. |
| FORMAT_MEM | Calls Go template type formatter for send events where the format string is in the data: field, and named values are in the memory register. |
| GEN_PIN | A new random 6-digit number is generated and stored in the PIN-named register, and FORMAT_MEM is executed according to the data: field. |
| INPUT_VALIDATE_EQUAL | Validates that received input is equal to the register value. The variable name is in the data: field. |
| INPUT_VALIDATE_NOT_EQUAL | Negative of previous, e.g., allows us to trigger transition if the input doesn’t match. |
| INPUT_EQUAL | Validates that the coming input data is the same in the data: field. For these, you can implement command keywords that don’t take arguments. |
| ACCEPT_AND_INPUT_VALUES | Accepts and stores a proof presentation and its values. Values are stored as key/value pairs in the memory register. |
| NOT_ACCEPT_VALUES | Declines a proof presentation. |
Protocol
The following table includes all the accepted Aries protocols and their properties.
| Protocol | In/Out | RFC | Meaning |
|---|---|---|---|
basic_message | Both | 0095 | Send or receive a messaging protocol (text) |
trust_ping | Both | 0048 | A ping protocol for a DIDComm connection |
issue_cred | Out | 0036 | Issue a verifiable credential thru DIDComm |
present_proof | Out | 0037 | Request a proof presentation thru DIDComm |
connection | In | 0023 | A new pairwise connection (DID exchange) is finished for the agent |
The following table includes currently recognized general protocols and their properties. Recognized protocols aren’t yet thoroughly tested or implemented, only keywords are reserved and properties listed.
| Protocol | In/Out | Spec | Meaning |
|---|---|---|---|
email | Both | JSON | Send or receive an email message (text) |
hook | Both | Internal | Currently reserved only for internal use |
On the design table, we have ideas like REST endpoints, embedded scripting language (Lua, now implemented), file system access, etc.
Data
The data field is used to transport the event’s data. Its function is determined by
both rule and protocol. Please see the next chapter, Event Data.
Event Data
The event_data field transports the event’s type-checked data. Its type
is determined by both rule and protocol. Currently, it’s explicitly used
only in the issue_cred protocol:
  ...
  data:
  event_data:
    issuing:
      AttrsJSON: '[{"name":"foo","value":"bar"}]'
      CredDefID: <CRED_DEF_ID>
  protocol: issue_cred
We are still work-in-progress to determine what will be the final role of data
and event_data. Are we going to have them both or something else? That will be
decided according to the feedback from the FSM chatbot feature.
Issuing Example
The following chatbot is an illustration of our chatbot from our Identity Hackathon 2023 repository. It’s proven extremely handy to kick these chatbots up during the demo or development without forgetting the production in the future.

Omni-Channel Chatbot
The diagram below presents another example of the automatic issuing
chatbot
for verifying an email address. Please read the state transition arrows
carefully. They define triggers and events to send. There is a transition that
sends an Aries basic_message and an email in the same transition. The email
message built by the machine includes a random PIN code. As you can see, the
state machine can adequately verify the PIN code.

It’s been rewarding to notice how well chatting and using verifiable credentials fit together. As an end-user, you won’t face annoying context switches, but everything happens in the same logical conversation.
Future Features
The most critical task in the future will be documentation. Hopefully, this blog post helps us to get it going.
Something we have thought about during the development:
- transition triggers are currently SSI-only which can be changed in the
future
- transient states
- Edit: Now embedded Lua that solves limitless trigger types and make need for transient states obsolete
- straightforward memory model
- no persistence model
- verification/simulation tools: a model checker
- simple scripting language inside the state machine, Edit: Lua is now implemented
- deployment model: cloud, end-user support
- end-user level tools
Please take it for a test drive and let us know your thoughts. Until the next time, see you!
How to Equip Your App with VC Superpowers
My previous blog post explained how to get started with SSI service agents using our CLI tool. But what about the next step, the integration into your application?
As I have previously described in my earlier blog post, Findy Agency API is the interface to Findy Agency for clients that wish to use the agency services programmatically. You can compile the gRPC API for multiple languages. However, the most straightforward is to start with the ones for which we provide some additional tooling: Go, Typescript (JavaScript), or Kotlin.
The Server Samples
The sample repository has an example server for each of the three languages. You can run the samples by cloning the repository and following the instructions in the README.
The sample servers demonstrate a similar issuing and verifying example as the CLI script in the previous post.
The server has two endpoints, /issue and /verify.
Both endpoints display QR codes for connection invitations.
The server starts a listener who gets notified when a new connection is established
(the holder has read the invitation).
The notification triggers either the credential issuance or verification,
depending on the endpoint that displayed the invitation.

Reading the QR code from the issue page triggers a credential offer. The Web Wallet is displayed on the right side with its chat UI.
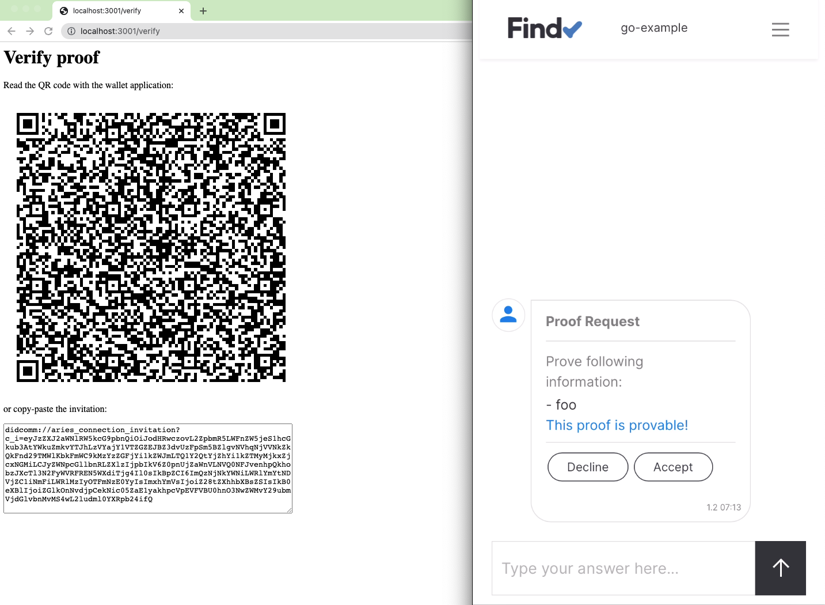
The connection created from the verify page triggers a proof request. The sample creates dedicated connections for both issue and verify operations, but it would be possible to use the same connection as well.
The Server Code
I have gathered snippets to which you should pay close attention when checking the sample code. The snippets chosen here are from the Go sample, but each server contains similar functionality.
Client Registration and Authentication
The agency API clients use headless FIDO2 authentication. Before the client can make any API requests, it must authenticate and acquire a JWT token using the FIDO2 protocol. This Go example uses the authenticator functionality from the github.com/findy-network/findy-agent-auth package. Other implementations (Typescript, Kotlin) currently utilize the findy-agent-cli binary for headless authentication.
The sample code tries to authenticate first, and only if the authentication fails will it try the client registration. The registration binds the client key to the client account, and after a successful registration, the client can log in and receive the JWT token needed for the API calls.
import (
  ...

  "github.com/findy-network/findy-agent-auth/acator/authn"
)

...

// use command from the headless authenticator package
var authnCmd = authn.Cmd{
  SubCmd:   "",
  UserName: os.Getenv("FCLI_USER"),// client username
  Url:      os.Getenv("FCLI_URL"), // FIDO2 server URL
  AAGUID:   "12c85a48-4baf-47bd-b51f-f192871a1511",
  Key:      os.Getenv("FCLI_KEY"), // authenticator key
  Counter:  0,
  Token:    "",
  Origin:   os.Getenv("FCLI_ORIGIN"),
}

...

func (a *Agent) register() (err error) {
  defer err2.Handle(&err)

  myCmd := authnCmd
  myCmd.SubCmd = "register"

  try.To(myCmd.Validate())
  try.To1(myCmd.Exec(os.Stdout))
  return
}

func (a *Agent) login() (err error) {
  defer err2.Handle(&err)

  myCmd := authnCmd
  myCmd.SubCmd = "login"

  try.To(myCmd.Validate())
  r := try.To1(myCmd.Exec(os.Stdout))

  // store token for successful authentication
  a.JWT = r.Token
  return
}
With a valid JWT, the client can create the gRPC API connection and the real fun can begin!
import (
  ...

  "github.com/findy-network/findy-common-go/agency/client"
  agency "github.com/findy-network/findy-common-go/grpc/agency/v1"
  "google.golang.org/grpc"
)

  ...
  // set up API connection
  conf := client.BuildClientConnBase(
    os.Getenv("FCLI_TLS_PATH"),
    agent.AgencyHost,
    agent.AgencyPort,
    []grpc.DialOption{},
  )

  conn := client.TryAuthOpen(agent.JWT, conf)

  agent.Client = &AgencyClient{
    Conn:           conn,
    AgentClient:    agency.NewAgentServiceClient(conn),
    ProtocolClient: agency.NewProtocolServiceClient(conn),
  }
Schema and Credential Definition Creation
When the server starts for the first time, it creates a schema and a credential definition. The issuer always needs a credential definition to issue credentials. For the verifier, it is enough to know the credential definition id.
  // use the agent API to create schema and credential definition
  schemaRes := try.To1(a.Client.AgentClient.CreateSchema(
    context.TODO(),
    &agency.SchemaCreate{
      Name:       schema.Name,
      Version:    "1.0",
      Attributes: schema.Attributes,
    },
  ))
  ...
  // tag the credential definition with our client username
  res := try.To1(a.Client.AgentClient.CreateCredDef(
    context.TODO(),
    &agency.CredDefCreate{
      SchemaID: schemaRes.ID,
      Tag:      authnCmd.UserName,
    },
  ))
  credDefID = res.GetID()
The app stores the created credential definition ID in a text file. The app will skip the credential definition creation step if this text file exists on the server bootup.
The credential definition ID is essential. You should share it with whoever needs to verify the credentials issued by your issuer.
Creating the Invitation
After the start routines, the server endpoints are ready to display the pairwise connection invitations. The holder agent can establish a secure pairwise connection with the information in the invitation.
The client uses CreateInvitation-API to generate the invitation:
  res := try.To1(ourAgent.Client.AgentClient.CreateInvitation(
    context.TODO(),
    &agency.InvitationBase{Label: ourAgent.UserName},
  ))
The endpoint returns HTML that renders the invitation as QR code.
When using a mobile device, the invitation can be read with the web wallet camera or desktop browser, copy-pasting the invitation URL to the Add connection -dialog.
Listening to Notifications
Another core concept in the client implementation is listening to the agent notifications. The client opens a gRPC stream to the server and receives notifications of the agent events through the stream.
  // pick notifications from stream channel
  ch := try.To1(agent.Client.Conn.ListenStatus(
    context.TODO(),
    &agency.ClientID{ID: agent.ClientID},
  ))

  // start go routine for the channel listener
  go func() {
    for {
      chRes, ok := <-ch
      if !ok {
        panic("Listening failed")
      }
      notification := chRes.GetNotification()
      log.Printf("Received agent notification %v\n", notification)

      ...

      switch notification.GetTypeID() {
      ...
      case agency.Notification_STATUS_UPDATE:
        switch notification.GetProtocolType() {
        case agency.Protocol_DIDEXCHANGE:
          agent.Listener.HandleNewConnection(status.GetDIDExchange().ID)
          ...
        }
        ...
      }
    }
 }()
For instance, when the server creates a pairwise connection so that the holder can connect to the issuer, the notification of the new connection is sent through the stream.
sequenceDiagram
  autonumber
    participant Server
    participant Agency
    participant Web Wallet

    Server->>Agency: Start listening
    Server-->>Web Wallet: Show QR code
    Web Wallet->>Agency: Read QR code
    Agency->>Server: Connection created!
    Note right of Server: Conn ID for issue
    Server->>Agency: Send credential offer
    Agency->>Web Wallet: Cred offer received!
    Web Wallet->>Agency: Accept offer
    Agency->>Server: Issue ok!
In the sequence above, steps 4 and 8 are notifications sent through the listener stream.
The client can then react to the event accordingly. For example, when a new connection is established from the issue endpoint, the client sends a credential offer:
func (a *AgentListener) HandleNewConnection(id string) {
  ...
  // pairwise based on the connection id
  pw := client.NewPairwise(ourAgent.Client.Conn, id)

  ...
  // credential values
  attributes := make([]*agency.Protocol_IssuingAttributes_Attribute, 1)
  attributes[0] = &agency.Protocol_IssuingAttributes_Attribute{
   Name:  "foo",
   Value: "bar",
  }

  // send the offer
  res := try.To1(pw.IssueWithAttrs(
   context.TODO(),
   ourAgent.CredDefID,
   &agency.Protocol_IssuingAttributes{
    Attributes: attributes,
   }),
  )
  ...
}
A similar flow happens when the proof is verified. The exception with the proof is that there is an additional step where the client can reject the proof if the proof values are not valid according to the business logic (even though the proof would be cryptographically valid).
Start with Your Use Case
Now you should have the technical setup ready to start implementing your use case. But as with always in software development, we need more than technical capabilities. Before starting the implementation, try to figure out the roles and duties of your process participants:
Define the credential(s) content. Think about which data attributes you need. The sample issues the type “foobar” credentials with a single attribute “foo.” Foobar data is probably not the type you wish to issue and utilize.
Define the data flow participants. Draft your data flow and resolve which parties are the issuer, verifier, and holder or are some parties even in multiple roles. In the sample, a single service agent handles both issuing and verifying. That is not a probable scenario in a real-world use case, as the whole point of SSI and verified data use is to verify credentials that other parties have issued.
Define how you operate each verified data flow participant. The sample had a CLI tool or API client as the issuer and verifier and a web wallet user as the holder. Depending on the use case, you might have a similar setup or, for example, another service agent as the holder in a service-to-service scenario. Or you would like to integrate the holder capabilities into your end-user application instead of using the agency web wallet.
Of course, in cases where we have multiple real-world parties involved, the detailed design is done together with the other participants.
Feedback
Let us know if you have any feedback regarding the Findy Agency functionality or documentation. It would also be cool to hear about the PoCs, demos and applications you have built using the agency.
You can also reach us via SoMe channels:
Getting Started with SSI Service Agent Development
In the new SSI world, we craft digital services according to the self-sovereign identity model. We will have applications that issue credentials for the data they possess and applications that can verify these credentials. The central entity is the digital wallet owner that can hold these credentials and present them when needed.
“Ok, sounds great!” you may think. “I want to utilize credentials also in my web application. But where to start?”
Developing decentralized applications is tricky as it usually requires setting up multiple applications on your local computer or acquiring access to services set up by others. Using Findy Agency tackles this hurdle. It is an SSI solution that offers a complete set of tools for managing your digital wallet and agent via a user interface or an API.
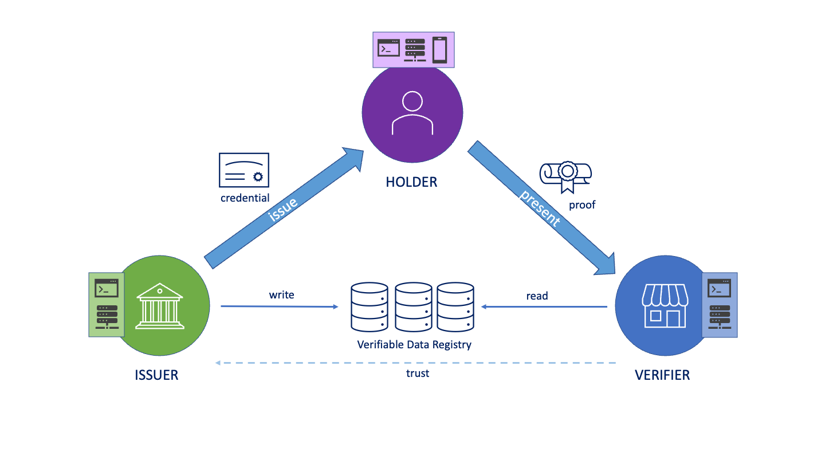
Findy Agency provides tools for playing each role in the trust triangle: CLI and API clients have the complete tool pack, and the web wallet user can currently hold and prove credentials.
The Agency tooling provides you with a web wallet and a CLI tool that you can use to test your service’s issuing and verifying features. You can easily setup the whole Findy Agency software to your local computer using Docker containers and a simulated ledger. Or, if you have an agency cloud installation available, you can utilize it for your service agent development without using any extra proxies or network tools.
“So, I have the agency up and running. What next?”
TL;DR Take a look at the examples found in the sample repository!
The sample repository provides simple yet comprehensive examples to start issuing and verifying using the CLI tool or with the agency API. The easiest path is to start with the CLI.
Run the CLI
“findy-agent-cli” is a command-line tool that provides all the required agent manipulation functionality. It provides means to quickly test out the issuing and verifying before writing any code.
The sample script is a good starting point. It shows how to allocate an agent in the cloud and issue and verify credentials using a simple chatbot. You can run it by cloning the repository and following the instructions in the README.
CLI Script Initialization Phase
The sample script initialization phase allocates a new agent from the agency (1) and authenticates the CLI user (2-3). The authentication returns a JWT token exposed to the script environment so that further CLI calls can utilize it automatically.
For the agent to issue credentials, an applicable schema needs to exist. The schema describes the contents of a credential, i.e., which attributes the credential contains. The sample script creates a schema “foobar” with a single attribute “foo” (4-5).
There needs to be more than the mere schema for the issuing process; the agent needs also to create and publish its credential definition (6-7) attached to the created schema so that it can issue credentials and verifiers can verify the proof presentations against the published credential definition.
We assume that the holder operates a web wallet and has taken it into use. Note that you can play the holder role also with the CLI tool.
sequenceDiagram
  autonumber
    participant CLI
    participant Agency
    participant Web Wallet

    CLI->>Agency: Register
    CLI->>Agency: Login
    Agency-->>CLI: JWT token
    CLI->>Agency: Create schema
    Agency-->>CLI: Schema ID
    CLI->>Agency: Create cred def
    Agency-->>CLI: Cred def ID
CLI Script Issuing Credential
The next task is to create a pairwise connection between the agent operated by the CLI user and the web wallet user. The pairwise connection is an encrypted pipe between the two agents that they can use to exchange data securely. The CLI script creates an invitation (1-2) and prints it out (3) as a QR code that the web wallet user can read (5).
Once the new connection ID is known, the CLI script starts a chatbot (4) for the new connection. The bot logic follows the rules for changing the bot states in the YAML file. Therefore, the bot handles the rest of the issuing process (6-7).
Once the issuer bot notices that credential issuing succeeded, it stops the bot (10-11), and the sample script moves on to verifying the same credential.
sequenceDiagram
  autonumber
    participant CLI
    participant Issue Bot
    participant Agency
    participant Web Wallet

    CLI->>Agency: Create invitation
    Agency-->>CLI: Invitation URL
    CLI-->>Web Wallet: <<show QR code>
    CLI->>Issue Bot: Start
    Web Wallet->>Agency: Read QR code
    Agency-->>Issue Bot: Connection ready!
    Issue Bot->>Agency: Issue credential
    Agency-->>Web Wallet: Accept offer?
    Web Wallet->>Agency: Accept
    Agency-->>Issue Bot: Issue ready!
    Issue Bot->>Issue Bot: Terminate
CLI Script Verifying Credential
Steps 1-6 proceed similarly to the issuing: first, the agents form a new pairwise connection. However, the process continues with a proof request sent by the verifier bot (7). The proof request contains the attributes the bot wishes the holder to present. The web wallet user sees the requested data once they receive the message (8), and they can either accept or reject the request.
After the proof is accepted (9), the agency verifies it cryptographically. If the verification succeeds, the agency notifies the verifier bot with the proof values (10). It can reject the proof if the values are not acceptable by the business logic. The sample bot accepts all attribute values, so the verifying process is continued without extra validation (11). The bot exits when the proof is completed (12-13).
sequenceDiagram
  autonumber
    participant CLI
    participant Verify Bot
    participant Agency
    participant Web Wallet

    CLI->>Agency: Create invitation
    Agency-->>CLI: Invitation URL
    CLI-->>Web Wallet: <<show QR code>
    CLI->>Verify Bot: Start
    Web Wallet->>Agency: Read QR code
    Agency-->>Verify Bot: Connection ready!
    Verify Bot->>Agency: Proof request
    Agency-->>Web Wallet: Accept request?
    Web Wallet->>Agency: Accept
    Agency-->>Verify Bot: Proof paused
    Verify Bot->>Agency: Resume proof
    Agency-->>Verify Bot: Proof ready!
    Verify Bot->>Verify Bot: Terminate
CLI as a Test Tool
Note that you can also utilize the CLI for testing. It is an excellent tool to simulate the functionality on the other end.
For instance, let’s say you are developing an issuer service. You can use the CLI tool to act as the holder client and to receive the credential. Or you can use the web wallet to hold the credential and create another client with the CLI tool to verify the issued data.
Feedback
The CLI sample script presented above demonstrates all the core features of verified data flow. It should make you well-equipped to play around with the CLI tool yourself!
Your tool pack will extend even more with our next blog posts. They will describe how to use the agency API programmatically and dive deep into crafting verified data supporting chatbot state machines.
Let us know if you have any feedback regarding the Findy Agency functionality or documentation. You can reach us, for example creating an issue or starting a discussion in GitHub.
You can also reach us via SoMe channels:
Good luck on your journey into the SSI world!
Ledger Multiplexer
In this technical blog post, I’ll explain how I implemented a plugin system into our Indy SDK Go wrapper and then extended it to work as a multiplexer. The plugin system allows us to use a key/value-based storage system instead of the normal Indy ledger. And multiplexing extended the functionality to use multiple data sources simultaneously and asynchronously. For instance, we can add a memory cache to help Indy ledger, which has been proving to make a considerable difference in a multi-tenant agency that can serve thousands of different wallet users simultaneously.

As you can see in the picture above plugin package defines just needed types
and interfaces that the addons package’s plugins implement. The FINDY_LEDGER
plugin routes transactions to the authentic Indy ledger. We will show in this
post how it’s implemented and used.
Reduce Setup Complexity
Indy ledger has been bugging me since we met each other:
- Why was it written in Python when everybody had to know that it would be a performance-critical part of the system?
- Why it was implemented with ZeroMQ when it used so simple TCP/IP communication? (Was it because of Python?) Anyway, every dependency is a dependency to handle.
- Why didn’t it offer a development run mode from the beginning? For instance, a pseudo node would offer local development and test environment?
- Why it didn’t offer a straightforward own separated API? With Indy SDK, you had to build
each transaction with three separate functions that weren’t general but
entity-specific, like
indy_build_cred_def_request(). - Why the transaction model was so unclear and ‘hid’ from the rest of the Indy SDK functions? (See previous one.)
- Why could Indy nodes not idle? When no one was connected to the ledger, it still used a shit load of CPU time per node, and there was a four (4) node minimum in the local setup.
For the record, first, it’s too easy to write the previous list when someone has done everything ready; second, I appreciate all the work Hyperledger Indy has done.
So why bother nagging? To learn and share that learning. If our team or I will ever build anything where we would use a distributed ledger from scratch, we would follow these guidelines:
- Give a straightforward and separated API for ledger access.
- Implement some out-of-the-box mocking for development, e.g., use a memory database.
- Offer a way to set up a production system without an actual consensus protocol and DLT but offer a single database and tools to migrate that to real DLT when the time comes.
Support TDD (Test-Driven Development)
I have noticed that we programmers far too easily avoid automating or documenting our work. Luckily, Go as a language selection supports that very well. Fortunately, our two-person team focused on how we should rely on code-centric automated testing in everything from the beginning.
I wanted to support both unit and integration tests without the mock framework’s help and the need to set up a complex environment just for simple testing. My choice was to have a memory ledger. That would also help with instrumentation and debugging of our code.
Soon I noticed that the memory ledger was insufficient to support fast phase development, but we would need some persistence. A JSON file, aka file ledger, seemed an excellent way to start. The JSON would support tracing and offer another interface for us humans.
When putting these two together, I ended up building our first plugin system for VDR.
We were so happy without the bloated ledger that we all started to think about how we could remove the whole ledger out of the picture permanently, but that’s it is own story to tell.
Reverse-engineering Indy SDK
Before I could safely relay that my solution won’t hit my face later, I had to check what Indy functions don’t separate wallet and ledger access, i.e., they take both wallet handle and ledger connection handle as their argument. I found two that kinds of functions that we were using at that time:
indy_key_for_did()indy_get_endpoint_for_did()
Both functions check if they can find information from the wallet, and the ledger is the backup. For those listening to our presentation on Hyperledger Global Forum, I mistakenly said that I used -1 for the wallet handle, which is incorrect. Sorry about that. (1-0, once again, for documentation.)
I discovered that I could enumerate our ledger connection handles
starting from -1 and going down like -1, -2, and so forth. So I didn’t need any extra
maps to convert connection handles, which would add complexity and affect
performance. I could give connection handles with negative values to
the above functions, and libindy accepted that.
Here you can see what the first function (indy_key_for_did()) looks like in
our wrapper’s API. And I can assure you that c2go.KeyForDid internal
implementation wrapper for Go’s CGO, which is a C-API bridge, doesn’t treat
pool and wallet handles differently before passing them to Indy SDK’s Rust
code. The pool handle can be -1, -2, etc.
// Key returns DIDs key from wallet. Indy's internal version tries to get the
// key from the ledger if it cannot get from wallet. NOTE! Because we have our
// Ledger Plugin system at the top of the wrappers we cannot guarantee that
// ledger fetch will work. Make sure that the key is stored to the wallet.
func Key(pool, wallet int, didName string) ctx.Channel {
	return c2go.KeyForDid(pool, wallet, didName)
}
Some versions of libindy worked so well that if the connection handle wasn’t
valid, it didn’t crash but just returned that it could not fetch the key. Of course,
that helped my job.
The Plugin Interface
I started with a straightforward key/value interface first. But when we decided to
promote Indy ledger to one of the plugins, which it wasn’t before multiplexing,
we brought transaction information to a still simple interface. It has only
Write and Read functions.
// Mapper is an property getter/setter interface for addon ledger
// implementations.
type Mapper interface {
	Write(tx TxInfo, ID, data string) error

	// Read follows ErrNotExist semantics
	Read(tx TxInfo, ID string) (string, string, error)
}
Naturally, the plugin system has an interface Plugin, but it’s even more
straightforward, and it does not interest us now, but you see it in the UML
picture above.
The following code block shows how transaction information is used to keep the public interface simple and generic.
func (ao *Indy) Write(tx plugin.TxInfo, ID, data string) error {
	switch tx.TxType {
	case plugin.TxTypeDID:
		return ao.writeDID(tx, ID, data)

	case plugin.TxTypeSchema:
		return ao.writeSchema(tx, ID, data)

	case plugin.TxTypeCredDef:
		return ao.writeCredDef(tx, ID, data)

	}

	return nil
}
The following code block is an example of how the Indy ledger plugin implements
schema writing transaction with libindy:
func (ao *Indy) writeSchema(
	tx plugin.TxInfo,
	ID string,
	data string,
) (err error) {
	defer err2.Return(&err)

	glog.V(1).Infoln("submitter:", tx.SubmitterDID)

	r := <-ledger.BuildSchemaRequest(tx.SubmitterDID, data)
	try.To(r.Err())

	srq := r.Str1()
	r = <-ledger.SignAndSubmitRequest(ao.handle, tx.Wallet, tx.SubmitterDID, srq)
	try.To(r.Err())

	try.To(checkWriteResponse(r.Str1()))
	return nil
}
The readFrom2 is the heart of the cache system of our multiplexer. As you can
see, it’s not a fully dynamic multiplexer with n data sources. It’s made for
just two, which is enough for all our use cases. It also depends on the
actuality that the Indy ledger plugin is the first, and the cache plugin is the
next. Please note that cache can still be whatever type of the plugins, even
immuDB.
Thanks to Go’s powerful channel system, goroutines, and an essential control
structure for concurrent programming with channels, the select -statement, the
algorithm is quite simple, short, and elegant. Faster wins the reading contest,
and if the Indy ledger wins, we can assume that the queried data is only in the
Indy ledger. Like the case where other DID agents use the same Indy ledger, we
are using DLT for interoperability.
And yes, you noticed, we think that the ledger is always the slower one, and if it’s not, it doesn’t matter that we tried to write it to cache a second time. No errors and no one waits for us because writing is async.
func readFrom2(tx plugin.TxInfo, ID string) (id string, val string, err error) {
	defer err2.Annotate("reading cached ledger", &err)

	const (
		indyLedger  = -1
		cacheLedger = -2
	)
	var (
		result    string
		readCount int
	)

	ch1 := asyncRead(indyLedger, tx, ID)
	ch2 := asyncRead(cacheLedger, tx, ID)

loop:
	for {
		select {
		case r1 := <-ch1:
			exist := !try.Is(r1.err, plugin.ErrNotExist)

			readCount++
			glog.V(5).Infof("---- %d. winner -1 (exist=%v) ----",
				readCount, exist)
			result = r1.result

			// Currently first plugin is the Indy ledger, if we are
			// here, we must write data to cache ledger
			if readCount >= 2 && exist {
				glog.V(5).Infoln("--- update cache plugin:", r1.id, r1.result)
				tmpTx := tx
				tx.Update = true
				err := openPlugins[cacheLedger].Write(tmpTx, ID, r1.result)
				if err != nil {
					glog.Errorln("error cache update", err)
				}
			}
			break loop

		case r2 := <-ch2:
			notExist := try.Is(r2.err, plugin.ErrNotExist)

			readCount++
			glog.V(5).Infof("---- %d. winner -2 (notExist=%v, result=%s) ----",
				readCount, notExist, r2.result)
			result = r2.result

			if notExist {
				glog.V(5).Infoln("--- NO CACHE HIT:", ID, readCount)
				continue loop
			}
			break loop
		}
	}
	return ID, result, nil
}
I hope you at least tried to read the previous function even when you aren’t familiar with Go because that might be the needed trigger point to start to understand why Go is such a powerful tool for distributed programming. I, who have written these kinds of algorithms with almost everything which existed before Go, even to OS, which didn’t have threads but only interrupts, has been so happy. Those who are interested in computer science, please read them Hoare’s paper of CSP. Of course, Go inventors aren’t the only ones using the paper since 1978.
Putting All Together
At the beginning of the document, I had a relatively long list of what’s not so
good in Indy SDK, and that was even all. I tried to leave out those things
caused because C-API has put together quite fast, I think. The libindy is
written in Rust.
But still, the C-API has hints of namespacing, and luckily I have been following the namespace structure in our Go wrapper’s package structure by the book. So, we have these Go packages:
didwalletpairwisecryptoledgerpool, this was very important, because it gave as the entry point to above layer. The layer was using our Go wrapper.
The following picture illustrates the whole system where the ledger connection pool is replaced
with our own pool package.

The code using our Go wrapper looks like the same as it has been since the beginning.
// open real Indy ledger named "iop" and also use Memory Cache
r = <-pool.OpenLedger("FINDY_LEDGER,iop,FINDY_MEM_LEDGER,cache")
try.To(r.Err())

try.To(ledger.WriteSchema(pool, w1, stewardDID, scJSON))

sid, scJSON = try.To2(ledger.ReadSchema(pool, stewardDID, sid))
All of this just by following sound software engineering practices like:
- abstraction hiding
- polymorphism
- modular structures
I hope this was helpful. Until the next time, see you!
The Hyperledger Global Forum Experience
Our team started utilizing Hyperledger technologies in 2019 when we began the experimentation with decentralized identity. Since then, we have implemented our identity agency with the help of two Hyperledger Foundation projects: Hyperledger Indy for implementing the low-level credential handling and Hyperledger Aries for the agent communication protocols specification.
The Dublin Convention Centre hosted the Global Forum. At the same time, the Open Source summit also took place at the same venue.
We released our work as open-source in 2021. When the pandemic restrictions finally eased in 2022, we thought the Hyperledger Forum would be an excellent chance to meet fellow agent authors and present our work to an interested audience. Luckily, the program committee chose our presentation among many candidates, so it was time to head for Ireland.
The three-day event consisted of two days of presentations and demos and one workshop day where the participants had a chance to get their hands dirty with the actual technologies. When over 600 participants and 100 speakers gather together, there is also an excellent chance to meet old friends and make new ones.
Presenting Findy Agency
Our presentation is available on YouTube.We had the opportunity to present our project’s achievements on the second day of the conference, Tuesday, 13th September. Our overall Hyperleger-timing was perfect because the other SSI agent builders had comforted the issues we had already solved. And for that reason, for example, our ledger-less running mode got lots of attention.
We had a little luck that the feature stayed in the slides. Previous conversations with Hyperledger Aries’s core team had not raised any interest in the subject. Now they had an idea that AnonCreds (Hyperledger Indy verified credentials) could stay in version 1.0 format, but VDR (verified data registry, ledger in most of the DID methods) could be something else in Indy SDK.
Our ledger multiplexer solves the same issue. It makes it possible to use Indy SDK with whatever VDR, or even multiple VDRs if necessary, for example, the second one as a cache.
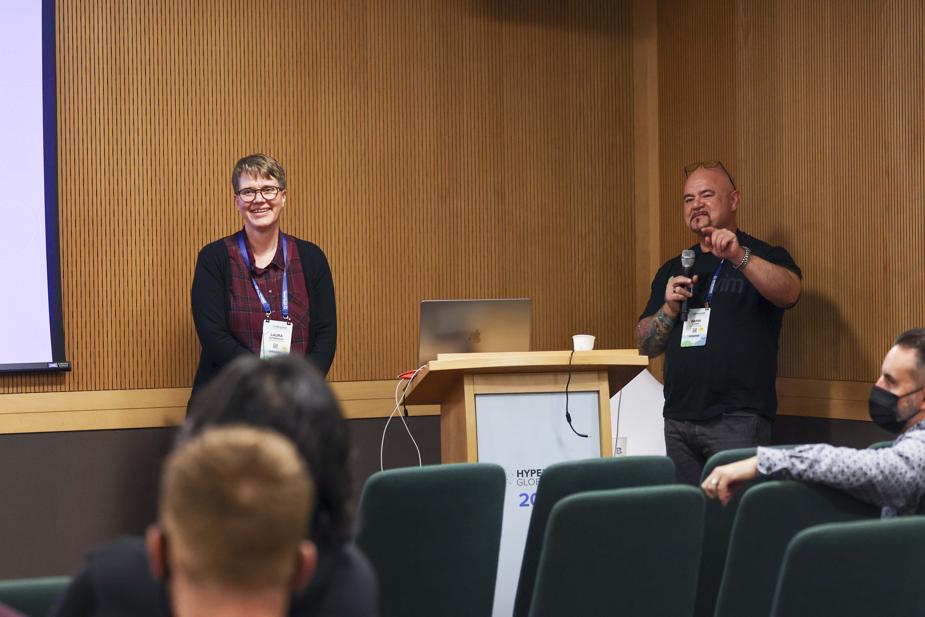
We had lots of questions in the Q&A section. (Photo by the Linux Foundation)
Summary of the rest of the QA section of the talk:
- There was a question about the business cases we have thought about or are keeping potential. Everybody seemed eager to find good use cases that could be referenced for their own use. Many sources confirmed that we should first solve something internal. Something that we can decide everything by ourselves. As a large enterprise, that would still give us a tremendous competitive advantage.
- Questions about how our solution differs from systems based on DIDComm routing, i.e., you must have multiple agents like a relay, a mediator (cloud agent), and an edge agent. We explained that you wouldn’t lose anything but get a much simpler system. There were questions about wallet export and import, which both we have implemented and tested.
- There were multiple reasonable questions about where DIDComm starts in our solution and where it’s used. Because our wallet app doesn’t use (anymore) DIDComm, e.g., for edge agent onboarding, it wasn’t easy to get your head around the idea that we integrated all the agent types into one identity domain agent (the term we used in the talk). Our web wallet was a UI extension of it.
- Luckily, we had some extra time because there was a break after our talk. We could answer all the questions. We can say that we had an excellent discussion at the end of the presentation.
The organizer recorded our talk and it is published on YouTube.
As shown in the Findy Agency demo at #HyperledgerForum, using FIDO2 to authenticate to a web wallet is a great way to keep access to an online web wallet passwordless. pic.twitter.com/GGuHnecnI7
— Animo (@AnimoSolutions) September 13, 2022
The Technical Demos
In addition to keeping our presentation, our goal was to participate in the sessions handling self-sovereign identity and verifiable data. There would have been exciting sessions covering, e.g., the Hyperledger Fabric project. However, unfortunately, many of the sessions were overlapping, so one needed to cherry-pick the most interesting ones, naturally keeping our focus on the technical track.
Aries Bifold project is a relatively new acquaintance in the Aries community. It is a long-awaited open-source mobile agent application built on react-native. The community was long missing an open-source solution for edge agents running on mobile devices, and they had to use proprietary solutions for this purpose. Aries Bifold tries to fill this gap and provide an easily customizable, production-ready wallet application.
In the Aries Bifold demo, we saw two wallet applications receiving and proving credentials, one being the basic version of the app and another with customization, the BC Wallet application. The BC Wallet is a digital wallet application developed by the Government of British Columbia in Canada and is even publicly available in application stores.
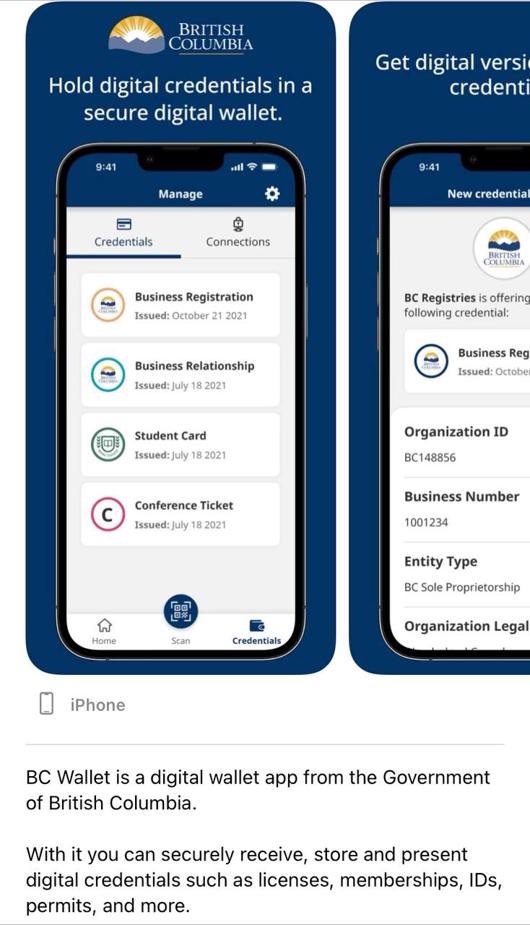
The BC Wallet application is available in the application stores.
Another open-source demo was about building controllers for ACAPy. ACAPy intends to provide services for applications (controllers) that aim to utilize Aries credential flows in their logic. In the demo, we saw how the ACAPy controllers could handle their agent hosted by ACAPy using the ACAPy REST API. However, this demo was a bit disappointing as it did not show us anything we hadn’t seen before.
”Decentralized Identity Is Ready for Adoption Now”
One of the most exciting keynotes was a panel talk with four SSI legends, Drummond Reed, Heather Dahl, Mary Wallace, and Kaliya Young. Their clear message was that we are now done with the mere planning phase and should boldly move to execution and implement real-world use cases with the technology. Also, the panelists raised the public sector to the conversation. The point was that the public sector should act as an example and be the pioneer in using the technology.
Some public sector organizations have already listened to this message as we heard about exciting pilot projects happening in the Americas. The state of North Dakota is issuing a verifiable credential to each graduating senior, and potential employers and universities can then verify these credentials. The city of San Francisco uses verified credentials to replace legacy authentication mechanisms in over 100 public sites. The change effectively means that users must remember 100 fewer passwords, significantly improving the user experience. Furthermore, the Aruba Health Pass allows Aruba travelers to enter the island using the digital health pass. Hyperledger Indy and Aries technologies empower all of the abovementioned cases.
Workshopping
The last day of the conference was about workshopping. We joined the workshop intended for building SSI agents with the Aries JavaScript framework. The framework approach for building the agent functionality differs from the approach we use with our agency: the framework makes building an agent more effortless compared to starting from scratch, but one still needs to host the agent themselves. In the agency way, agency software runs and hosts the agent even though the client application would be offline.
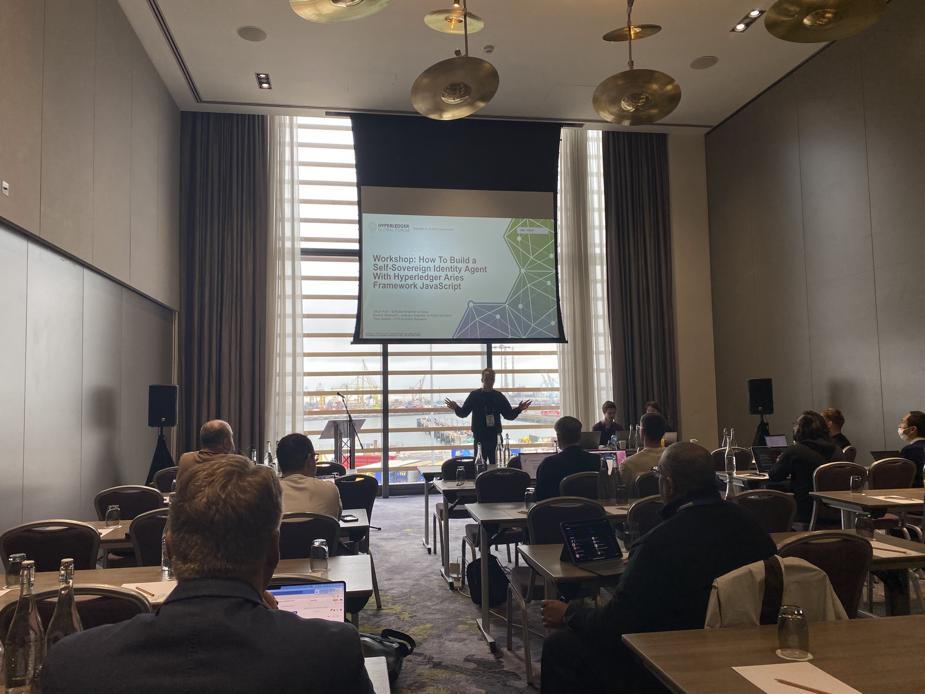
Timo Glastra from Animo was one of the workshop hosts.
The workshop’s purpose was to set up a web service for issuing and verifying credentials and a mobile application for storing and proving the credentials. Both projects, the Node.js and the React Native applications, used the Aries JavaScript Framework to implement the agent functionality under the hood. The organizers provided templates – all the participants needed to do was fill out the missing parts.
The organizers arranged the workshop quite nicely, and after we solved the first hiccups related to the building with Docker in ARM architecture, it was pretty easy to get going with the development – at least for experienced SSI developers like us. The session showed again how important these hands-on events are, as there was a lot of valuable technical discussion going on the whole day.
The Most Important Takeaways
The technology is not mature, but we should still go full speed ahead.
Kaliya Young’s blog post listing the challenges in the Hyperledger Indy and Aries technologies shook the Hyperledger SSI community just a week before the conference started. The article was a needed wake-up call to make the community start discussing that much work is still required before the technology is ready for the masses.
It is essential to take into account these deficiencies of the technology. Still, it shouldn’t stop us from concentrating on the most complicated problems: figuring out the best user experience and how to construct the integrations to the legacy systems. To get started with the pilot projects, we should take conscious technical debt regarding the underlying credential technology and rely on the expert community to figure it out eventually. This approach is possible when we use products such as Findy Agency that hide the underlying technical details from client applications.
Creating a first-class SSI developer experience is challenging.
There are many participants in a credential utilizing application flow. Quite often end-user is using some digital wallet on her mobile device to receive and prove credentials. There might be running a dedicated (web) application both for issuing and verifying. And, of course, a shared ledger is required where the different participants can find the needed public information for issuing and verifying credentials.
Sounds like a complex environment to set up on one’s local computer? Making these three applications talk with each other and access the shared ledger might be an overwhelming task for a newcomer, not to mention grasping the theory behind SSI. However, getting developers quickly onboard is essential when more and more developers start working with SSI. We think we have successfully reduced the complexity level in the Findy Agency project, which positively impacts the developer experience.
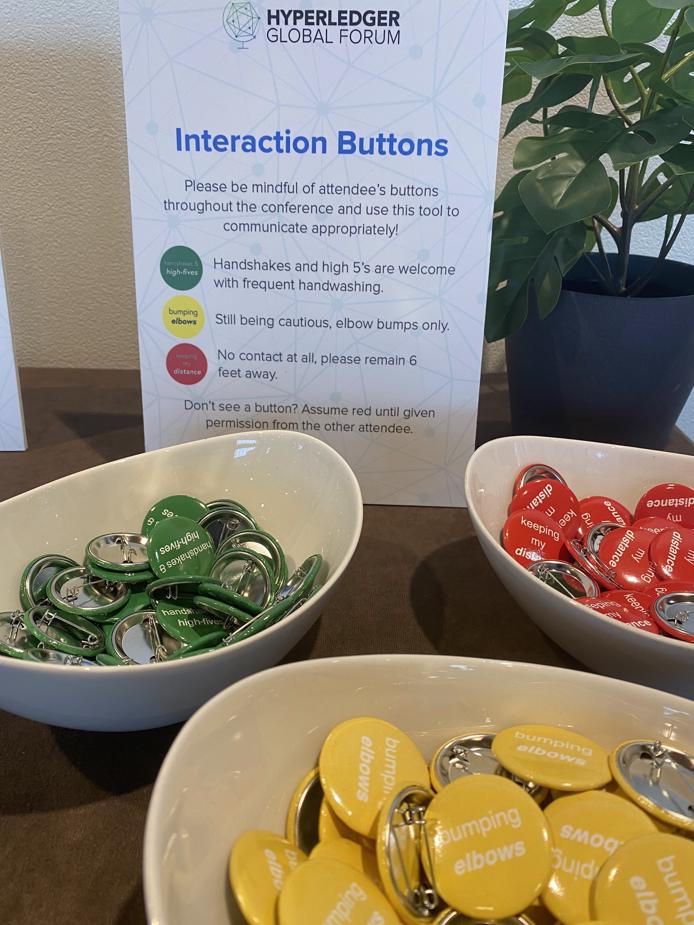
The post-pandemic era with interaction buttons.
There’s no substitute for live events and meeting people f2f.
The event proved that live interaction between people is often more efficient and creative than many hours of online working and countless remote meetings. Meeting people in informal discussions is sometimes needed for new ideas to be born. Also, the change of knowledge is so much more efficient. For example, we have had the ledgerless run mode in our agency for several years, but only now did our fellow agent developers realize it, and they may utilize this finding as well.
The Findy Agency API
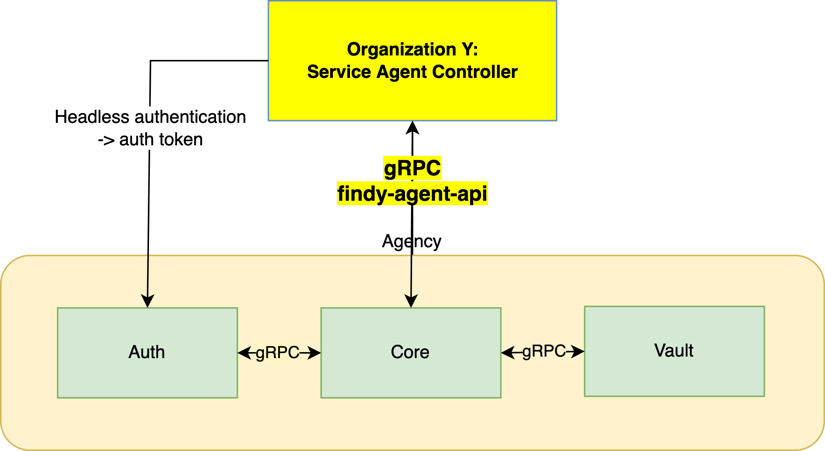
The gRPC API serves the client applications.
The Findy Agency clients can control their agents through the Findy Agency API over the high-performing gRPC protocol. The API design results from iterative planning and multiple development cycles. Initially, we implemented it using a custom protocol that utilized JSON structures and DIDComm as the transport mechanism. The initial design seemed like a good plan, as we got the chance to test the exact DIDComm implementation we were using to send the agent-2-agent messages (used in the credential exchange flows).
However, as we gained more experience using the API and the agent-2-agent protocol evolved as the community introduced Hyperledger Aries, we realized our API was too laborious, clumsy, and inefficient for modern applications.
One option would have been switching our API implementation to traditional REST over HTTP1.1. However, we wanted something better. We were tired of JSON parsing and wanted a better-performing solution than REST. We also wanted to be able to use the API using multiple different languages with ease. The obvious choice was gRPC, which provided us with protocol buffer messaging format, HTTP2-protocol performance gains, and tooling suitable for the polyglot, i.e., multilingual environment.
The technology choice was even better than we expected. Given that we have an agency installation available in the cloud, we can listen to agent events through the gRPC stream without setting up external endpoints using tools such as ngrok. Thus, gRPC streaming capabilities have considerably simplified client application development in a localhost environment. Also, the logic of how gRPC handles errors out-of-the-box have helped us trace the development time problems efficiently.
The API Contract
Our API contract defined with proto files resides in a separate repository, findy-agent-api. Using the gRPC tooling, one can take these proto files and compile them to several target languages, which enables the use of API structures directly from the target implementation.
A brief example is displayed below. We define the structures and an RPC call for schema creation in protobuf language:
// SchemaCreate is structure for schema creation.
message SchemaCreate {
  string name = 1; // name is the name of the schema.
  string version = 2; // version is the schema version.
  repeated string attributes = 3; // attributes is JSON array string.
}

// Schema is structure to transport schema ID.
message Schema {
  string ID = 1; // ID is a schema ID.
}

/*
AgentService is to communicate with your cloud agent. With the cloud agent
you can Listen your agent's status, create invitations, manage its running environment,
and create schemas and credential definitions.
 */
service AgentService {
  ...

  // CreateSchema creates a new schema and writes it to ledger.
  rpc CreateSchema(SchemaCreate) returns (Schema) {}

  ...
}
The protobuf code is compiled to target languages using gRPC tooling, and after that the structures can be used natively from the application code.
    agent := agency.NewAgentServiceClient(conn)
    r := try.To1(agent.CreateSchema(ctx, &agency.SchemaCreate{
        Name:       name,
        Version:    version,
        Attributes: attrs,
    }))
    fmt.Println(r.ID) // plain output for pipes
    log.info(`Creating schema ${JSON.stringify(body)}`);

    const msg = new agencyv1.SchemaCreate();
    msg.setName(body.name);
    msg.setVersion(body.version);
    body.attrs.map((item) => msg.addAttributes(item));

    const res = await agentClient.createSchema(msg);

    const schemaId = res.getId();
    log.info(`Schema created with id ${schemaId}`);
The examples show that the code is simple and readable compared to making HTTP requests to arbitrary addresses and JSON manipulation. The code generated from the proto-files guides the programmer in the correct direction, and there are no obscurities about which kind of structures the API takes in or spits out.
Helpers and Samples
We have developed two helper libraries that contain some common functionalities needed for building API client applications. One is for our favorite language Go (findy-common-go), and the other is for Typescript (findy-common-ts) to demonstrate the API usage for one of the most popular web development languages.
These helper libraries make building a Findy Agency client application even more straightforward. They contain
- the ready-built proto-code,
- functionality for opening and closing the connection and streaming the data,
- utilities for client authentication, and
- further abstractions on top of the API interface.
There already exist two excellent example client applications that utilize these helper libraries. In addition to being examples of using the API, they are handy tools for accessing and testing the agency functionality.
Our CLI tool provides agent manipulation functionality through a command-line interface. It uses the agency API internally through the Go helper.

Example above shows how it is possible to use the CLI tool for chatting with web wallet user.
The issuer tool is a sample web service with a simple UI that can issue and verify credentials using the issuer tool’s cloud agent. It is written in Javascript and utilizes the Typescript helper.

Issuer tool provides functionality for testing different Aries protocols.
One is not limited to using these two languages, as using the API from any language with gRPC tooling support is possible. Stay tuned for my next post that describes our latest experiment with Kotlin.
Trust in Your Wallet
Our previous post showed how to speed up the leap to the SSI world for existing OIDC clients, i.e., web services using external identity providers for their user authentication. Our demonstrated concept enabled users to log in to web services using credentials from their identity wallet.
We used an FTN credential in the demo. After reading the post and seeing the demo, you may have wondered what this FTN credential is? Where did the user get it? And how the web service can trust this mysterious credential? This post will concentrate on these questions.
The Cryptographic Magic
The core concept of self-sovereign identity is verified data. The idea is that entities can hold cryptographically signed data (aka credentials) in their digital identity wallets. They can produce proof of this data and hand it over to other parties for verification.
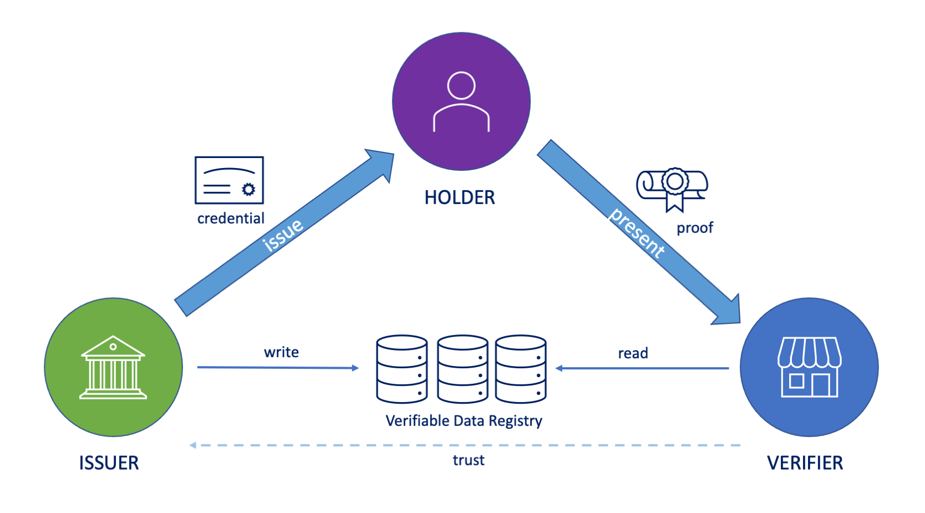
The trust triangle describes the roles of the data verification scenario. Verifier utilizes cryptography to verify the proof that the holder provides.
The cryptographic magic during the verification allows the verifier to be sure of two aspects. Firstly, the issuer was the one who issued the credential, and secondly, the issuer issued it to the prover’s wallet (and no one else’s). The verifier must know the issuer’s public key for this magic to happen.
We showcased the cryptographic verification in the demo mentioned above. When logging in to the sample web service, instead of providing the user name and password, the user made proof of his credential and handed it over to the identity provider. The identity provider then verified the proof cryptographically and read and provided the needed data to the sample service (OIDC client application).
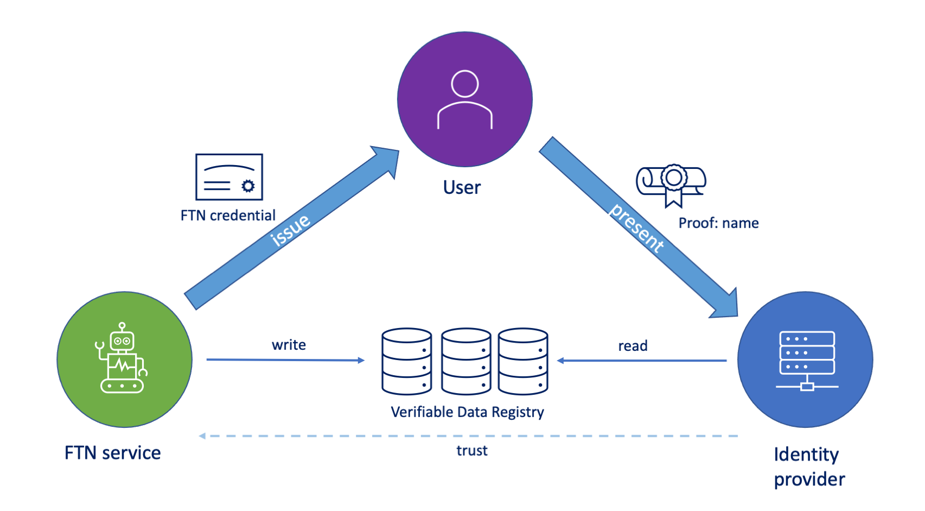
OIDC demo actors in the trust triangle. The user creates proof of his FTN credential for the identity provider's verification.
Who to Trust?
So cryptography gets our back regarding the authenticity of the data and its origin. But how can we trust the issuer, the entity that created the credential initially?

The answer to this question is no different from the present situation regarding dealing with third parties. We choose to trust the issuer.
For example, consider the current OIDC flow, where identity providers deliver data from their silos to the client applications (relaying parties). The client application implementers consciously decide to trust that the IdP (identity provider) runs their server in a documented URL and provides them with correct data in the OIDC protocol flows. They may have secrets and keys to keep the OIDC data exchange secure and private, but ultimately, the decision to trust the OIDC provider is part of the application design.
In the SSI scenario, we choose to trust the issuer similarly, only we are not aware of the issuer’s servers but their public key for signing the credential. In our OIDC login demo, the client application (“issuer-tool”) has decided to trust the “FTN service” that has issued the data to the user’s wallet.
Finnish Trust Network
Finnish Trust Network (FTN) consists of “strong electronic identification” providers. The concept means proving one’s identity in electronic services that meets specific requirements laid down by Finnish law. The identity providers are required to implement multi-factor authentication to authenticate the users. The result data of the authentication process typically contains the user’s name and personal identification code.
In the FTN flow, users usually authenticate using their bank ID. Before the users start the authentication, they select the identity provider in the identity service broker view.
FTN is an exciting playground for us as it is so essential part of the digital processes of Finnish society. Integrating FTN in one way or another into the SSI wallet seems like a natural next step for us when thinking about how to utilize verified data large scale in Finland.
Even though regulation may initially prohibit using SSI wallets as a “strong electronic identification” method, the FTN credential could be part of onboarding wallet users or provide additional security to services that currently use weak authentication. The selective disclosure feature would allow users to share only the needed data, e.g., age or name, without revealing sensitive personal identification code information.
We decided to experiment with the FTN and create a PoC for a service (“FTN service”) that can issue credentials through an FTN authentication integration. And as it happened, we met our old friend OIDC protocol again.
The Demo
The idea of the PoC FTN service is to authenticate users through FTN and issue a credential for the received FTN data. The PoC integrates an identity broker test service with dummy data that enables us to test out the actual authentication flow.
The process starts with the user reading the FTN service connection invitation QR code with his SSI wallet. After the connection is ready, the interaction with the FTN service and the user happens in the mobile device browser. FTN service instructs the user to authenticate with his bank credentials. After successful authentication, the FTN service receives the user information and issues a credential for the data.
The demo video shows how the technical PoC works. The user receives the FTN credential by authenticating himself with bank credentials.Our previous OIDC demo provided data from the credentials through the OIDC protocol. In this FTN issuer demo, we utilized the OIDC protocol again but now used it as the credential data source. Once the user has acquired the FTN credential to his wallet, he can prove facts about himself without reauthenticating with his bank credentials.
The Sequence Flow
The entire process sequence is below in detail:

Food for Thought: Self-Service Issuers
In the SSI dream world of the future, each organization would have the capabilities to issue credentials for the data they possess. Individuals could store these credentials in their wallets and use them how they see fit in other services. Verified data would enable many use cases that are cumbersome or even manual today. Only in the financial sector the possibilities to improve various processes (for example, AML, KYC, or GDPR) are countless.
However, our pragmatic team realizes that this future may be distant, as the adoption of SSI technologies seems to be still slow. The presented experimentation led us to consider another shortcut to the SSI world. What if we could create similar services as the PoC FTN service to speed up the adoption? These “issuer self-services” would utilize existing API interfaces (such as OIDC) and issue credentials to users.
And at the same time, we could utilize another significant benefit of verified data technology: reducing the count of integrations between systems.
Once we have the data available in the user’s wallet, we do not need to fetch it from online servers and integrate services with countless APIs. Instead, the required data is directly available in the digital wallets of different process actors using a standard protocol for verified data exchange, Hyperledger Aries.
Also, from the application developer’s point of view, the count of integrations reduces only to one point—and for that, the SSI agent provides the needed functionality.
Try It Out
The codes are available on GitHub. You can set up the demo on your localhost by launching
the agency
and the issuer service.
Once you have the services running, you can access the web wallet opening browser at http://localhost:3000
and the FTN service at http://localhost:8081.
If you have any questions about these demos or Findy Agency, you can contact our team and me via GitHub, LinkedIn, or Twitter. You can also find me in Hyperledger Discord.
SSI-Empowered Identity Provider
Utilizing SSI wallets and verifiable credentials in OIDC authentication flows has been an interesting research topic for our team already for a while now. As said, the OIDC protocol is popular. Countless web services sign their users in using OIDC identity providers. And indeed, it provides many benefits, as it simplifies the authentication for service developers and end-users. The developers do not have to reinvent the authentication wheel and worry about storing username/password information. The users do not have to maintain countless digital identities with several different passwords.
However, the protocol is not flawless, and it seems evident that using verified data would fix many of the known weaknesses.
Our most significant concerns for current OIDC protocol practices are related to privacy.
Let’s suppose that our imaginary friend Alice uses an application, say a dating service, that provides a Facebook login button for its users. Each time Alice logs in, Facebook becomes aware that Alice uses the dating service. Depending on the service authentication model, i.e., how often the service requires users to reauthenticate, it can also learn a great deal at which time and how often Alice is using the service.
Alice probably didn’t want to share this data with Facebook and did this unintentionally. Even worse, Alice probably uses a similar login approach with other applications. Little by little, Facebook learns about which applications Alice is using and how often. Moreover, as applications usually provide a limited amount of login options, most users choose the biggest identity providers such as Facebook and Google. The big players end up collecting an enormous amount of data over users.
How Would SSI and Verified Data Change the Scenario?
In the traditional OIDC flow, identity providers hold the sensitive end-user data and personally identifiable information. Yet, this is not the case with the SSI model, where the user owns her data and stores it in her digital wallet as verifiable credentials. In the SSI-enabled authentication process, instead of typing username and password to the identity provider login form, the user presents verifiable proof of the needed data. No third parties are necessary for the login to take place.
Furthermore, the transparent proof presentation process lets the user know which data fields the application sees. In the traditional flow, even though the service usually asks if the user wishes to share her profile information, the data is transferred server-to-server invisibly. The level of transparency depends on the identity provider’s goodwill and service design quality. In the proof presentation, the wallet user sees in detail which attributes she shares with the application.
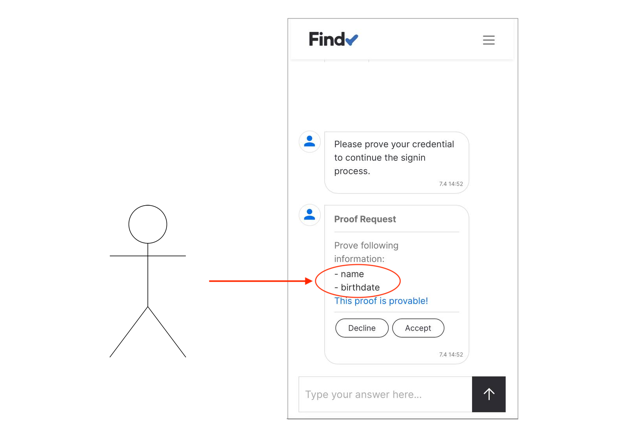
In the proof presentation, the wallet user sees in detail which attributes she shares with the application.
The verifiable credentials technology would even allow computations on the user data without revealing it. For example, if we assume that Alice has a credential about her birthdate in her wallet, she could prove that she is over 18 without exposing her birthdate when registering to the dating service.
Midway Solution for Speeding up Adoption
The ideal SSI-enabled OIDC login process wouldn’t have any identity provider role, or actually, the user would be the identity provider herself. The current identity provider (or any other service holding the needed identity data) would issue the credential to the user’s wallet before any logins. After the issuance, the user could use the data directly with the client applications as she wishes without the original issuer knowing it.
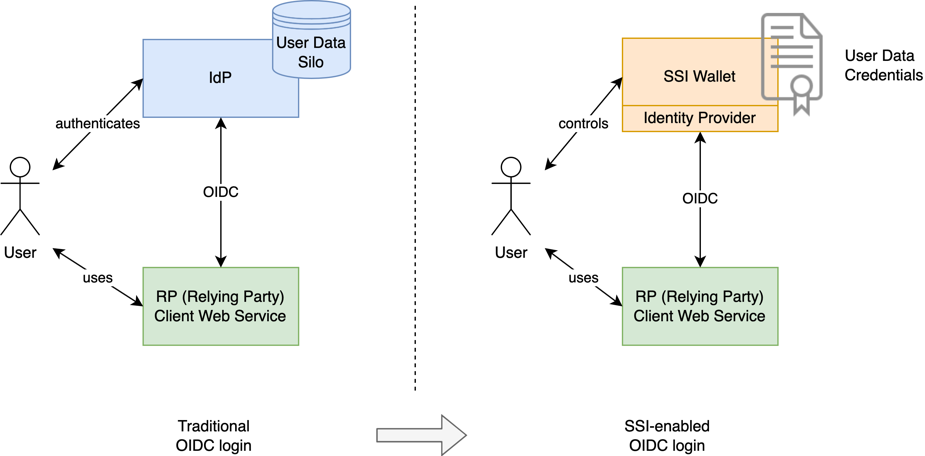
In SSI-Enabled OIDC login flow there is no need for traditional identity provider with user data silos.
The OIDC extension SIOP (Self-Issued OpenID Provider) tries to reach this ambitious goal. The specification defines how the client applications can verify users’ credential data through the renewed OIDC protocol. Unfortunately, implementing SIOP would require considerable changes to existing OIDC client applications.
As adapting these changes to OIDC client applications is undoubtedly slow, we think a midway solution not requiring too many changes to the OIDC clients would be ideal for speeding up the SSI adoption. The identity provider would work as an SSI proxy in this solution, utilizing SSI agent capabilities. Instead of storing the sensitive user data in its database, the provider would verify the user’s credential data and deliver it to the client applications using the same API interfaces as traditional OIDC.
Findy Agency under Test
In the summer of 2020, our team did some initial proofs-of-concept around this subject. The experiments were successful, but our technology stack has matured since then. We decided to rewrite the experiments on top of our latest stack and take a closer look at this topic.
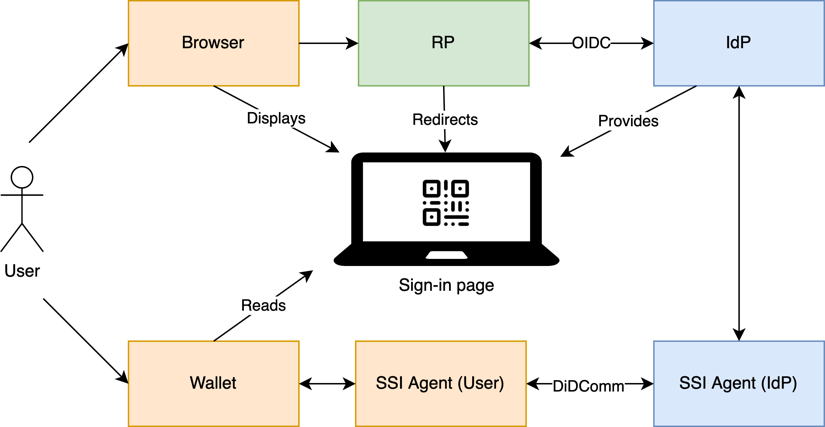
Overview of the midway solution process participants
Other teams have created similar demos in the past but using different SSI technology stacks. Our target was to test our Findy Agency gRPC API hands-on. Also, our web wallet’s user experience is somewhat different from other SSI wallets. The web wallet can be used securely with the browser without installing mobile applications. Furthermore, the core concept of our wallet app is the chat feature, which is almost missing altogether from other SSI wallet applications. We think that the chat feature has an essential role in creating an excellent user experience for SSI wallet users.
Demo
The demo video shows how the technical PoC works on localhost setup. The user logs in to a protected service using the web wallet.The basic setup for the demo is familiar to OIDC utilizers. The end-user uses a browser on the laptop and wishes to log in to a protected web service. The protected sample service for this demo playing the OIDC client role is called the “issuer tool”. The service has configured an SSI-enabled identity provider as a login method. It displays the button “Login via credential” on its login page. The service redirects the user to the identity provider login page with a button click.
Then the flow changes from the usual OIDC routine. Before the login, the user has already acquired the needed data (an FTN - Finnish Trust Network credential) in her SSI wallet. She uses her web wallet on her mobile device to read the connection invitation as a QR code from the login page to begin the DIDComm communication with the identity provider. The identity provider will then verify the user’s credential and acquire the data the client application needs for the login. The rest of the flow continues as with traditional OIDC, and finally, the client application redirects the user to the protected service. The entire process sequence is below in detail:

Implementation
The demo services utilize OIDC JS helper libraries (client, server). We implemented the client application integration similarly to any OIDC login integration, so there was no need to add any dedicated code for SSI functionality. For the identity provider, we took the JS OIDC provider sample code as the basis and extended the logic with the SSI-agent controller. The number of needed code changes was relatively small, which showed us that these integrations to the “legacy” world are possible and easy to implement with an SSI agency that provides a straightforward API.
All of the codes are available on GitHub (client, provider) so that you can take a closer look or even set up the demo on your local computer.
We will continue our exploration journey with the verified data and the OIDC world, so stay tuned!
Replacing Indy SDK
Once again, we are at the technology crossroad: we have to decide how to proceed with our SSI/DID research and development. Naturally, the business potential is the most critical aspect, but the research subject has faced the phase where we have to change the foundation.
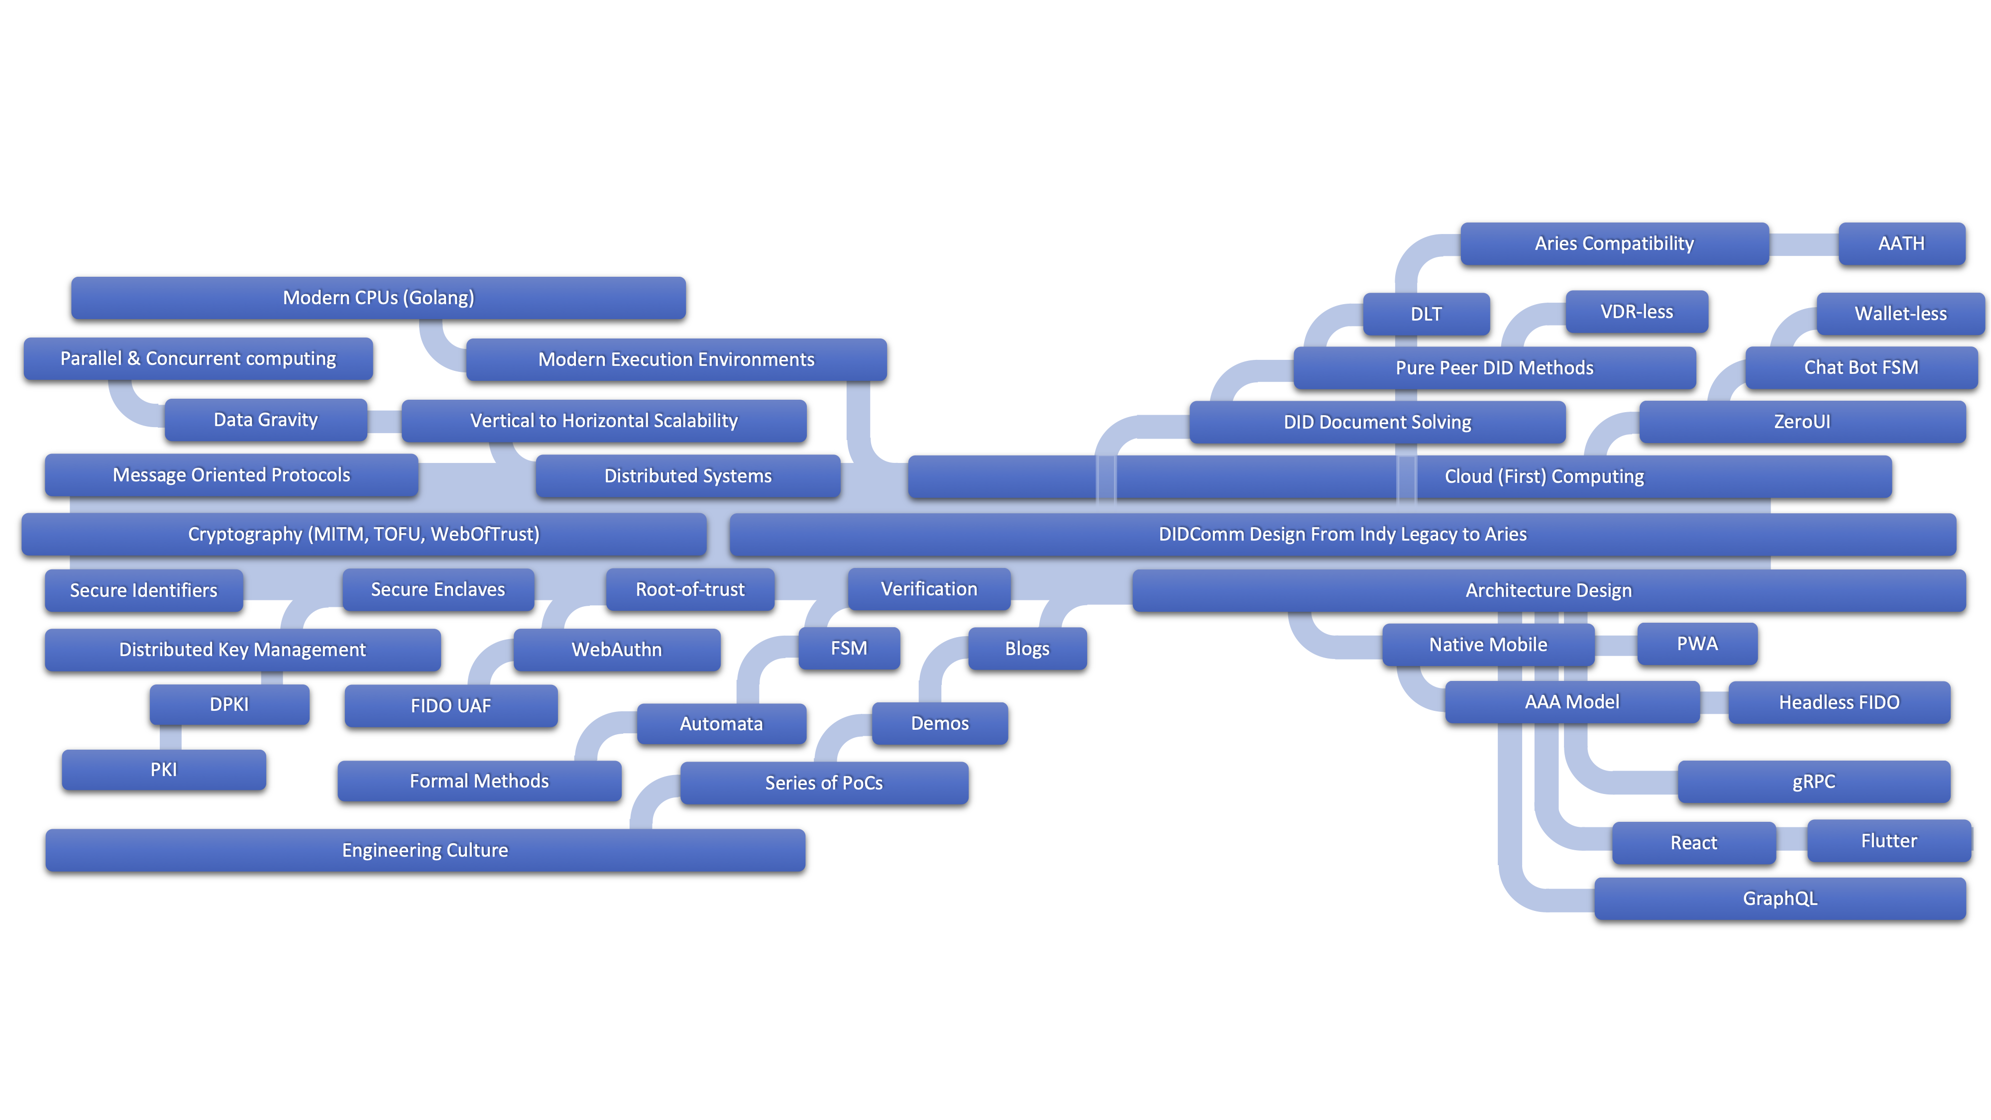
Our Technology Tree - Travelogue
Changing any foundation could be an enormous task, especially when a broad spectrum of technologies is put together. (Please see the picture above). Fortunately, we have taken care of this type of a need early in the design when the underlying foundation, Indy SDK is double wrapped:
- We needed a Go wrapper for
libindyitself, i.e. language wrapping. - At the beginning of the
findy-agentproject, we tried to find agent-level concepts and interfaces for multi-tenant agency use, i.e. conceptual wrapping.
This post is peculiar because I’m writing it up front and not just reporting something that we have been studied and verified carefully.
“I am in a bit of a paradox, for I have assumed that there is no good in assuming.” - Mr. Eugene Lewis Fordsworthe
I’m still writing this. Be patient; I’ll try to answer why in the following chapters.
Who Should Read This?
You should read this if:
You are considering jumping on the SSI/DID wagon, and you are searching good technology platform for your SSI application. You will get selection criteria and fundamentals from here.
You are in the middle of the development of your own platform, and you need a concrete list of aspects you should take care of.
You are currently using Indy SDK, and you are designing your architecture based on Aries reference architecture and its shared libraries.
You are interested to see the direction the
findy-agentDID agency core is taking.
Indy SDK Is Obsolete
Indy SDK and related technologies are obsolete, and they are proprietary already.
We have just reported that our Indy SDK based DID agency is AIP 1.0 compatible, and everything is wonderful. How in the hell did Indy SDK become obsolete and proprietary in a month or so?
Well, let’s start from the beginning. I did write the following on January 19th 2022:
Indy SDK is on the sidetrack from the DID state of the art.
Core concepts as explicit entities are missing: DID method, DID resolving, DID Documents, etc.
Because of the previous reasons, the API of Indy SDK is not optimal anymore.
libindyis too much framework than a library, i.e. it assumes how things will be tight together, it tries to do too much in one function, or it doesn’t isolate parts like ledger from other components like a wallet in a correct way, etc.Indy SDK has too many dynamic library dependencies when compared to what those libraries achieve.
The Problem Statement Summary
We have faced two different but related problems:
- Indy SDK doesn’t align with the current W3C and Aries specifications.
- The W3C and Aries specifications are too broad and lack clear focus.
DID Specifications
I cannot guide the work of W3C or Aries, but I can participate in our own team’s decision making, and we will continue on the road where we’ll concentrate our efforts to DIDComm, which will mean that we’ll keep the same Aries protocols implemented as we have now, but with the latest DID message formats:
- DID Exchange to build a DIDComm connection over an invitation or towards public DID.
- Issue Credential to use a DIDComm connection to issue credentials to a holder.
- Present Proofs to present proof over a DIDComm connection.
- Basic Message to have private conversations over a DIDComm connection.
- Trust Ping to test a DIDComm connection.
Keeping the same protocol set might sound simple, but unfortunately, it’s not because
Indy SDK doesn’t have, e.g. a concept for DID Method. At the end of the January
2022, no one has implemented the did:indy method either, and its specification is
still in work-in-progress.
The methods we’ll support first are did:peer and did:key. The first is
evident because our current Indy implementation builds almost identical pairwise
connections with Indy DIDs. The did:key method replaces all public keys in
DIDComm messages. It has other use as well.
The did:web method is probably the next. It gives us an
implementation baseline for the actual super DID Method
did:onion.
In summary, onion routing gives us a new transport layer (OSI
L4).
We all know how difficult adding security and privacy to the internet’s (TCP/IP) network layers are (DNS, etc.). But replacing the transport layer with a new one is the best solution. Using onion addresses for the DID Service Endpoints solves routing in own decoupled layer which reduces complexity tremendously.

“In some sense IP addresses are not even meaningful to Onion Services: they are not even used in the protocol.” - Onion Services
Indy SDK Replacement
Indy SDK is obsolete and proprietary. It’s not based on the current W3C DID core concepts. That makes it too hard to build reasonable solutions over Indy SDK without reinventing the wheel. We have decided to architect the ideal solution first and then make the selection criteria from it. With the requirements, we start to select candidates for our crypto libraries.
We don’t want to replace Indy SDK right away. We want to keep it until we don’t need it anymore. When all parties have changed their verified credential formats according to the standard, we decide again if we can drop it.
Putting All Together
We described our problems in the problem statement summary. We will put things together in the following chapters and present our problem-solving strategy.
First, we need to align our current software solution to W3C specifications. Aries protocols are already covered. Secondly, we need to find our way for specification issues like selecting proper DID methods to support.
The missing (from Indy SDK) DID core concepts: DID, DID document, DID method, DID resolving, will be the base for our target architecture. The following UML
diagram presents our high-level conceptual model of these concepts and
their relations.

Agency DID Core Concepts
The class diagram shows that DIDMethodBase is a critical abstraction because
it hides implementation details together with the interfaces it extends. Our
current agent implementation uses factory pattern with new-by-name, which
allows our system to read protocol streams and implicitly create native Go objects.
That has proven to be extremely fast and programmer-friendly. We will use
a similar strategy in our upcoming DID method and DID resolving solutions.
Resolving
The following diagram is our first draft of how we will integrate DID document resolving to our agency.

Agency DID Core Concepts
The sequence diagram is a draft where did:key is solved. The method is solved
by computation. It doesn’t need persistent storage for DID documents. However,
the drawing still illustrates our idea to have one internal resolver (factory)
for everything. That gives many advantages like caching, but it also
keeps things simple and testable.
Building Pairwise – DID Exchange
You can have an explicit invitation (OOB) protocol or you can just have a public DID that implies an invitation just by existing and resolvable the way that leads service endpoints. Our resolver handles DIDs and DID documents and invitations as well. It’s essential because our existing applications have proven that a pairwise connection is the fundamental building block of the DID system.
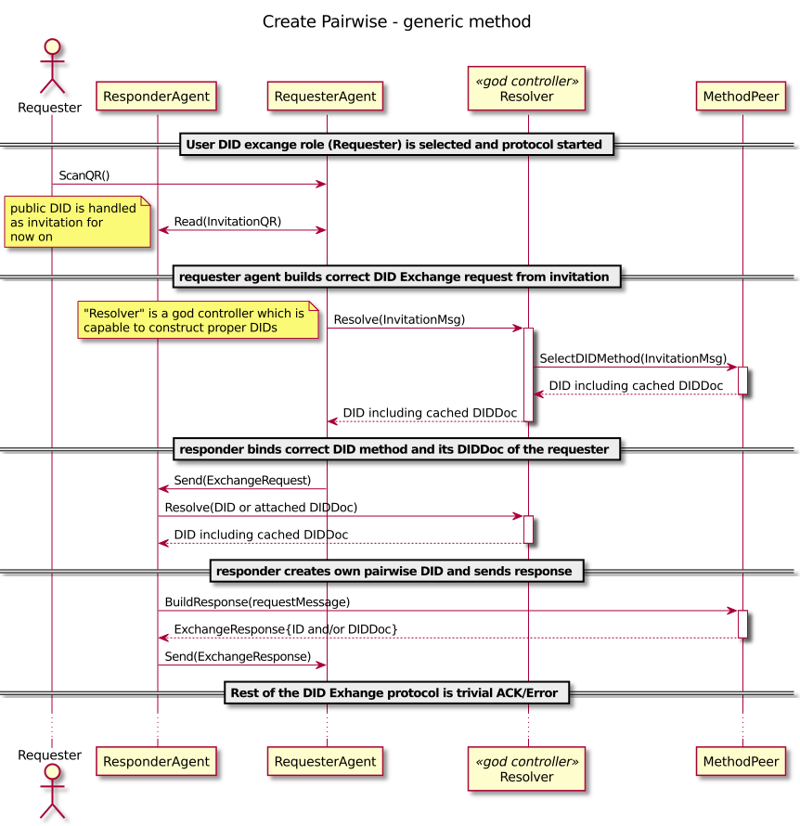
Agency DID Core Concepts
We should be critical just to avoid complexity. If the goal is to reuse existing pairwise (connection), and the most common case is a public website, should we leave that for public DIDs and try not to solve by invitation? When public DIDs would scale and wouldn’t be correlatable, we might be able to simplify invitations at least? Or, should we think if we really need connectable public DIDs? Or maybe we don’t need both of them anymore, just another?
Our target architecture helps us to find answers to these questions. It also allows us to keep track of non-functional requirements like modifiability, scalability, security, privacy, performance, simplicity, testability. These are the most important ones, and everyone is equally important to us.
Existing SDK Options?
Naturally, Indy SDK is not the only solution for SSI/DID. When the Aries project and its goals were published, most of us thought that replacing SDKs for Indy would come faster. Unfortunately, that didn’t happen, and there are many reasons for that.
Building software has many internal ’ecosystems’ mainly directed by programming languages. For instance, it’s unfortunate that gophers behave like managed language programmers and rarely use pure native binary libraries because we lose too many good Go features. For example, we would have compromised in super-fast builds, standalone binaries, broad platform support, etc. They might sound like small things, but they aren’t. For example, the container image sizes for standalone Go binaries are almost the same as the original Go binary.
It is easier to keep your Go project only written in Go. Just one ABI library usage would force you to follow the binary dependency tree, and you could not use standalone Go binary. If you can find a module just written in Go, you select that even it would be some sort of a compromise.
That’s been one reason we have to build our own API with gRPC. That will offer the best from both worlds and allow efficient polyglot usage. I hope others do the same and use modern API technologies with local/remote transparency.
We Are Going To Evaluate AFGO
Currently, the Aries Framework Go seems to be the best evaluation option for us because:
- It’s written in Go, and all its dependencies are native Go packages.
- It follows the Aries specifications by the book.
Unfortunately, it also has the following problems:
It’s is a framework which typically means all or nothing, i.e. you have to use the whole framework because it takes care of everything, and it only offers you extension points where you can put your application handlers. A framework is much more complex to replace than a library.

Difference Between Library and Framework - The Blog Post
Its protocol state machine implementation is not as good as ours:
It doesn’t fork protocol handlers immediately after receiving the message payload.
It doesn’t offer a 30.000 ft view to machines, i.e. it doesn’t seem to be declarative enough.
It has totally different concepts than we and Indy SDK have for the critical entities like DID and storage like a wallet. Of course, that’s not necessarily a bad thing. We have to check how AFGO’s concepts map to our target architecture.
During the first skimming of the code, a few alarms were raised primarily for the performance.
We will try to wrap AFGO to use it as a library and produce an interface that we can implement with Indy SDK and AFGO. This way, we can use our current core components to implement different Aries protocols and even verifiable credentials.
Our agency has bought the following features and components which we have measured to be superior to other similar DID solutions:
- Multi-tenancy model, i.e. symmetric agent model
- Fast server-side secure enclaves for KMS
- General and simple DID controller gRPC API
- Minimal dependencies
- Horizontal scalability
- Minimal requirements for hardware
- Cloud-centric design
We really try to avoid inventing the wheel, but with the current knowledge, we cannot switch to AFGO. Instead, we can wrap it and use it as an independent library.
Don’t call us, we’ll call you. - Hollywood Principle
We will continue to report our progress and publish the AFGO wrapper when ready. Stay tuned, folks, something extraordinary is coming!
The Missing Network Layer Model
The W3C’s DID Specification is flawed without the network layer model.
You might think that I have lost my mind. We have just reported that our Indy SDK based DID agency is AIP 1.0 compatible, and everything is wonderful. What’s going on?
Well, let’s start from the beginning. I did write the following list on January 19th 2022:
Indy SDK doesn’t align the current W3C and Aries specifications.
- Core concepts (below) as explicit entities are missing: DID method, DID resolving, DID Documents, etc.

DID Concepts - www.w3.org
No one in the SSI industry seems to be able to find perfect focus.
There are too few solutions running in production (yes, globally as well) which would give us needed references to drive a good design from.
Findings during our study of SSI/DID and others in the industry.
We don’t need a ledger to solve self-certified identities.
We don’t need human memorable identifiers. (memorable \(\ne\) meaningful \(\ne\) typeable \(\ne\) codeable)
We rarely need an identifier just for referring but we continuously need self-certified identifiers for secure communication: should we first fully solve the communication problem and not the other way around?
Trust always seems to lead back to a specific type of centralization. There are many existing studies like web-of-trust that should at least take in a review. Rebooting Web-of-Trust is an excellent example of that kind of work.
We must align the SSI/DID technology to the current state of the art like Open ID and federated identity providers. Self-Issued OpenID Provider v2 the protocol takes steps in the right direction and will work as a bridge.
W3C DID Specification Problems
Now, February 20th 2022, the list is still valid, but now, when we have dug deeper, we have learned that the DID W3C “standard” has its flaws itself.
It’s far too complex and redundant – the scope is too broad.
There should not be so many DID methods. “No practical interoperability.” & “Encourages divergence rather than convergence.”
For some reason, DID-core doesn’t cover protocol specifications, but protocols are in Aries RFCs. You’ll face the problem in the DID peer method specification.
It misses layer structures typical for network protocols. When you start to implement it, you notice that there are no network layers to help you to hide abstractions. Could we have OSI layer mappings or similar at least? (Please see the chapter The Missing Layer - Fixing The Internet)
Many performance red flags pop up when you start to engineer the implementation. Just think about tail latency in DID resolving and you see it. Especially if you think the performance demand of the DNS. The comparison is pretty fair.
No Need For The Ledger
The did:onion method is currently the only straightforward way to build
self-certified public DIDs that cannot be correlated. The did:web is
analogue, but it doesn’t offer privacy as itself. However, it provides privacy
for the individual agents through herd privacy if DID specification doesn’t
fail in it.
Indy stores credential definitions and schemas to the ledger addition to public DIDs. Nonetheless, when verifiable credentials move to use BBS+ credential definitions aren’t needed and schemas can be read, e.g. from schema.org. Only those DID methods need a ledger that is using a ledger as public DID’s trust anchor and source of truth.
What Is A Public DID?
It’s a DID who’s DIDDoc you can solve without an invitation.
The did:key is superior because it is complete. You can compute (solve) a DID
document by receiving a valid DID key identifier. No third party or additional
source of truth is needed. However, we cannot communicate with the did:key’s
holder because the DIDDoc doesn’t include service
endpoints. So, there is no one
listening and nothing to connect to.
Both did:onion’s and did:web’s DIDDocs can include service endpoints because
they can offer the DID document by their selves from their own servers. We must
remember that the DID document offers verification
methods which can be used
to build the actual cryptographic
trust.
How To Design Best Agency?
How to do it right now when we don’t have a working standard or de facto specifications? We have thought that for a long time, over three years for now.
I have thought and compared SSI/DID networks and solutions. I think we need to have a layer model similar to the OSI network model to handle complexity. Unfortunately, the famous trust-over-IP picture below isn’t the one that is missing:
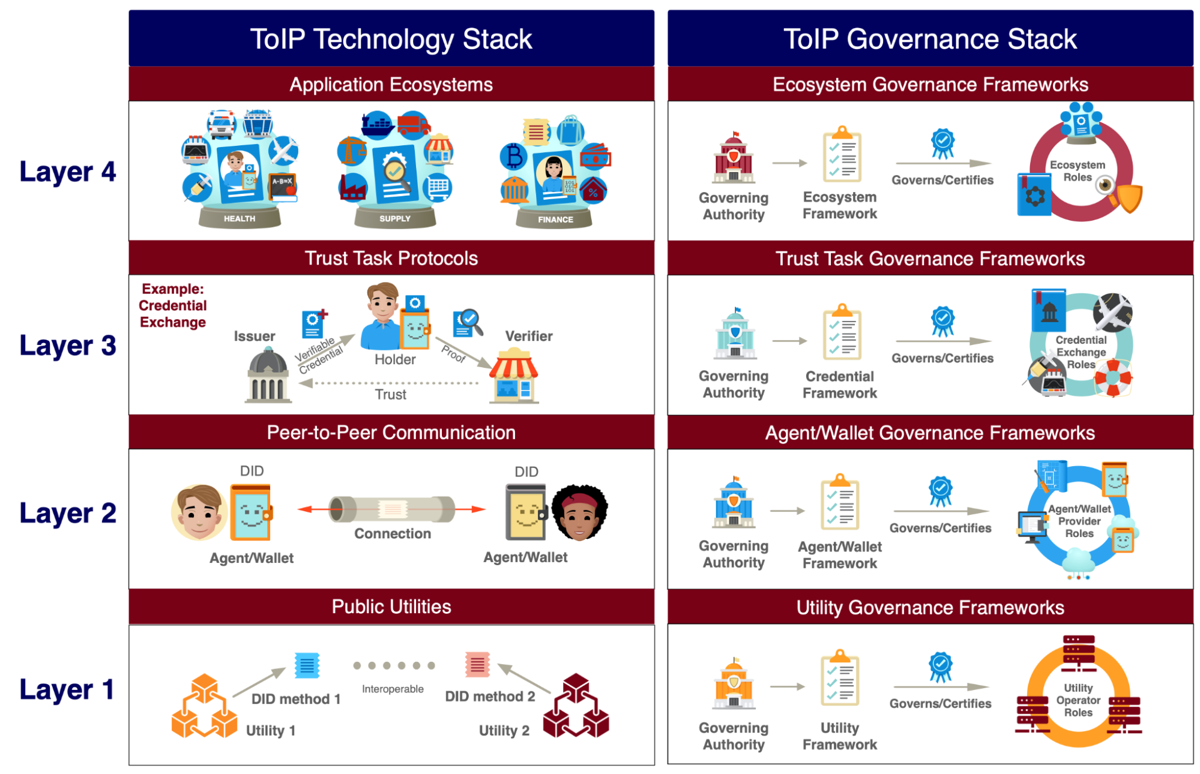
ToIP Stacks
Even though the ToIP has a layer model, it doesn’t help us build technical solutions. It’s even more unfortunate that many in the industry think that it’s the network layer model when it’s not. It’s been making communication between different stakeholders difficult because we see things differently, and we don’t share common ground detailed enough.
Luckily, I found a blog post which seems to be the right one, but I didn’t find any follow-up work. Nonetheless, we can use it as a reference and proof that there exists this kind of need.
The following picture is from the blog post. As we can see, it includes problems, and the weirdest one is the missing OSI mapping. Even the post explains how vital the layer model is for interoperability and portability. Another maybe even more weird mistake is mentioning that layers could be coupled when the whole point of layered models is to have decoupled layers. Especially when building privacy holding technology, it should be evident that there cannot be leaks between layers.
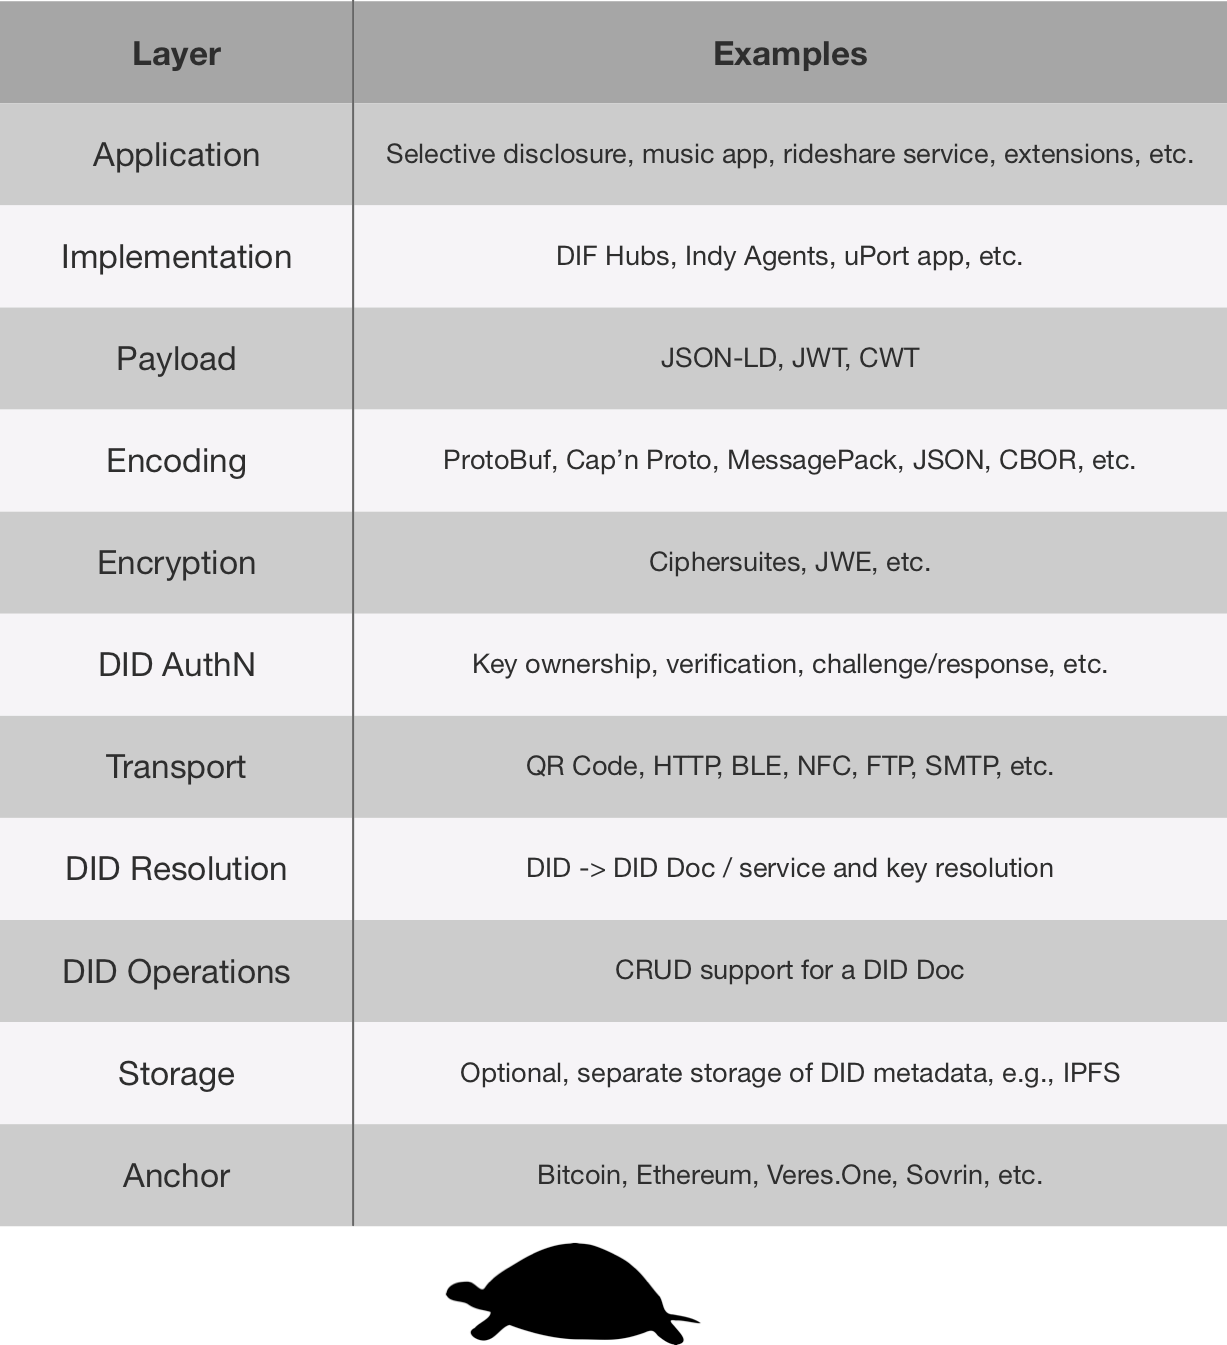
The Self-sovereign Identity Stack - The Blog Post
The Missing Layer - Fixing The Internet
The following picture illustrates mappings from the OSI model through protocols to TCP/IP model.
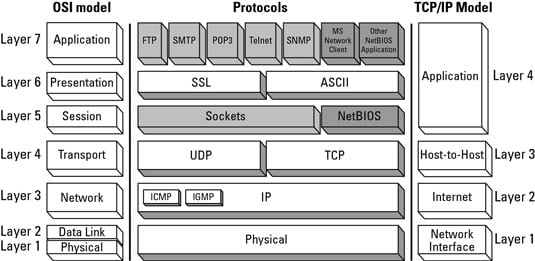
We all know that the internet was created without security and privacy, and still, it’s incredibly successful and scalable. From the layer model, it’s easy to see that security and privacy solutions should be put under the transport layer to allow all of the current applications to work without changes. But it’s not enough if we want to have end-to-end encrypted and secure communication pipes.
We need to take the best of both worlds: fix as much as possible, as a low layer as you can one layer at a time.
Secure & Private Transport Layer
There is one existing solution, and others are coming:
I know that Tor has its performance problems, etc., but the point is not about that. The point is to which network layer should handle secure and private transport. It’s not DIDComm, and it definitely isn’t implemented as statical routing like currently in DIDComm. Just think about it: What it means when you have to change your mediator or add another one, and compare it to current TCP/IP network? It’s a no-brainer that routing should be isolated in a layer.
The following picture shows how OSI and TCP/IP layers map. It also shows one possibility to use onion routing instead on insecure and public TCP/IP routing for DID communication.
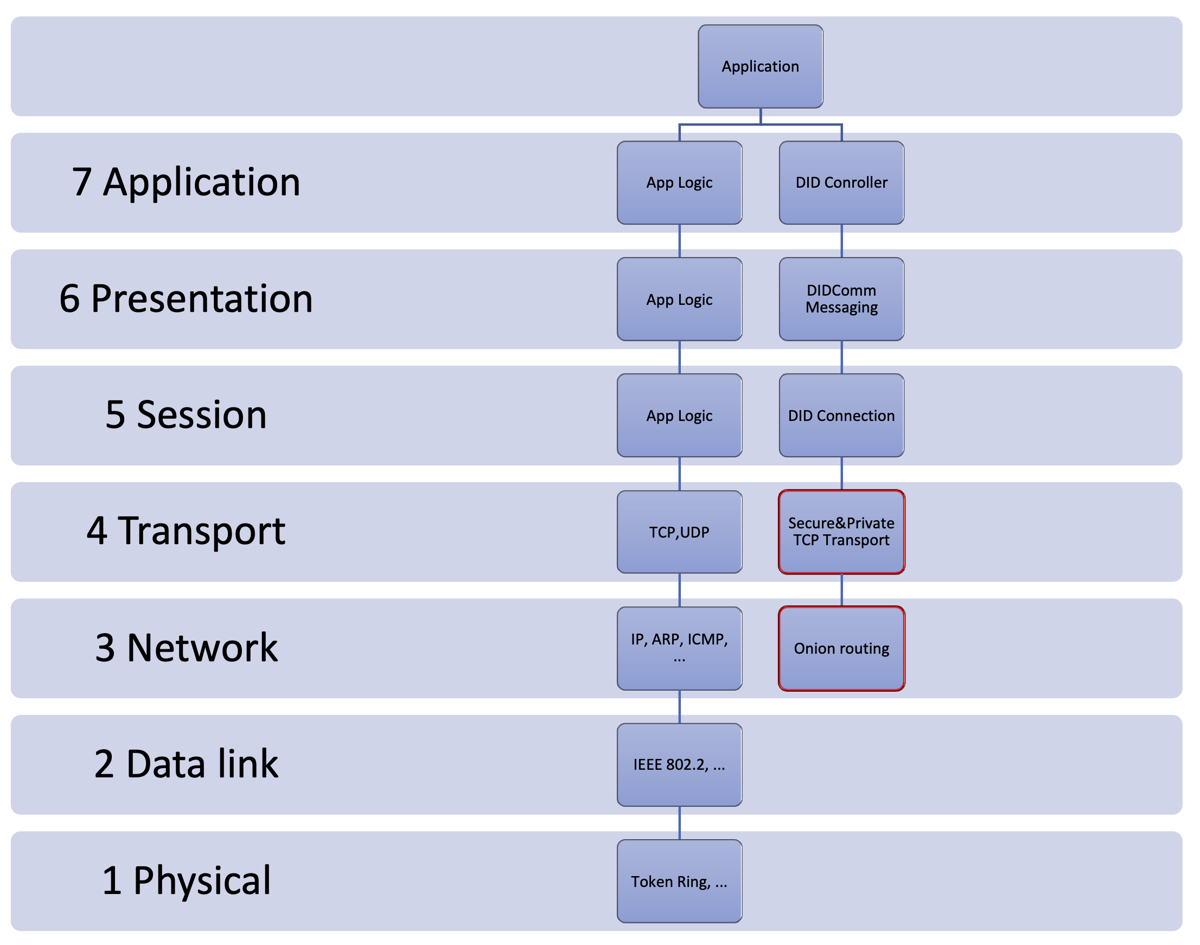
DID Communication OSI Mapping
The solution is secure and private, and there aren’t no leaks between layers which could lead to correlation.
Putting All Together
The elephant is eaten one bite at a time is a strategy we have used
successfully and continue to use here. We start with missing core
concepts: DID, DID document, DID method, DID resolving. The following
UML diagram present our high-level conceptual model of these concepts and their
relations.
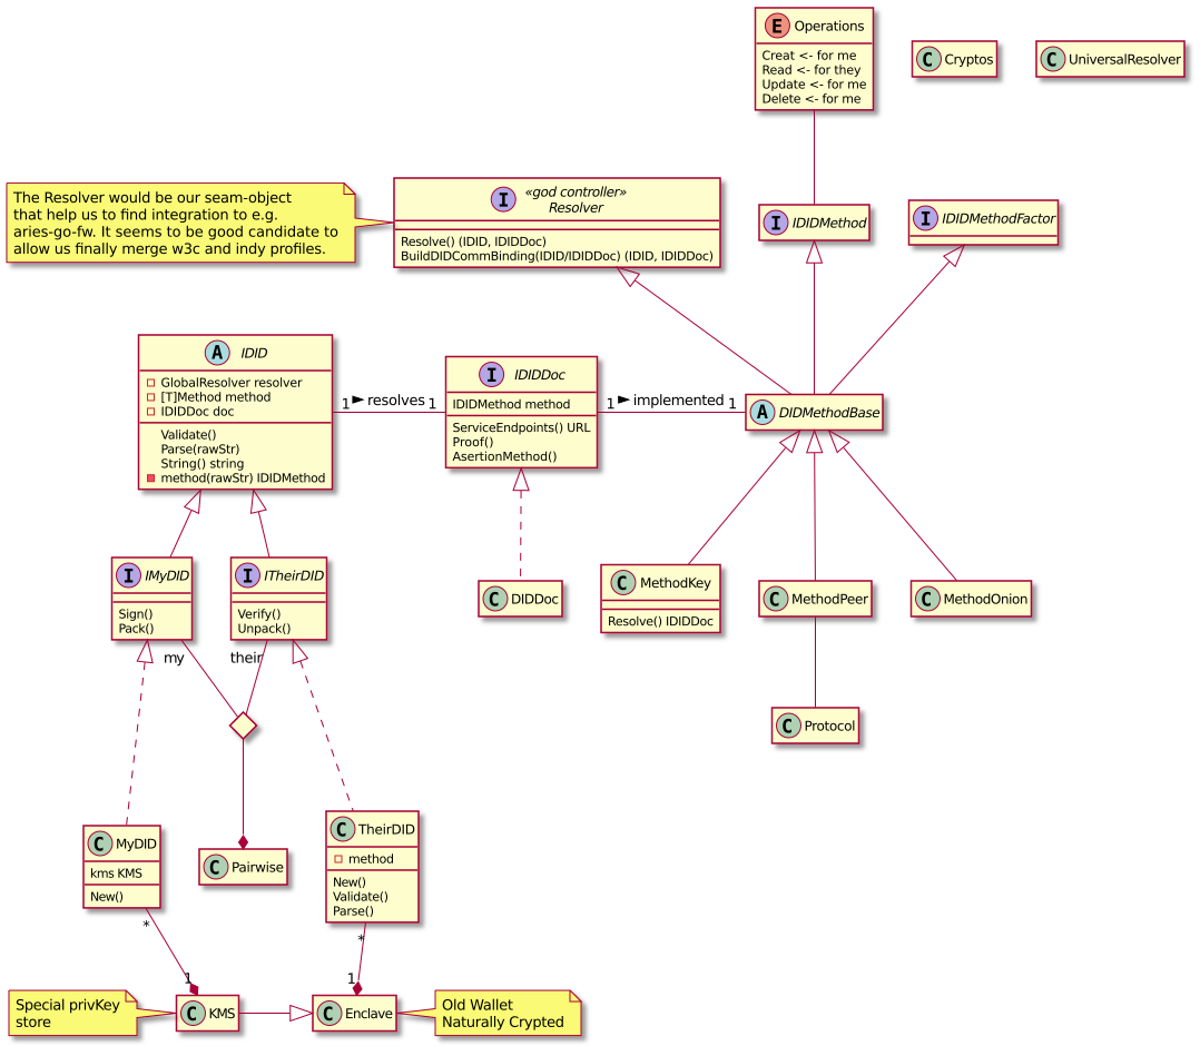
Agency DID Core Concepts
Because current DID specification allows or supports many different DID Methods we have to take care of them in the model. It would be naive to think we could use only external DID resolver and delegate DIDDoc solving. Just for think about performance, it would be a nightmare, security issues even more.
Replacing the Indy SDK
We will publish a separate post about replacing Indy SDK or bringing other Aries solutions as a library. What the basic strategy will be is decided during the work. We’ll implement new concepts and implement only these DID methods during the process:
- DID Key, needed to replace public key references, and it’s usable for many other purposes as well.
- DID Peer, building pairwise connection is a foundation to DIDComm. However,
we are still figuring out the proper implementation scope for
the
did:peer. - DID Web and Onion, it seems that this is an excellent transition method towards
more private and sovereign
did:onionmethod.
Stay tuned. The following blog post is coming out in a week.
Fostering Interoperability
Different services have different requirements and technical stacks; there are also multiple ways to implement the Aries agent support in an application. Some projects choose to rely on an Aries framework of a specific language and bundle the functionality within the service. Others might run the agent as a separate service or, as in the case of Findy Agency, as an agency that serves multiple clients.
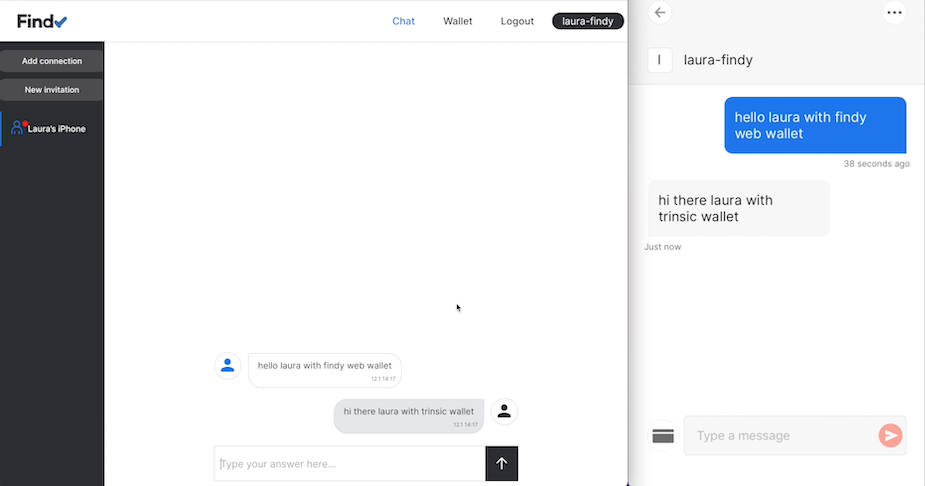
Sending Aries basic messages between wallets from different technology stacks. See full demo in YouTube.
Interoperability is a crucial element when we think about the adaptation and success of the Aries protocol. Even though the agent software might fulfill all the functional requirements and pass testing with use cases executed with a single agent technology stack, the story ending might be different when running the cases against another agent implementation. How can we then ensure that the two agents built with varying technology stacks can still work together and reach the same goals? Interoperability testing solves this problem. Its purpose is to verify that the agent software complies with the Aries protocol used to communicate between agents.
Aries Interoperability Testing
Interoperability considerations came along quite early to the protocol work of the Aries community. The community faced similar challenges as other technical protocol developers have faced over time. When the number of Aries protocols increases and the protocol flows and messages are updated as the protocols evolve, how can the agent developers maintain compatibility with other agent implementations? The community decided to take Aries Interoperability Profiles (AIPs) in use. Each AIP version defines a list of Aries RFCs with specific versions. Every agent implementation states which AIP version it supports and expects other implementations with the same version support to be compatible.
To ensure compatibility, the community had an idea of a test suite that the agent developers could use to make sure that the agent supports the defined AIP version. The test suite would launch the agent software and run a test set that measures if the agent under test behaves as the specific protocol version requires. The test suite would generate a report of the test run, and anyone could then easily compare the interoperability results of different agents.
At first, there were two competing test suites with different approaches to execute the tests. Aries Protocol Test Suite (APTS) includes an agent implementation that interacts with the tested agent through the protocol messages. On the other hand, Aries Agent Test Harness (AATH) runs the tests operating the agent-client interface. This approach makes it possible to measure the compatibility of any two agent implementations. AATH seems to be the winning horse of the test suite race. Its test suite includes several test cases and has extensive reporting in place.
Aries Agent Test Harness
Aries Agent Test Harness provides a BDD (behavioral driven) test execution engine and a set of tests derived from Aries RFCs. The aim is to run these tests regularly between different Aries agents (and agent frameworks) to monitor the compatibility score for each combination and catch compatibility issues.
Harness operates the agents under test through backchannels. Backchannel is a REST interface defined by an OpenAPI definition, and its purpose is to pass the harness requests to the agents. The target is to handle the agent as a black box without interfering with the agent’s internal structures. Thus, the backchannel uses the agent’s client interface to pass on the harness requests.
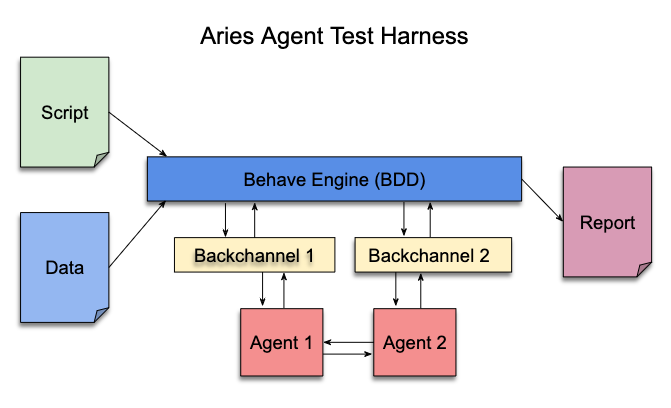
Harness utilizes Docker containers for testing. It launches a container based on a required agent image for each test scenario actor during the test run. Before the test run, one needs to build a single image containing all the needed agent services and the backchannel. The recipes for making each of the different agent images, i.e., Dockerfiles with the needed scripts, are stored in the AATH repository. The same repository also contains CI scripts for executing the tests regularly and generating an extensive test report site.
Interoperability for Findy Agency
One of our main themes for 2H/2021 was to verify the Aries interoperability level for Findy Agency. When I investigated the Aries interoperability tooling more, it became evident that we needed to utilize the AATH to accomplish the satisfactory test automation level.
My first task was to create a backchannel for the harness to operate Findy Agency-hosted agents. Backchannel’s role is to convert the harness’s REST API requests to Findy Agency gRPC client interface. Another challenge was to combine the agency microservices into a single Docker image. Each agency microservice runs in its dedicated container in a regular agency deployment. For AATH, I needed to bundle all of the required services into a single container, together with the backchannel.
Once the bundle was ready, I made a PR to the AATH repository to include Findy Agency in the Aries interoperability test set. We decided to support AIP version 1.0, but leave out the revocation for now. Tests exposed some essential but mainly minor interoperability issues with our implementation, and we were able to solve all of the found problems quite swiftly. The tests use the latest Findy Agency release with each test run. One can monitor the test results for Findy Agency on the test result site.
Test result snapshot from Aries test reporting site
In addition to interoperability testing, we currently utilize the AATH tooling for our functional acceptance testing. Whenever PR gets merged to our agency core repository that hosts the code for Aries protocol handlers, CI builds an image of the code snapshot and runs a partial test set with AATH. The testing does not work as a replacement for unit tests but more as a last acceptance gate. The agency core runs in the actual deployment Docker container. The intention is to verify both the successful agency bootup and the functionality of the primary protocol handlers. This testing step has proven to be an excellent addition to our test repertoire.
Manual Tests
Once the interoperability test automation reached an acceptable level, my focus moved to actual use cases that I could execute between the different agents.
My main interests were two wallet applications freely available in the app stores, Lissi Wallet and Trinsic Wallet. I was intrigued by how Findy Agency-based applications would work with these identity wallets. I also wanted to test our Findy Agency web wallet with an application from a different technology stack. BCGov provides a freely available test network that both wallet applications support, so it was possible to execute the tests without network-related hassle.
Manual test setup
I executed the following tests:
Test 1: Findy Agency based issuer/verifier with Lissi Wallet
A Findy Agency utilizing issuer tool invites Lissi Wallet to form a pairwise connection. Issuer tool sends and verifies a credential with Lissi Wallet.
Test 2: Findy Agency Web Wallet with Trinsic Wallet
Findy Agency Web Wallet user forms a pairwise connection with Trinsic Wallet user. Wallet applications send Aries basic messages to each other.
Test 3: ACA-Py based issuer/verifier with Findy Agency Web Wallet
Aries Test Harness runs ACA-Py-based agents that issue and verify credentials with Findy Agency Web Wallet.
The practical interoperability of Findy Agency also seems to be good, as proven with these manual tests. You can find the video of the test screen recording on YouTube.
Next Steps
Without a doubt, Aries interoperability will be one of the drivers guiding the development of Findy Agency also in the future. With the current test harness integration, the work towards AIP2.0 is now easier to verify. Our team will continue working with the most critical Aries features relevant to our use cases. We also welcome contributions from others who see the benefit in building an OS world-class enterprise-level identity agency.
Anchoring Chains of Trust
You will notice a repetitive pattern once you start to play with public-key cryptography. Everything is about chains, or more precisely about the links in the chain. You build these links with public/private key pairs. Links are unidirectional, which means that if you must link or point both ways, you need to have two key pairs, one for each direction.
Crypto Chain with Authenticator
In this blog post, we talk mostly about protocols built with asymmetric key pairs, but we can build immutable data structures like Merkle trees and blockchains with one-way functions as well. We will return to these data types in future posts by building something interesting to replace general ledgers as DID’s VDR.
Crypto Chain Protocols
We all know that the connection protocols should cover all security issues, but protocols based on public-key cryptography might not be so obvious public key, you know? There are known subjects with protocols based on asymmetric cryptography like trust-on-first-use.
MITM - Wikipedia
It’s trivial to execute MITM attack if we cannot be sure that the public key source is the one it should be. The industry has developed different ways to make sure that presented details are valid. That lays down one of the most fundamental aspects of modern cryptographic systems – chain of trust.

PKI Chain of trust - Wikipedia
It is essential to understand that most of the modern security protocols use public-key cryptography only for authentication and switch to symmetric keys during the data transfer for performance reasons. The famous example of this kind of protocol is Diffie-Hellman where the shared secret (the symmetric key) is transported over public network.
The DIDComm protocol is something that is not used only for authentication but communication without sacrificing privacy. My prediction is that the current message-oriented DIDComm protocol as a holistic transport layer is not enough. The ongoing DIDComm V2 mentions potential other protocols like DIDComm Stream, DIDComm Multicast, and so forth, but that will not be an easy task because of the current routing model, and especially because of the privacy needs. That has been one reason we have focused our efforts on finding a solution that would scale for all modern needs of transporting data and keeping individuals private. For that, our cloud agency is a perfect candidate.
Symmetry vs Asymmetry in Protocols
Before we go any further with DIDComm, let’s think about what it means to have an asymmetric protocol. We know the differences between symmetric and asymmetric cryptography. Let’s focus on communication, i.e. how we transport keys during the protocol.
Asymmetric protocol means that Bob can trust Alice when Alice have given her public key to Bob, and Bob can be sure that it’s Alice whose key he has received.
Every time Bob needs to authenticate Alice, he asks Alice to sign something with her private key. To make it crystal-clear, cryptographically, we can be only sure that it’s Alice who (still) controls the private key.
We could achieve symmetry only by that Alice has Bob’s public key as well. Now Alice can ask Bob to sign something for the authenticity of Bob.
Why is this important? There are several reasons for that, but the most crucial reason is the root-of-trust model. The last link in the crypto chain doesn’t need to be bidirectional, because the last private key is the cryptographic root-of-trust, i.e. it’s passive. It doesn’t need authentication from the referrer. It’s like grounding in electronics.
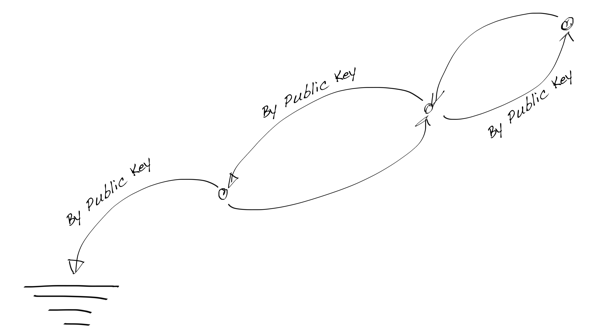
Crypto Chain with Grounding
DID Concepts
The DID’s controller is an essential piece of the puzzle. It defines who is the entity in the analogue world, i.e. who owns the DID cryptographically. As long as we stay in a digital world, it is easiest to bind the controller to its DID is by using public-key cryptography. The one who has DID controller’s private key is the actual controller.
For instance, an essential thing for SSI is a DID pairwise, i.e. a secure connection between two DIDs or DID services. Unfortunately, W3C’s specifications don’t underline that enough. Probably because it concentrates on external properties of DIDs and how the presented specification can implement different methods. But DIDs cannot work on their own properly. They need to have a controller, and in Aries, they have agents as well. Also, DIDs doesn’t always present the entity they are pointing, should I say, alone. DIDs present a subject. A subject like an IoT device can have many different DIDs for many different contexts.
DID Concepts - www.w3.org
In the digital world, it is expected that a controller has its controller, which has its controller, etc. When public-key cryptography is used to verify this controlling structure, it’s a chain with its root, the final private key, i.e. the root-of-trust.
DIDComm Protocols
The following drawing describes a common installation scenario where an agency based DID controller (leftmost) is implemented as verifiable automata (Finite State Machine) and it’s controlling the DID in the agency. At the right, there is conventional Edge Agent running in a mobile device that needs a mediator to help the agent is accessible from the network.
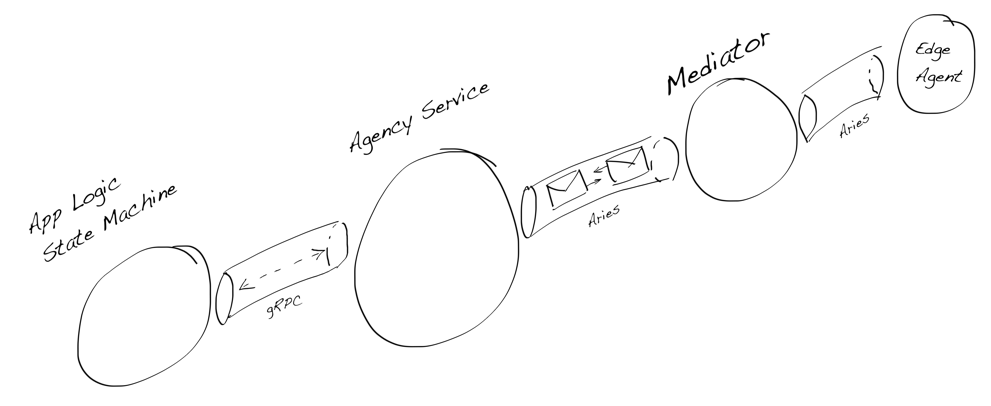
DIDComm Installation Example
As we can see in the drawing below, there are many different crypto chains in the current installation. During the study, we were most interested in the question: what is the best way to implement the root-of-trust for the DID managed by the multi-tenant agency. Now we have found the answer. Luckily it existed already.
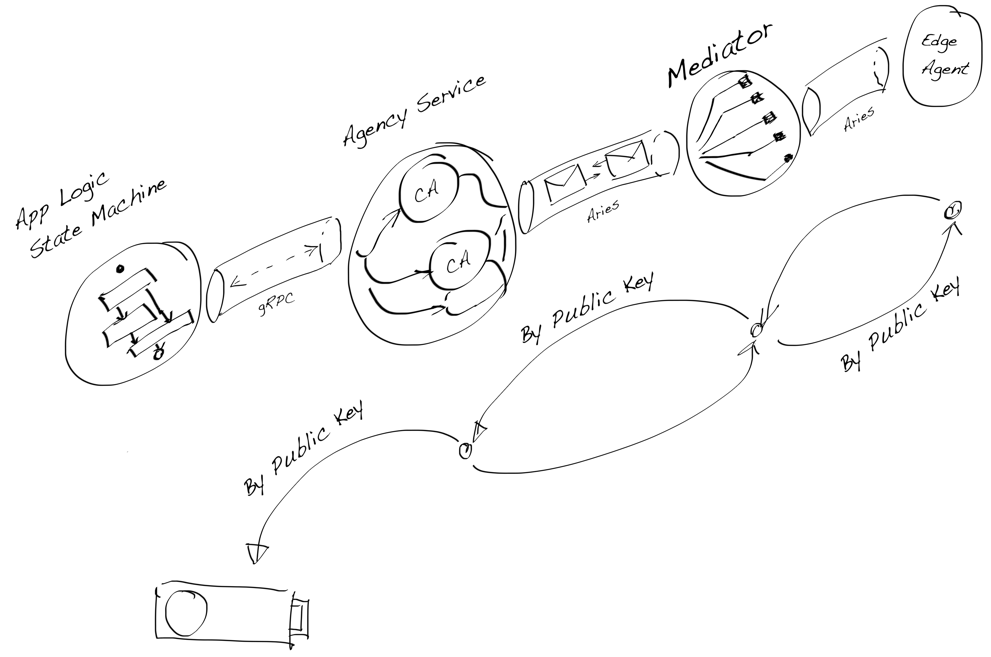
DIDComm Installation Example and Crypto Chain
FIDO2 Authentication
When we started to understand that the DIDComm protocol chain is not symmetric to all directions. Or, more precisely, when we understood that there must be one core agent for each identity domain and from that core or root agent, you should refer to multiple separated authenticators.
Let’s see what it means to have separate authenticators. The following drawing illustrates an oldish and problematic way of implementing, e.g. password manager, DID controller, SSI Edge Agent, etc.
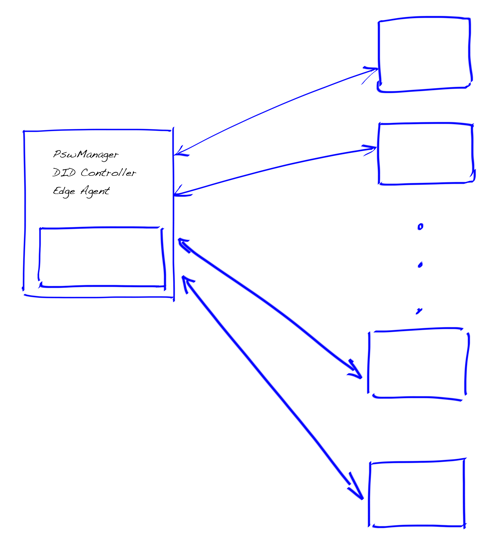
Integrated Secure Enclave
That is how we first thought our edge agent implementation where the mobile device’s secure element was felt as a cryptographic root-of-trust for an identity domain that can be individual, organization, etc. However, that leads to many unnecessary problems in protocol implementation. Most importantly, to which part of the end-to-end protocol we should implement the use cases like:
- I want to use my identity domain from iPhone, iPad, etc. same time.
- I want to have a ‘forget password’ -type recovery option (by doing nothing)
- I want to handle my identity domain’s keys easily. More precisely, I don’t want to know public-key cryptography is used under the hood
- I want to have automatic backups and recovery
If we think about the drawing above, it’s easy to see that the presented use cases aren’t easy to implement secure way if you have integrated a secure element to your agent in the same machine. In case you have only one integrated secure enclave for each edge agent, it’s near impossible.
When we separate the secure enclave from the identity domain’s root controller at the design level, everything seems to be set in a place as we can see in the next drawing.

Separated Secure Enclaves in Multiple Authenticators
I don’t imply that all of the other parties in the SSI/DID study scene have done or are making the same mistake we did at the beginning. My point is that treating secure elements as the root of the crypto chain only and not integrating it into the software agent or the device agent is running guided us in the right direction. That allowed us to realize that we don’t need a fully symmetric protocol to bind the controller to the agent. All we needed was the simplest possible thing, an authenticator, a trust anchor in all potential cases.
That innovation brought us a possibility to use modern existing solutions and still have an equally robust system where we have cryptographic root-of-rust.
It’s essential to understand why we had to consider this so carefully. Should it be just obvious? We must remember what kind of technology we were developing. We didn’t want to make a mistake that would lead back to centralization. For example, if we would still totally relay PKI, which is centralized, we couldn’t do that.
During the years we have studied the SSI/DID technology, we have constantly tested the architecture with these questions:
- Could this work and be safe without any help from the current PKI? (Naturally, it doesn’t mean that we couldn’t use individual protocols like TLS, etc. The infrastructure is the keyword here.)
- Can a use case or a protocol action be executed peer to peer, i.e. between only two parties? (Doesn’t still necessarily mean off-line)
Headless FIDO2/WebAuthn Authenticator
FIDO2 is the name of the standard. WebAuthn is just browser JS API to talk to the authenticators. So correct way to call your server is “FIDO2 Server” and to say “Authentication with FIDO2”. - WebAuthn Resource List
We started our tests with the new agent API by using implementing our FIDO2 server and by using only browsers at the beginning. When results, especially the performance and simplicity, were so good, we decided to go further.
The following architecture-drawing present the final deployment diagram of the overall system. The needed FIDO2 components are marked light red, and the ones we implemented ourselves are marked in red.
The basic idea was to have a system-level SSO where we implemented authorization with JWT and authentication with FIDO2 regardless of which type of the entity needs to be authenticated: individuals, organizations, legal entities, or system components. For us, it implicated that we needed FIDO2 for service agents, which meant that a headless FIDO2 Authenticator was required.
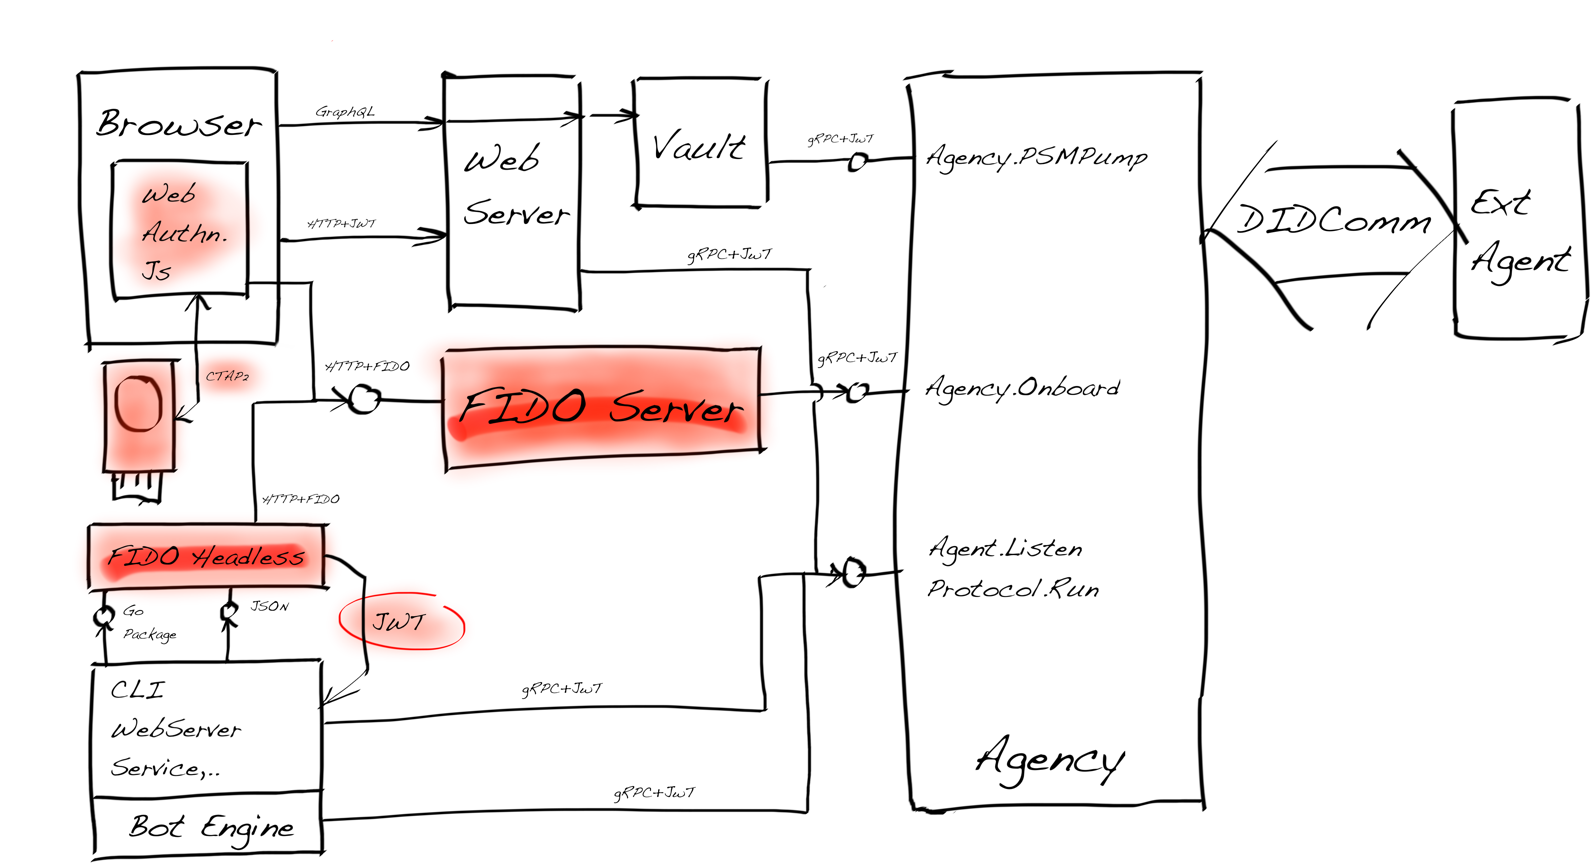
All Key Components of The System Architecture
Architectural requirements for the solution were quite complex because we wanted to have security covered, not to compromise performance, and still support polyglot development.
Polyglot Authenticator Interface
FIDO2/WebAuthn specification gives a well over a description of how main components work. Here we focus on the two most important ones. The first is the authenticator registration flow which is presented picture below.

FIDO2 Authenticator Registration - www.w3.org
To summarise, the above flow registers a new instance of an authenticator. Then it verifies that the same authenticator is bound to the account. That is done using a unique public/private key pair where the private key is in the authenticator. Note that the authenticator doesn’t map a particular user to an account. That is done thru the other process flow and by the relying party.
The flow below shows how a registered authenticator is used to authenticate the account holder.

FIDO2 Authentication - www.w3.org
The Command pattern was the perfect solution for the first authenticator implementation because it supported all of our use cases, but same time was simplest. Most straightforward to integration was naturally with a programming language it was implemented which was Go.
The second thing was to figure out how we would like to implement interprocess
communication. For that, the command pattern is suited very well. Fill the
command with all the needed data and give one of the operations we were
supporting: register and login from the FIDO2 standard. The process
communication is handled just as the process starts by reading the command from
JSON. That is suited for Node.js use as well. (For the record, my fantastic
colleague Laura did all the needed Node.js work.)
When we considered security, we followed our post-compromise principle. We didn’t (yet) try to solve the situation where someone managed to hack the server and hook a debugger to our processes without our notice. To solve that, we need TEE or similar. Our specification is ready, but before the implementation, we should think if it’s worth it, and about the use case we are implementing.
Stateless Authenticator
Because you rarely find anything that removes complexity from your implementation from security-related standards or specifications, it’s forth of mentioning: By following WebAuthn specification I did learn that I could, once again, use crypto chaining!
We knew that you would use one authenticator for many different places. That was clear, of course. But when an authenticator is used for the service or as a service, there is the next tenancy level.
Before I started to write the whole thing, I thought that I use our server-side secure enclave to store all the key pairs there and let the tenant set the enclave’s master key. It would still mean that the implementation would be state-full. From the operations’ perspective, we all know what that means: more things to take care of and manage, but most importantly, one potential scalability issue to solve.
The FIDO2 standard documentation describes a perfect solution for our needs
which made our authenticator stateless. You give the other party your public
key, but you give your private key in your credential ID. It might
first sound crazy, but it’s genius indeed.
Hold on! That cannot be?
But it is. You have to build your identifier to include your private key, but no one but you can use it because you have encrypted it with a symmetric master key. The key that no one but you controls.
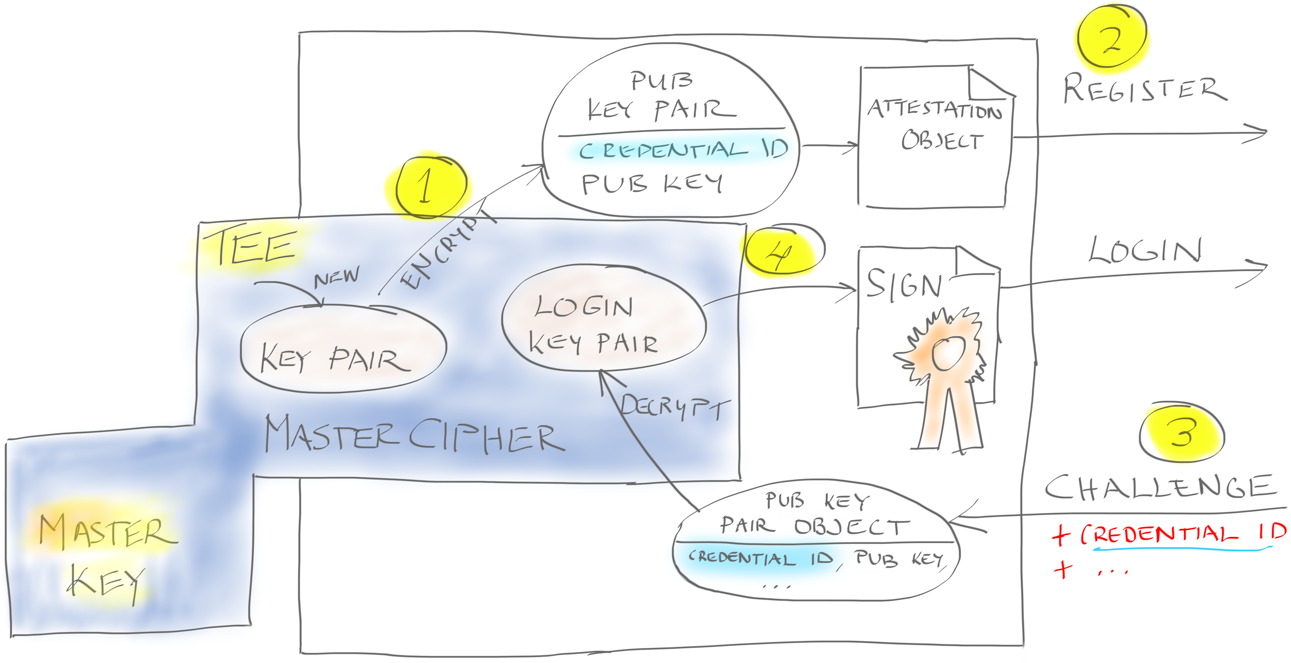
Stateless Authenticator Implementation
The draft above illustrates how our stateless FIDO2 authenticator works at a master key level. Other factors like a cloning counter and an authenticator ID are left out for simplicity.
- We can ask TEE to create a new key pair for FIDO2 registration, which gives
us a unique key pair that includes
public keyand encrypted private key, i.e.credential ID. - Our authenticator sends the FIDO2
attestation objectto the server. - When the authenticator receives the FIDO2 challenge during authentication, it builds it to the key pair in the same format as registration.
- The TEE inside the authenticator builds us the
assertion objectready to send to the FIDO2 server.
As we can see, the master key never leaves the TEE. The implementation can be done with help cloud HSM or TEE-based app; or we can implement an application with the help of AWS Nitro Enclaves or similar.
Note! This is not a good solution for a pure client-side software-based authenticator, because it needs help from the hardware, i.e. secure enclave. It’s suitable for hardware-based and certain types of server-side solutions where you can use TEE or similar solutions.
Conclusion
FIDO2 authentication is an excellent match for DID Wallet authentication. gRPC transport combined with JWT authorization has been straightforward to use. Our gRPC SDK allows you to implicitly move the JWT token during the API calls after opening the server connection. Plus, gRPC’s capability to have bidirectional streams make the programming experience very pleasant. Finally, an option is to authenticate the gRPC connection between server and client with (no PKI is needed) TLS certificates: You can authorize software components to bind to your deployment.
The SDK and the API we have built with this stack have fulfilled all our expectations:
- security
- performance
- easy to use
- solving DRY e.g. error handling
- polyglot
- cloud-ready
- micro-service friendly
And hopefully yours. Give it a try!
The Arm Adventure on Docker
Since the Findy Agency project launched, Docker has been one of our main tools to help set up the agency development and deployment environments. First of all, we use Docker images for our cloud deployment. On a new release, the CI build pipeline bundles all needed binaries to each service image. After the build, the pipeline pushes Docker images to the GitHub container registry, from where the deployment pipeline fetches them and updates the cloud environment.
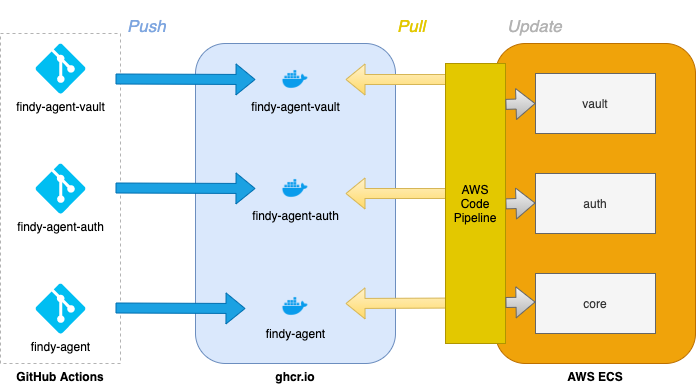
Agency deployment pipeline: New release triggers image build in GitHub actions. When the new container image is in the registry, AWS Code Pipelines handles the deployment environment update.
In addition, we’ve used Docker to take care of the service orchestration in a local development environment. When developing the agency itself, a native setup with full debugging capabilities is naturally our primary choice. However, suppose one wishes only to use the agency services and develop, e.g., a web service utilizing agency capabilities. In that case, the most straightforward approach is to run agency containers with a preconfigured docker-compose script. The script pulls correct images to the local desktop and sets needed configuration parameters. Setting up and updating the three services could be cumbersome without the orchestration, at least for newbies.
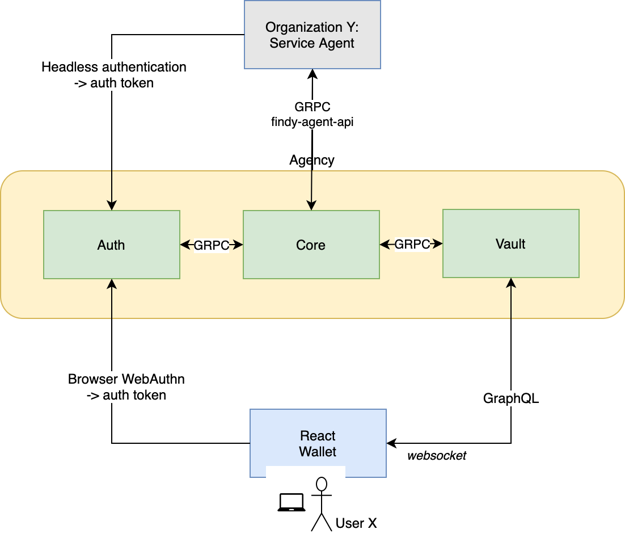
High-level architecture of Findy Agency. Setting up the agency to localhost is most straightforward with the help of a container orchestration tool.
Until recently, we were happy with our image-building pipeline. Local environments booted up with ease, and the deployment pipeline rolled out updates beautifully. Then one day, our colleague with an M1-equipped Mac tried out the docker-compose script. Running the agency images in an Arm-based architecture was something we hadn’t considered. We built our Docker images for amd64 architecture, while M1 Macs expect container images for arm64 CPU architecture. It became clear we needed to support also the arm64, as we knew that the popularity of the M1 chipped computers would only increase in the future.
Multi-architecture Support in Docker
Typically, when building images for Docker, the image inherits the architecture type from the building machine. And as each processor architecture requires a dedicated Docker image, one needs to build a different container image for each target architecture. To avoid the hassle with the multiple images, Docker has added support for multi-architecture images. It means that there is a single image in the registry, but it can have many variants. Docker will automatically choose the appropriate architecture for the processor and platform in question and pull the correct variant.
Ok, so Docker takes care of the image selection when running images. How about building them then? There are three strategies.
- QEMU emulation support in the kernel: QEMU works by emulating all instructions of a foreign CPU instruction set on the host processor. For example, it can emulate ARM CPU instructions on an x86 host machine, and thus, the QEMU emulator enables building images that target another architecture than the host. This approach usually requires the fewest modifications to the existing Dockerfiles, but the build time is the slowest.
- Multiple native nodes using the same builder instance: Hosts with different CPU architectures execute the build. The build time is faster than with the other two alternatives. The drawback is that it requires access to as many native nodes as there are target architectures.
- Stage in a Dockerfile for cross-compilation: This option is possible with languages that support cross-compilation. Arguments exposing the build and the target platforms are automatically available to the build stage. The build command can utilize these parameters to build the binary for the correct target. The drawback is that the builder needs to modify the Dockerfile build commands and perhaps familiarize oneself with using the cross-compilation tools for the target language.
From these three options, we chose the first one, as it seemed the most straightforward route. However, in our case, the third option might have worked as well since we are building with tools that support cross-compilation, Rust, and GoLang.
A Docker CLI plugin, buildx, is required to build multi-architecture images. It extends the docker command with additional features, the multi-architecture build capability being one of them. Using buildx is almost the same as using the ordinary Docker build function. The target platform is added to the command with the flag --platform.
Example of building Docker image with buildx for arm64:
docker buildx build --platform linux/arm64 -t image_label .
Reviewing the Build Receipts
Now we had chosen the strategy and had the tools installed. The next step was to review each image stack and ensure that it was possible to build all image layers for the needed variants.
Our default image stack consists of the custom base image and an application layer (service binary in question). The custom base image contains some tools and libraries that are common for all of our services. It expands the official Docker image for Ubuntu.
For the official Docker images, there are no problems since Docker provides the needed variants out-of-the-shelf. However, our custom base image installs indy-sdk libraries from the Sovrin Debian repository, and unfortunately, the Debian repository did not provide binaries for arm64. So instead of installing the library from the Debian repository, we needed to add a build step that would build and install the indy-sdk from the sources. Otherwise, building for arm64 revealed no problems.
Integration to GitHub Actions
The final step was to modify our GitHub Actions pipelines to build the images for the different architectures. Fortunately, Docker provides ready-made actions for setting up QEMU (setup-qemu-action) and buildx (setup-buildx-action), logging to the Docker registry (login-action), and building and pushing the ready images to the registry (build-push-action).
We utilized the actions provided by Docker, and the release workflow for findy-agent looks now like this:
name: release
on:
  push:
    tags:
      - '*'
jobs:

  push-image:
    runs-on: ubuntu-latest
    permissions:
      packages: write
      contents: read
    steps:
      - uses: actions/checkout@v2

      - name: Set up QEMU
        uses: docker/setup-qemu-action@v1
        with:
          platforms: all

      - name: Set up Docker Buildx
        uses: docker/setup-buildx-action@v1

      - name: Login to Registry
        uses: docker/login-action@v1
        with:
          registry: ghcr.io
          username: ${{ github.repository_owner }}
          password: ${{ secrets.GITHUB_TOKEN }}

      - run: echo "version=$(cat ./VERSION)" >> $GITHUB_ENV

      - uses: docker/build-push-action@v2
        with:
          platforms: linux/amd64,linux/arm64
          push: true
          tags: |
            ghcr.io/${{ github.repository_owner }}/findy-agent:${{ env.version }}
            ghcr.io/${{ github.repository_owner }}/findy-agent:latest
          cache-from: type=registry,ref=ghcr.io/${{ github.repository_owner }}/findy-agent:latest
          cache-to: type=inline
          file: ./scripts/deploy/Dockerfile
The result was as expected; the actions took care of building of the container images successfully. The build process is considerably slower with QEMU, but luckily, the build caches speed up the process.
Now have the needed variants for our service images in the registry. Furthermore, our colleague with the M1-Mac can run the agency successfully with his desktop.
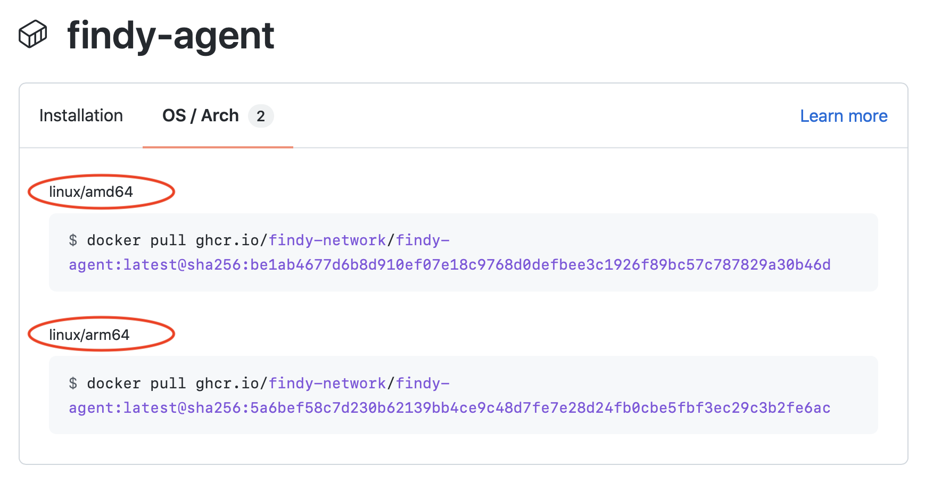
Docker registry for Findy agent
Travelogue
The success of our team is measured:
- How well do we understand certain emerging technologies?
- How relevant they are to the business we are in?
- How much potential do they have for our company’s business?
If you are asking yourself if the order of the list is wrong, the answer is, it is not.
We have learned that you will fail if you prioritize technologies by their business value too early. There is a catch, though. You must be sure that you will not fall in love with the technologies you are studying. Certain scepticism is welcomed in our line of work. That attitude may follow thru this post as well. You have now been warned, at least.
Technology Tree

Findy Agency Tech Tree
Technology roots present the most important background knowledge of our study. The most fundamental technologies and study subjects are in the trunk. The trunk is the backbone of our work. It ties it all together. Branches and leaves are outcomes, conclusions, and key learnings. At the top of the tree, some future topics are considered but not implemented or even tried yet.
Even if the technology tree illustrates the relevant technologies for the subject, we will not address them in this post. We recommend you to study the tree for a moment to get the picture. You will notice that there aren’t any mention of VC. For us, the concept of VC is an internal feature of DID system. Naturally, there are a huge amount of enormous study subjects inside VCs like ZKP, etc. But this approach has to lead us to concentrate on the network itself and the structure it should have.
The tree has helped us to see how things are bound together and what topics are the most relevant for the study area.
Trust Triangle
The famous SSI trust triangle is an excellent tool to simplify what is important and what is not. As we can see, everything builds on peer to peer connections, thick arrows. VCs are issued, and proofs are presented thru them. The only thing that’s not yet solved at the technology level is the trust arrow in the triangle. (I know the recursive trust triangle, but I disagree with how it’s thought to be implemented). But this blog post is not about that either.

The SSI Trust Triangle
Targets and Goals
Every project’s objectives and goals change during the execution. The longer the project, the more pivots it has. (Note that I use the term project quite freely in the post). When we started to work with DID/SSI field, the goal was to build a standalone mobile app demo of the identity wallet based on Hyperledger Indy. We started in test drive mode but built a full DID agency and published it as OSS. The journey has been inspiring, and we have learned a lot.
In every project, it’s important to maintain the scope. Thanks to the nature of our organisation we didn’t have changing requirements. The widening of the scope came mostly from the fact that the whole area of SSI and DID were evolving. It still is.
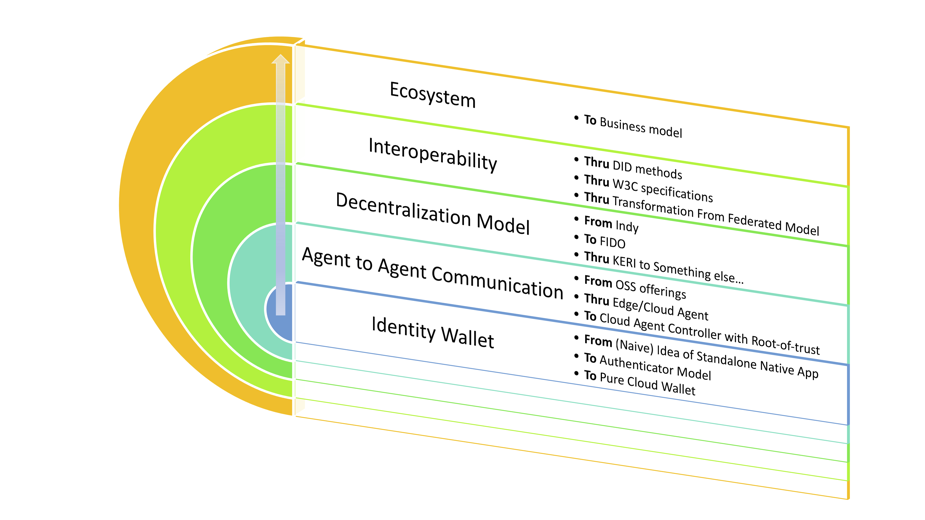
The Journey From Identity Wallet to Identity Ecosystem
Many project goals changed significantly during the execution, but that was part of the job. And as DID/SSI matured, we matured as well, and goals to our work aren’t so test-driven mode anymore. We still test other related technologies that can be matched to DID/SSI or even replace some parts of it but have transited to the state where we have started to build our own related core technologies to the field.
Incubators usually start their trip by testing different hypotheses and trying them out in practice. We did the same but more on the practical side. We didn’t have a formal hypothesis, but we had some use cases and a vision of how modern architecture should work and its scaling requirements. Those kinds of principles lead our decision-making process during the project. (Maybe some of us write a detailed blog about how our emerging tech process and organisation worked.)
The journey
We have been building our multi-tenant agency since the beginning of 2019. During that time, we have tried many different techniques, technologies and architectures, and application metaphors. We think we have succeeded to find interesting results.
In the following chapters, we will report the time period from the beginning of 2019 to autumn of 2021 in half of a year intervals. I really recommend that you look at the timelines carefully because they include valuable outcomes.
2019/H1
2019/H1
The Start
Me:
“I’m interested in studying new tech by programming with it.”
Some block-chain experts in the emerging technologies team:
“We need an identity wallet to be able to continue with our other projects. Have you ever heard of Hyperledger Indy..”
In one week, I have been smoke-tested indy SDK on iOS and Linux. During the spring, we ended up following the Indy’s proprietary agent to agent protocol, but we didn’t use libcvx for that because:
This library is currently in an experimental state and is not part of official releases. - [indy SDK GitHub pages]
To be honest, that was the most important reason because we have had so much extra work with other Indy libs, and of course, we would need a wrapper at least for Go. It was an easy decision. Afterwards, it was the right because the DIDComm protocol is the backbone of everything with SSI/DID. And now, when it’s in our own (capable) hands, it’s made many such things possible which weren’t otherwise. We will publish a whole new technical blog series of our multi-tenant DIDComm protocol engine.
All of the modern, native mobile apps end up been written from two parts: the mobile app component running on the device and the server part doing everything it can to make the mobile app’s life easier. Early stages, DIDComm’s edge and cloud agent roles weren’t that straightforward. From every point of view, it seemed overly complicated. But still, we stuck to it.
First Results
At the end of spring 2019, we had a quick and dirty demo of the system, which had multi-tenant agency to serve cloud agents and iOS mobile app to run edge agents. An EA onboarded itself to the agency with the same DID Connect protocol, which was used everywhere. Actually, an EA and a CA used Web Sockets as a transport mechanism for indy’s DIDComm messages.
We hated the protocol. It was insane. But it was DID protocol, wasn’t it?
The system was end to end encrypted, but the indy protocol had its flaws, like being synchronous. We didn’t yet have any persistent state machine or the other basics of the communication protocol systems. Also, the whole thing felted overly complicated and old – it wasn’t modern cloud protocol.
Third party integration demo
In early summer ended up building a demo that didn’t follow totally the current architecture, because the mobile app’s edge agent was communicating directly to the third party agent. This gave us a lot of experience, and for me, it gave needed time to spec what kind of protocol the DIDComm should be and what kind of protocol engine should run it.
It was a weird time because indy’s legacy agent to agent protocol didn’t have a public, structured and formal specification of its protocol.
Those who are interested in history can read more from here.
The integration project made it pretty clear for us what kind of protocol was needed.
Async with explicit state machine
DIDComm must be async and message-driven simple because it’s deliberative in its nature. Two agents are negotiating for issuing, proofing, etc.
Aries news
Hyperledger Aries was set up during the summer, which was good because it showed the same we learned. We were on the right path.
Code Delivery For a Business Partner
For this mail-stone, we ended up producing some documentation, mostly to explain the architecture. During the whole project, we have had a comprehensive unit and integration test harness.
At this point, we had all of the important features covered: issuing, holding, present and verify proofs in a quick and dirty way. Now we knew the potential.
Results 2019 Summer
We had managed to implement pre-Aries DIDComm over HTTP and WebSocket. We had a multi-tenant agency running cloud agents even though it was far from production readiness. Everything was end to end encrypted. The current agency supported indy’s ledger transactions, and first, we had taken some tests from issuing and proofing protocols. We started to understand what kind of beast was tearing at us from another end of the road.
2019/H2
2019/H2
Start Of The Async Protocol Development
When we started architecture redesign after the summer break, we had a clear idea of what kind of direction we should take and what to leave for later:
- Cloud-first and we have newer wanted to step back on that.
- Modern micro-service architecture targeting continuous delivery and scalability. That leads to a certain type of technology stack which consists of techs like Go, gRPC, Docker (or other containerization technology), container orchestration like K8s, etc. One key requirement was that hardware utilization must be perfect, i.e. tiny servers are enough.
- No support for offline use cases for now.
- No revocation until there is a working solution. Credit card revocation has taught us a lot. Scalable and fast revocation is a hard problem to solve.
- Message routing should not be part of the protocol’s explicit ‘headers’, i.e. there is only one service endpoint for a DID. We should naturally handle the service endpoint so that privacy is maintained as it is in our agency. By leaving routing out, it has been making everything so much simple. Some technologies can do that for us for free, like Tor. We have tested Tor, and it works pretty well for setting service endpoints and also connecting to them.
- Use push notifications along with the WebSockets, i.e. lent APNS to trigger edge agents when they were not connected to the server.
Multi-ledger Architecture
Because everything goes through our Go wrapper to the Plenum ledger, I made a version that used memory or plain file instead of the ledger as a hobby project. It was meant to be used only for tests and development. Later the plug-in architecture has allowed us to have other persistent saving media as well. But more importantly, it has helped development and automatic testing a lot.
Technically the hack is to use pool handle to tell if the system is
connected to a ledger or some other predefined media. indy API has only two
functions that take pool handle as an argument but doesn’t use it at all or
a handle is an option.
Server Side Secure Enclaves
During the server-side development, we wanted to have at least post-compromised secured key storage for cloud servers. Cloud environments like AWS give you managed storage for master secrets, but we needed more when developing OSS solutions with high performance and scalability requirements.
Now we store our most important keys for LMDB-based fast key-value storage fully encrypted. Master keys for installation are in a managed cloud environments like AWS, Google, Azure, etc.
First Multi-tenant Chat Bot
The first running version of the chatbot used a semi-hard-coded version.
It supported only sequential steps: a single line in a text file,
CredDefIds in its own file, and finally text messages in its own files. The
result was just a few lines of Go code, thanks to its concurrent model.
The result was so good that I made a backlog issue to start studying to use SCXML or some other exciting language for chatbot state machines later. About a year later, I implemented a state machine on my own with a proprietary YAML format.
But that search isn’t totally over. Before that, I considered many different options, but there wasn’t much of an OSS alternative. One option could be to embed Lua combined with the current state machine engine and replace the memory model with Lua. We shall see what the real use case needs are.
I personally think that an even more important approach would be a state machine verifier. Keeping that as a goal sets strict limits to the computation model we could use. What we have learned now is you don’t need the full power of general programming language but finite state machine (automata theory) could just be enough.
2019/H2 Results
We had implemented all the most important use cases with our new protocol engine. We had an symmetric agent which could be in all of the needed roles of SSI: a holder, an issuer, and a verifier. Also, the API seemed to be OK at a high level of abstraction. The individual messages were shit.
At the end of the year, we also had a decent toolbox both on command-line and especially on the web.
2020/H1
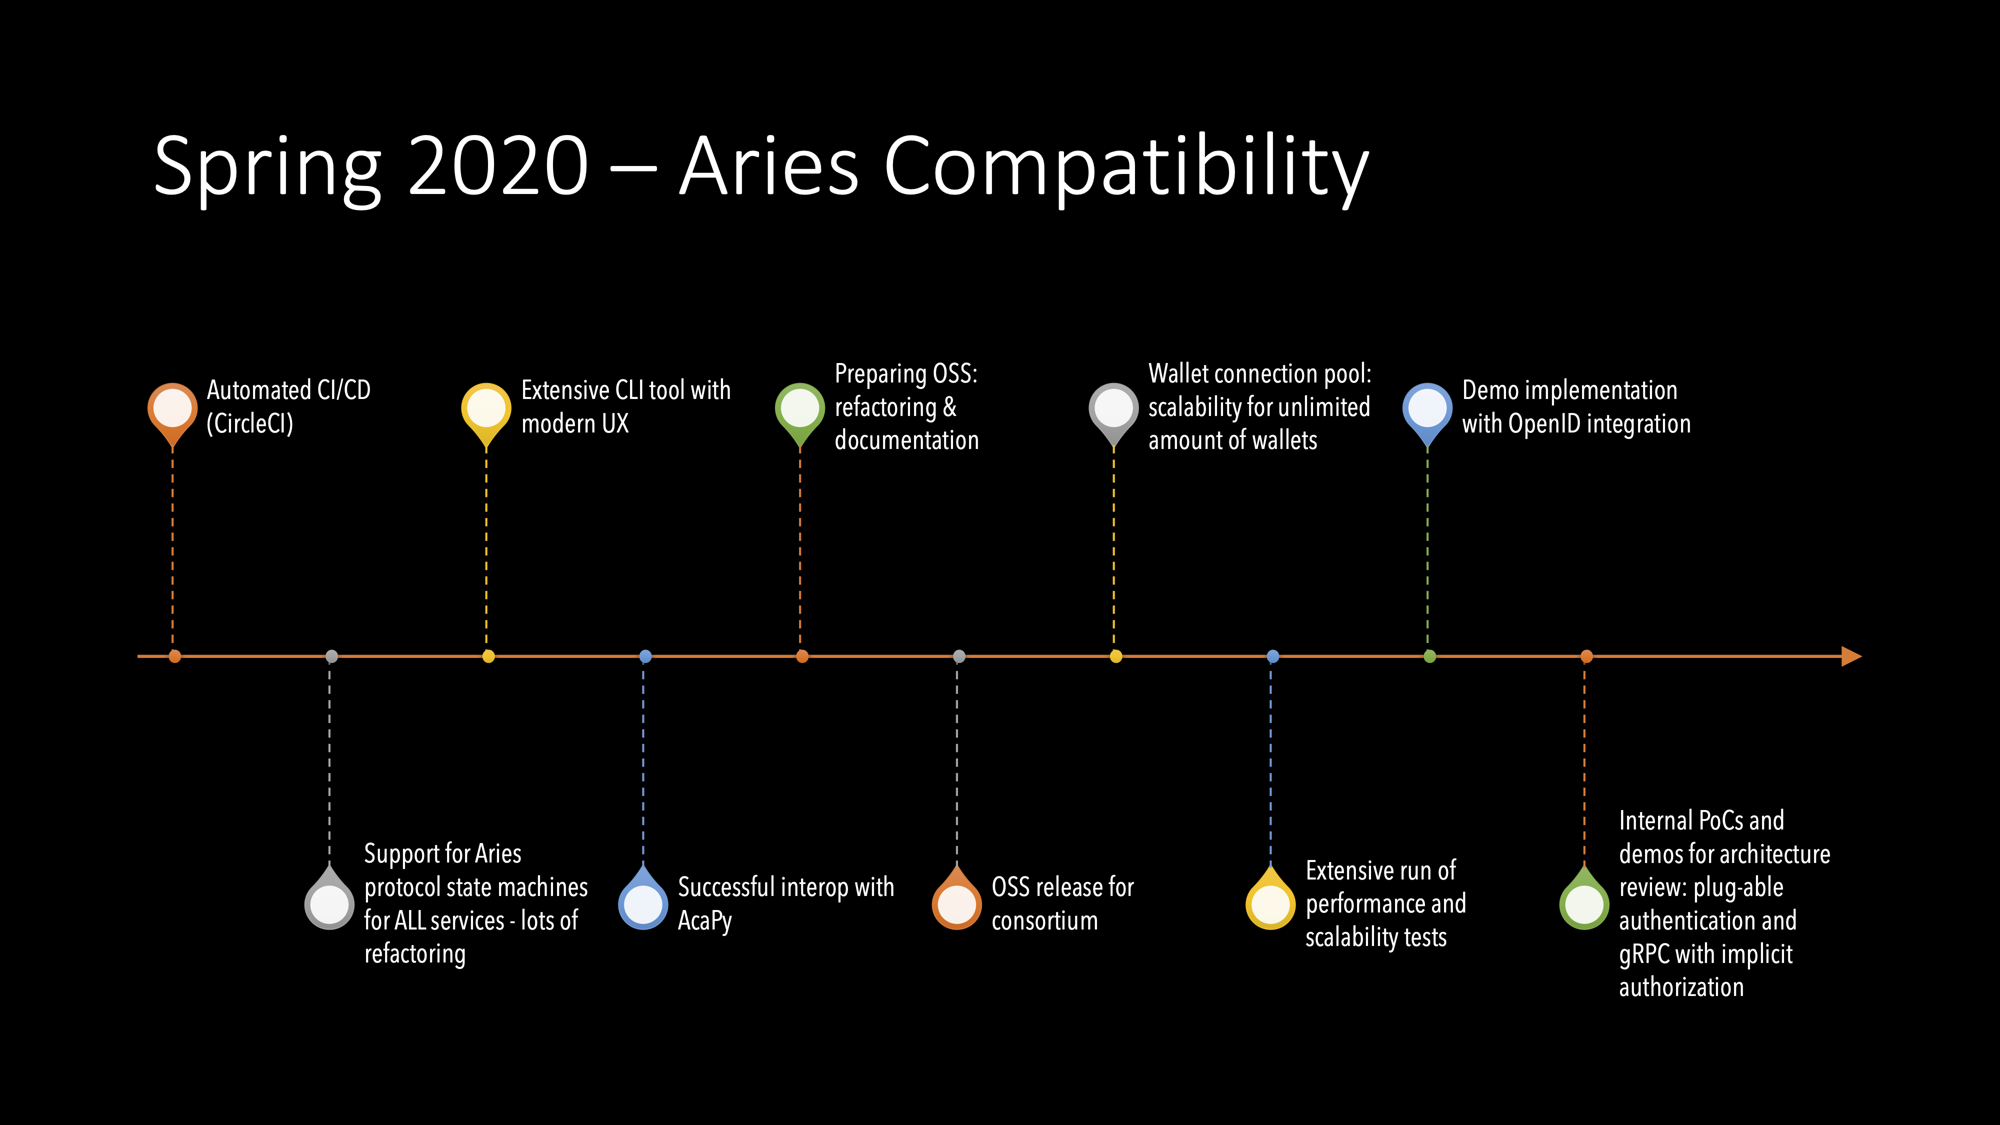
2020/H1
Findy-consortium Level OSS Publication
At the beginning of 2020, we decided to publish all the produced code inside the Findy consortium. We produced the new GitHub account, and code without history moved from original repos to new ones.
Even the decision brought a lot of routine work for that moment, it also brought many good things:
- refactoring,
- interface cleanups,
- documentation updates.
ACA-Py Interoperability Tests
We implemented the first version of the new async protocol engine with existing JSON messages came from legacy indy a2a protocols. It’s mostly because I wanted to build it in small steps, and it worked pretty well.
Most of the extra work did come from the legacy API we had. JSON messages over indy’s proprietary DIDComm. As always, some bad but some good: because we had to keep both DIDComm message formats, I managed to integrate a clever way to separate different formats and still generalise with Go’s interfaces.
New CLI
We noticed that Agency’s command-line UI started to be too complicated. Go has a clever idea of how you can do services without environmental variables. I’m still the guy who would stick with that, but it was a good idea to widen the scope to make our tools comfortable for all new users.
Our design idea was to build CLI, which follows subcommands like git and docker nowadays. The latest version we have now is quite good already, but the road was rocky. It is not easy to find the right structure the first time. The more you use your CLI by yourself, the more you start to notice what is intuitive and what is not.
We decided to separate CLI commands from Agency to own tool and git repo. It was good to move for that time, and when we managed to make it right, we were able to move those same commands pack to the agency one year later because we needed CLI tool without any libindy dependencies. That is a good example of successful software architecture work. You cannot predict the future, but you can prepare yourself for change.
2020/H2
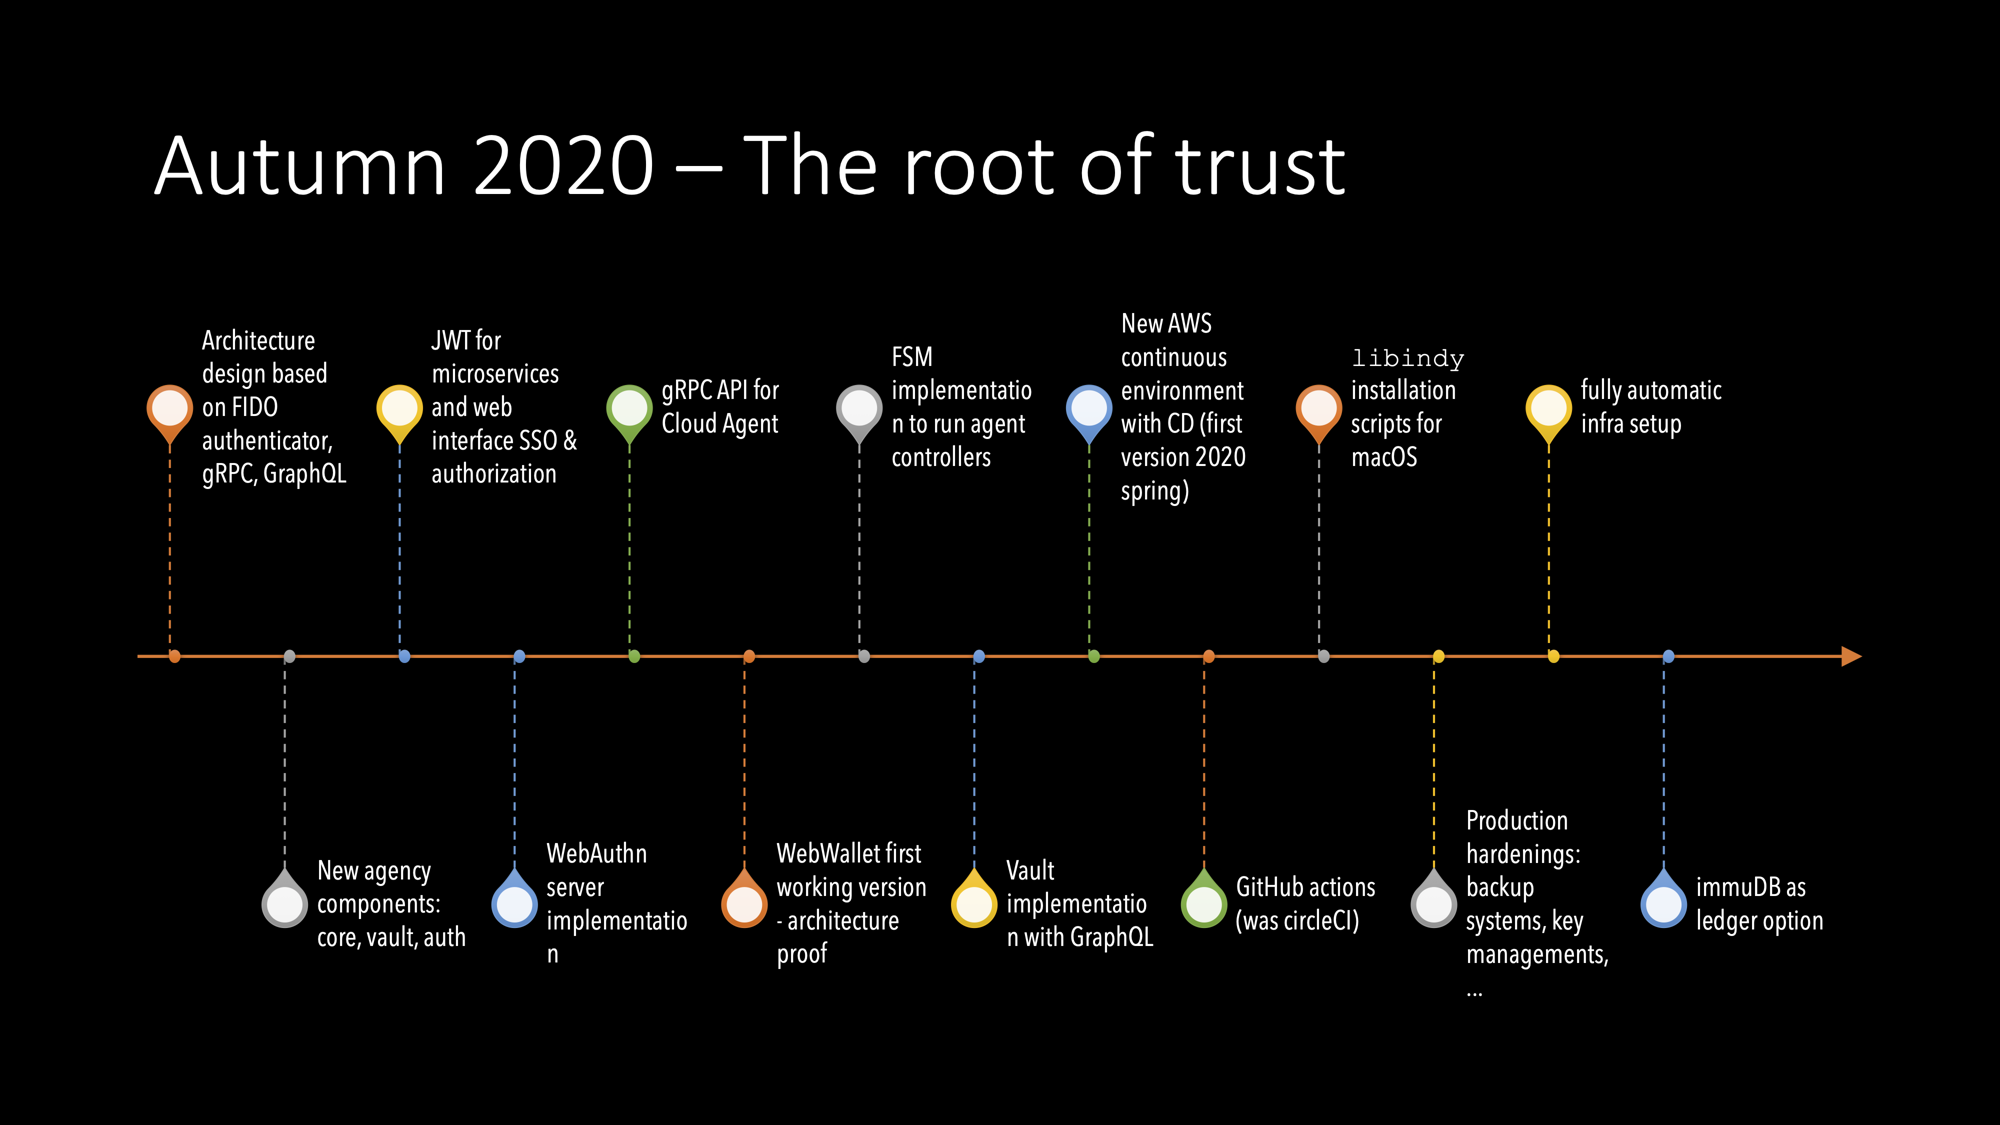
2020/H2
Architecture Planning
I had had quite a long time the idea of using gRPC for the Cloud Agent controller. My core idea was to get rid of the EA because, currently, it was just an onboarding tool. The wallet had, included only the pairwise DID to its cloud agent, nothing else. The actual wallet (we called it worker edge agent wallet) was the real wallet, where the VCs were. I went thru many similar protocols until I found FIDO UAF. The protocol is similar to DIDComm’s pairwise protocol, but it’s not symmetric. Another end is the server, and the other has the authenticator – the cryptographical root of trust.
When I presented an internal demo of the gRPC with the JWT authorization and explained that authentications would be FIDO2 WebAuthn, we were ready to start the architecture transition. Everything was still good when I implemented the first FIDO server with the help of Duo Labs Go packages. Our FIDO2 server was now capable of allocating cloud agents. But there was one missing part I was hoping someone in the OSS community would implement until we needed it. It was a headless WebAuthn/UAF authenticator for those issuers/verifiers running as service agents. How to onboard them, and how they would access the agency’s resources with the same JWT authorization? To allow us to proceed, we added support to get JWT by our old API. It’s was only intermediated solution but served its purpose.
Learnings when implementing the new architecture
- implicit JWT authorization helps gRPC usage a lot and simplifies it too.
- gRPC streams and Go’s channel is just excellent together.
- You should use pre-generated wallet keys for indy wallets.
- We can integrate performance and scalability tests into CI.
- gRPC integration and unit testing could be done in the same way as with HTTP stack in Go, i.e. inside a single process that can play both client and server.
Highlights of the end of the year 2020
We started to build for new SA architecture and allowed both our APIs to existing. WebAuth server, headless authenticator, and Vault first versions were now ready. Also, I did the first version of a state machine for service agent implementation. We had an option to use immuDB instead of Plenum ledger.
2021/H1
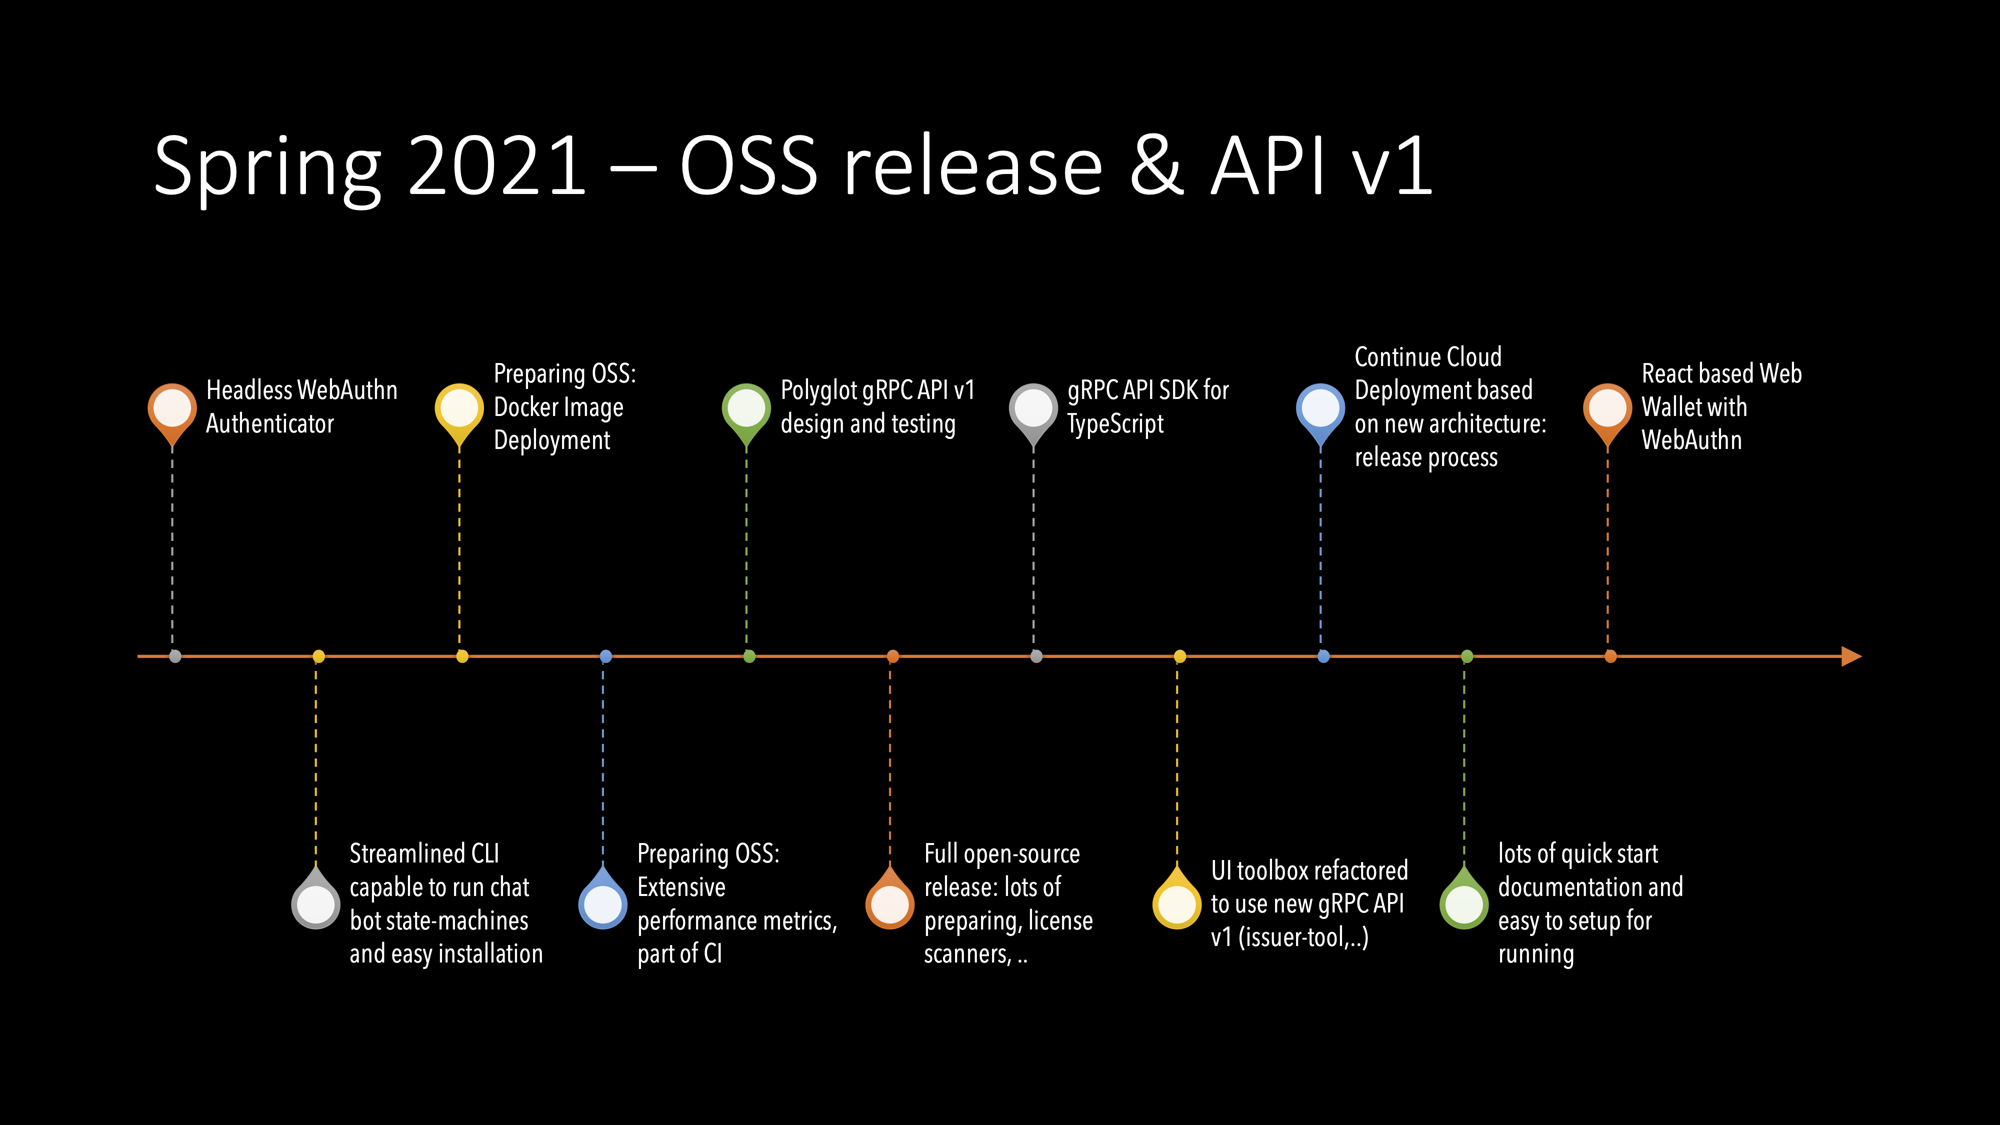
2021/H1
Now we have an architecture that we can live with. All the important elements are in place. Now we just clean it up.
Summary of Spring 2021 Results
Until the summer, the most important results have been:
- Headless WebAuthn authenticator
- React-based Web Wallet
- Lots of documentation and examples
- Agency’s gRPC API v1
- Polyglot implementations gRPC: TypeScript, Go, JavaScript
- New toolbox both Web and Command-line
- The full OSS release
As said, all of the important elements are in place. However, our solution is
based on libindy, which will be interesting because the Aries group moves to
shared libraries, whereas the original contributor continues with it. We haven’t
made the decision yet on which direction we will go. Or do we even need to
choose? At least in the meantime, we could add some new solutions and run them
both. Thanks to our own architecture and interfaces, those are plausible options
for our agency.
There are many interesting study subjects we are continuing to work on within SSI/DID. We will report them in upcoming blog posts. Stay tuned, folks!
Announcing Findy Agency
Findy Agency provides a Hyperledger Aries compatible identity agent service. It includes a web wallet for individuals and an API for organizations to utilize functionality related to verified data exchange: issuing, holding, verifying, and proving credentials. The agents hosted by the agency operate using DIDComm messaging and Hyperledger Aries protocols. Thus it is interoperable with other Hyperledger Aries compatible agents. The supported verified credential format is currently Hyperledger Indy “Anoncreds” that work with Hyperledger Indy distributed ledger. However, the plan is to add more credential formats in the future.
Main design principles of Findy Agency
In this post, we share some background information on the project. If you want to skip the history, start directly with the documentation or launch Findy Agency in your local computer.
Verified data exchange as digitalization enabler
Distributed and self-sovereign identity, along with verified data exchange between different parties, has been an area of our interest at the OP innovation unit for quite some time. After all, when thinking about the next steps of digitalization, secure and privacy-preserving handling of identity is one of the main problem areas. When individuals and organizations can prove facts of themselves digitally, it will enable us to streamline and digitalize many processes that may be still cumbersome today, including those in the banking and insurance sectors.
Since 2019 the Findy team at OP has been working on two fronts. We have collaborated with other Finnish organizations to set up a cooperative to govern a national identity network Findy. At the same time, our developers have researched credential exchange technologies, concentrating heavily on Hyperledger Indy and Aries.
From scratch to success with incremental cycles
When we started the development at the beginning of 2019, the verified credential world looked a whole lot different. Low-level indy-sdk was all that a developer had if wanting to work with indy credentials. It contained basic credential manipulation functionality but almost nothing usable related to communication between individuals or organizations. We were puzzled because the scenarios we had in mind involved users with mobile applications and organizations with web services and interaction happening between these two.
Soon we realized that we needed to build all the missing components ourselves if we would want to do the experiments. And so, after multiple development cycles and as a result of these experiments became Findy Agency. The path to this publication has not always been straightforward: there have been complete refactorings and changes in the project direction along the way. However, we feel that now we have accomplished something that truly reflects our vision.
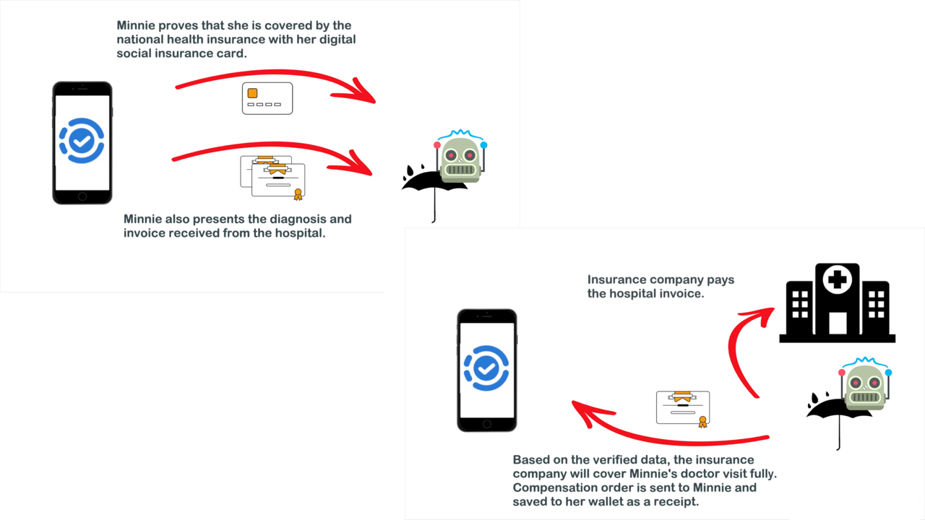
One of the team's experiments, Findy Bots, was built on Findy Agency. See demo video in Youtube.
Why the hard way?
The situation is not anymore so sad for developers wanting to add credential support to their app as it was three years ago. There are several service providers and even open source solutions one can choose from. So why did we choose the hard way and wrote an agency of our own? There are several reasons.
- Experience: We believe that verified data technology will transform the internet in a profound way. It will have an impact on perhaps even the most important data processing systems in our society. We want to understand the technology thoroughly so that we know what we are betting on.
- Open-source: As we stated in the previous bullet, we want to be able to read and understand the software we are running. In addition, community-given feedback and contributions improve the software quality. There is also a good chance that open-sourced software is more secure than proprietary since it has more eyes looking at the possible security flaws.
- Pragmatic approach: We have scarce resources, so we have to concentrate on the most essential use cases. We do not wish to bloat the software with features that are far in the future if valid at all.
- Performance: We aim to write performant software with the right tools for the job. We also value developer performance and hence have a special eye for the quality of the API.
The Vision
Our solution contains several features that make our vision and that we feel most of other open-source solutions are missing.
Findy Agency has been multi-tenant from the beginning of the project. It means single agency installation can securely serve multiple individuals and organizations without extra hassle.
Agency architecture is based on a cloud strategy. Credential data is stored securely in the cloud and cloud agents do all the credentials-related hard work on behalf of the agency users (wallet application/API users). The reasoning for the cloud strategy is that we think that individuals store their credential data rather with a confided service provider than worry about losing their device or setting up complex backup processes. Furthermore, the use cases relevant to us are also always executed online, so we have knowingly left out the logic aiming for offline scenarios. This enabled us to reduce the complexity related to mediator implementation.
Due to the cloud strategy, we could drop out the requirement for the mobile application. Individuals can use the web wallet with their device browser. Authentication to the web wallet is done with secure and passwordless WebAuthn/FIDO protocol.
Agency backend services are implemented with performance in mind. That is why we selected performant GoLang and gRPC as the base technologies of the project.
Next steps
We do not regard Findy Agency as a finalized product, there is still a lot to be done. However, we think it can already be used to experiment and build verified data utilizing scenarios. Our work continues with further use case implementations as well as improving the agency with selected features based on our experimentation results.
The codes are available in GitHub and the developer documentation will be improved in the near future. We look forward getting feedback from the community.