No-Code SSI Chatbots - FSM Part I
In this blog post, I’ll explain the syntax of our chatbot language. The good news is that the language is simple, and we already offer some development tools like UML rendering. There’ll be a second post where we’ll dive deeply into the implementation details. Our ultimate goal is to find a proper model checker and theorem proofer for the correctness of the chatbot applications.
Our team got the idea of chatbots quite early after we started to play with verifiable credentials and SSI.
Zero UI + No-Code => Fast Delivery
I think that chatbots and zero UI are some sorts of a lost opportunity for SSI/DID. The backbone of the DID network is its peer-to-peer communication protocol. Even though the client/server API model is very convenient to use and understand, DIDComm based apps need something different – more conversational. What would be more conversational than chatting?
Anyhow, we have been positively surprised by how far you can get without NLP but just a strict state machine-guided conversation where each party can proof facts about themselves when needed. And, of course, you can build perfect hybrid, where you fix structural parts of the discussion with the FSM and leave unstructured details for the NLP engine.
Hello World
The chatbot state machines are written in YAML (JSON accepted). Currently, a YAML file includes one state machine at a time.
As all programming books and manuals start with the hello world app, we do the same.
initial:                                             # (1)
  target: INITIAL
states:                                              # (2)
  INITIAL:                                           # (3)
    transitions:                                     # (4)
    - trigger:                                       # (5)
        protocol: basic_message                      # (6)
      sends:                                         # (7)
      - data: Hello! I'm Hello-World bot.
        protocol: basic_message                      # (8)
      target: INITIAL                                # (9)
The previous machine is as simple as it can be in that it does something. Let’s see what the lines are for:
- Initial state transition is mandatory. It’s executed when the machine is started. It’s the same as all the state transitions in our syntax but doesn’t have a transition trigger.
- States are listed next. There are no limits to how many states the machine holds.
- This machine has only one state named
INITIAL. Each state must have a unique name. - States include transitions to the next states (
target). We have one in this machine, but no limit exists to how many transitions a state can have. - Each transition has a trigger event.
- Triggers have protocol that is in this case
basic_message. - We can send limitless a mount of
eventsduring the state transition. - In this machine, we send a
basic_messagewhere thedataisHello! I'm Hello-World bot. - Our
transitiontargetis theINITIALstate. It could be whatever state exists in the machine.
Did you get what the machine does? You can try it by following the instructions
in Findy CLI’s readme to setup
your playground/run environment. After you have set up a pairwise connection
between two agents, and needed environment variables set like FCLI_CONNN_ID,
execute this to the first agent’s terminal:
findy-agent-cli bot start <Hello-World.yaml> # or whatever name you saved the script above
For the second agent, use two terminals and give these commands to them:
# terminal 1
findy-agent-cli bot read # listens and shows other end's messages
# terminal 2
findy-agent-cli bot chat # sends basic_message's to another end thru the pairwise
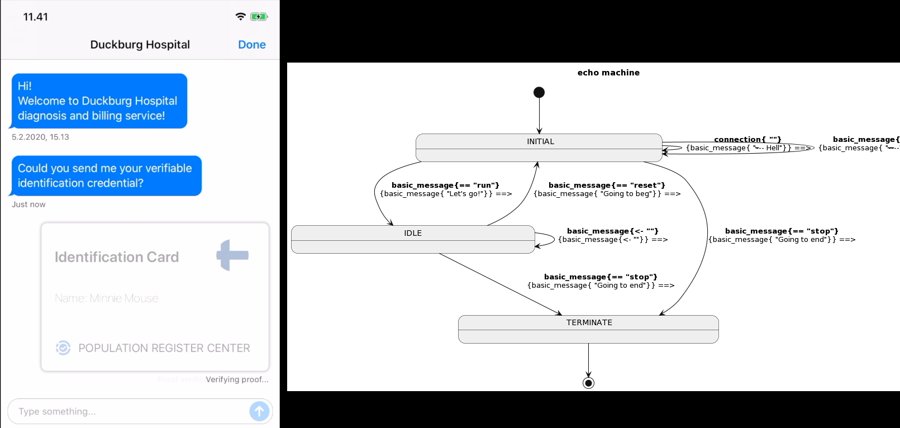
And when you want to render your state machine in UML, give this command:
findy-agent-cli bot uml <Hello-World.yaml> # name of your FSM
The result looks like this:

The UML rendering may help with understanding. It’s also an excellent tool for manual verification. Automatic model checking is something we are studying in the future.
The FSM Language
The YAML-based state machine definition language is currently as simple as possible.
State Machine
The first level is the states, which are the primary building blocks of the machine. A machine has one or more states. During the execution, the machine can be in only one state at a time. Sub- or embedded states aren’t supported because they are only convenient, not mandatory. Also, parallel states are out-scoped.
One of the states must be marketed as initial. Every chatbot conversation
runs its own state machine instance, and the current implementation of machine
termination terminates all running instances of the machine. The state
machine can have multiple termination states.
Note, because the final multi-tenant deployment model is still open, and we have yet to decide on the persistence model, we recommend being extra careful with the state machine termination. Even though the ending is especially convenient for the one-time scripts.
Each state can include relations to other states, including itself. These relations are state-transitions which include:
- a trigger event
- send events
- a target state
Memory
Each state machine instance has one memory register/dictionary/map. All of the
memory access (read/write) are integrated state-transitions, and their
rules. If we bring some scripting language onboard, the memory model
integration is the first thing to solve. Also current memory model isn’t
production ready for large-scale service agents because there isn’t any
discarding mechanism. However, this will be fixed in the next minor release,
where a transition to the initial state frees the state machine instance’s
memory register. Edit: memory cleanup is implemented, and Lua is onboard.
Meta-Model
Information about the meta-model behind each state machine can be found in the following diagram. As you can see, the Machine receives and sends Events. And States controls which inputs, i.e., triggers are valid, when and how.

Next, we will see how the Event is used to run the state machine. After the next chapter, we should learn to declare all supported types of input and output events.
Event
As we previously defined, state transitions are input/output entities. Both
input and output are also event-based. An input event is called trigger: and
outcomes are sends:.
The event has necessary fields, which we describe next in more detail.
rule:Defines an operation to be performed when sending an event or what should happen when inputting an event.protocol:Defines a protocol to be executed when sending or a protocol event that triggers a state transition.data:Defines additional data related to the event in astringformat.
      ...
      trigger:                                             # 1
        data: stop                                         # 2
        protocol: basic_message                            # 3
        rule: INPUT_EQUAL                                  # 4
- Simple example of the trigger event.
stopis a keyword in this trigger because of the rule (see # 4).- The keyword is received thru the
basic_messageAries DIDComm protocol. INPUT_EQUALmeans that if incoming data equals thedata:field, the event is accepted, and a state transition is triggered.
Rule
The following table includes all the accepted rules and their meaning for the event.
| Rule | Meaning |
|---|---|
| OUR_STATUS | Currently used with issue_cred protocol to build triggers to know when issuing is ended successfully. |
| INPUT | Copies input event data to output event data. Rarely needed, more for tests. |
| INPUT_SAVE | Saves input data to a named register. Thedata: defines the name of the register. |
| FORMAT | Calls printf type formatter for send events where the format string is in data: and value is input data: field. |
| FORMAT_MEM | Calls Go template type formatter for send events where the format string is in the data: field, and named values are in the memory register. |
| GEN_PIN | A new random 6-digit number is generated and stored in the PIN-named register, and FORMAT_MEM is executed according to the data: field. |
| INPUT_VALIDATE_EQUAL | Validates that received input is equal to the register value. The variable name is in the data: field. |
| INPUT_VALIDATE_NOT_EQUAL | Negative of previous, e.g., allows us to trigger transition if the input doesn’t match. |
| INPUT_EQUAL | Validates that the coming input data is the same in the data: field. For these, you can implement command keywords that don’t take arguments. |
| ACCEPT_AND_INPUT_VALUES | Accepts and stores a proof presentation and its values. Values are stored as key/value pairs in the memory register. |
| NOT_ACCEPT_VALUES | Declines a proof presentation. |
Protocol
The following table includes all the accepted Aries protocols and their properties.
| Protocol | In/Out | RFC | Meaning |
|---|---|---|---|
basic_message | Both | 0095 | Send or receive a messaging protocol (text) |
trust_ping | Both | 0048 | A ping protocol for a DIDComm connection |
issue_cred | Out | 0036 | Issue a verifiable credential thru DIDComm |
present_proof | Out | 0037 | Request a proof presentation thru DIDComm |
connection | In | 0023 | A new pairwise connection (DID exchange) is finished for the agent |
The following table includes currently recognized general protocols and their properties. Recognized protocols aren’t yet thoroughly tested or implemented, only keywords are reserved and properties listed.
| Protocol | In/Out | Spec | Meaning |
|---|---|---|---|
email | Both | JSON | Send or receive an email message (text) |
hook | Both | Internal | Currently reserved only for internal use |
On the design table, we have ideas like REST endpoints, embedded scripting language (Lua, now implemented), file system access, etc.
Data
The data field is used to transport the event’s data. Its function is determined by
both rule and protocol. Please see the next chapter, Event Data.
Event Data
The event_data field transports the event’s type-checked data. Its type
is determined by both rule and protocol. Currently, it’s explicitly used
only in the issue_cred protocol:
  ...
  data:
  event_data:
    issuing:
      AttrsJSON: '[{"name":"foo","value":"bar"}]'
      CredDefID: <CRED_DEF_ID>
  protocol: issue_cred
We are still work-in-progress to determine what will be the final role of data
and event_data. Are we going to have them both or something else? That will be
decided according to the feedback from the FSM chatbot feature.
Issuing Example
The following chatbot is an illustration of our chatbot from our Identity Hackathon 2023 repository. It’s proven extremely handy to kick these chatbots up during the demo or development without forgetting the production in the future.

Omni-Channel Chatbot
The diagram below presents another example of the automatic issuing
chatbot
for verifying an email address. Please read the state transition arrows
carefully. They define triggers and events to send. There is a transition that
sends an Aries basic_message and an email in the same transition. The email
message built by the machine includes a random PIN code. As you can see, the
state machine can adequately verify the PIN code.

It’s been rewarding to notice how well chatting and using verifiable credentials fit together. As an end-user, you won’t face annoying context switches, but everything happens in the same logical conversation.
Future Features
The most critical task in the future will be documentation. Hopefully, this blog post helps us to get it going.
Something we have thought about during the development:
- transition triggers are currently SSI-only which can be changed in the
future
- transient states
- Edit: Now embedded Lua that solves limitless trigger types and make need for transient states obsolete
- straightforward memory model
- no persistence model
- verification/simulation tools: a model checker
- simple scripting language inside the state machine, Edit: Lua is now implemented
- deployment model: cloud, end-user support
- end-user level tools
Please take it for a test drive and let us know your thoughts. Until the next time, see you!