Anchoring Chains of Trust
You will notice a repetitive pattern once you start to play with public-key cryptography. Everything is about chains, or more precisely about the links in the chain. You build these links with public/private key pairs. Links are unidirectional, which means that if you must link or point both ways, you need to have two key pairs, one for each direction.
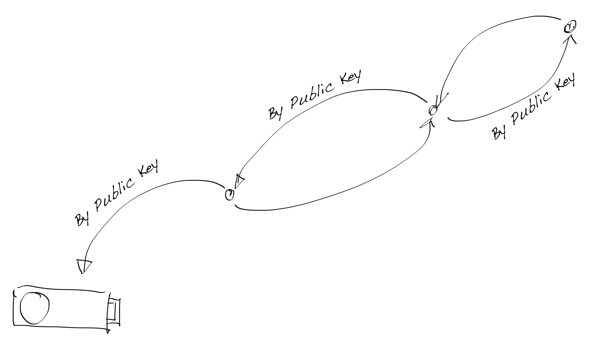
Crypto Chain with Authenticator
In this blog post, we talk mostly about protocols built with asymmetric key pairs, but we can build immutable data structures like Merkle trees and blockchains with one-way functions as well. We will return to these data types in future posts by building something interesting to replace general ledgers as DID’s VDR.
Crypto Chain Protocols
We all know that the connection protocols should cover all security issues, but protocols based on public-key cryptography might not be so obvious public key, you know? There are known subjects with protocols based on asymmetric cryptography like trust-on-first-use.
MITM - Wikipedia
It’s trivial to execute MITM attack if we cannot be sure that the public key source is the one it should be. The industry has developed different ways to make sure that presented details are valid. That lays down one of the most fundamental aspects of modern cryptographic systems – chain of trust.

PKI Chain of trust - Wikipedia
It is essential to understand that most of the modern security protocols use public-key cryptography only for authentication and switch to symmetric keys during the data transfer for performance reasons. The famous example of this kind of protocol is Diffie-Hellman where the shared secret (the symmetric key) is transported over public network.
The DIDComm protocol is something that is not used only for authentication but communication without sacrificing privacy. My prediction is that the current message-oriented DIDComm protocol as a holistic transport layer is not enough. The ongoing DIDComm V2 mentions potential other protocols like DIDComm Stream, DIDComm Multicast, and so forth, but that will not be an easy task because of the current routing model, and especially because of the privacy needs. That has been one reason we have focused our efforts on finding a solution that would scale for all modern needs of transporting data and keeping individuals private. For that, our cloud agency is a perfect candidate.
Symmetry vs Asymmetry in Protocols
Before we go any further with DIDComm, let’s think about what it means to have an asymmetric protocol. We know the differences between symmetric and asymmetric cryptography. Let’s focus on communication, i.e. how we transport keys during the protocol.
Asymmetric protocol means that Bob can trust Alice when Alice have given her public key to Bob, and Bob can be sure that it’s Alice whose key he has received.
Every time Bob needs to authenticate Alice, he asks Alice to sign something with her private key. To make it crystal-clear, cryptographically, we can be only sure that it’s Alice who (still) controls the private key.
We could achieve symmetry only by that Alice has Bob’s public key as well. Now Alice can ask Bob to sign something for the authenticity of Bob.
Why is this important? There are several reasons for that, but the most crucial reason is the root-of-trust model. The last link in the crypto chain doesn’t need to be bidirectional, because the last private key is the cryptographic root-of-trust, i.e. it’s passive. It doesn’t need authentication from the referrer. It’s like grounding in electronics.
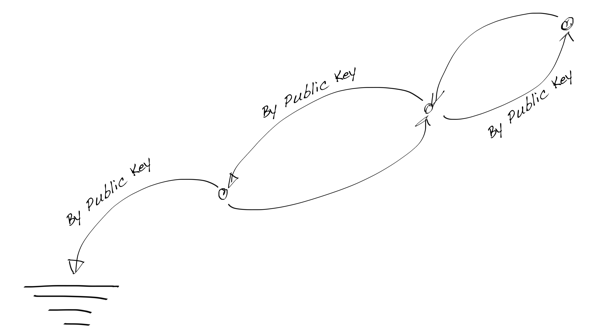
Crypto Chain with Grounding
DID Concepts
The DID’s controller is an essential piece of the puzzle. It defines who is the entity in the analogue world, i.e. who owns the DID cryptographically. As long as we stay in a digital world, it is easiest to bind the controller to its DID is by using public-key cryptography. The one who has DID controller’s private key is the actual controller.
For instance, an essential thing for SSI is a DID pairwise, i.e. a secure connection between two DIDs or DID services. Unfortunately, W3C’s specifications don’t underline that enough. Probably because it concentrates on external properties of DIDs and how the presented specification can implement different methods. But DIDs cannot work on their own properly. They need to have a controller, and in Aries, they have agents as well. Also, DIDs doesn’t always present the entity they are pointing, should I say, alone. DIDs present a subject. A subject like an IoT device can have many different DIDs for many different contexts.

DID Concepts - www.w3.org
In the digital world, it is expected that a controller has its controller, which has its controller, etc. When public-key cryptography is used to verify this controlling structure, it’s a chain with its root, the final private key, i.e. the root-of-trust.
DIDComm Protocols
The following drawing describes a common installation scenario where an agency based DID controller (leftmost) is implemented as verifiable automata (Finite State Machine) and it’s controlling the DID in the agency. At the right, there is conventional Edge Agent running in a mobile device that needs a mediator to help the agent is accessible from the network.
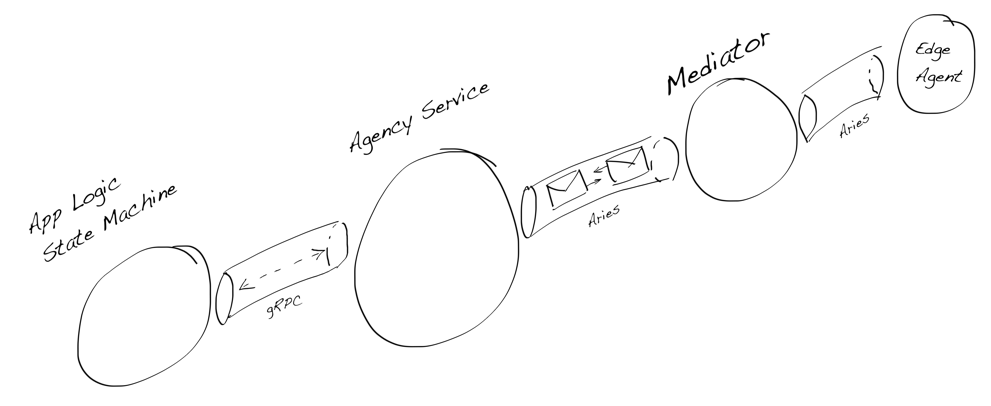
DIDComm Installation Example
As we can see in the drawing below, there are many different crypto chains in the current installation. During the study, we were most interested in the question: what is the best way to implement the root-of-trust for the DID managed by the multi-tenant agency. Now we have found the answer. Luckily it existed already.
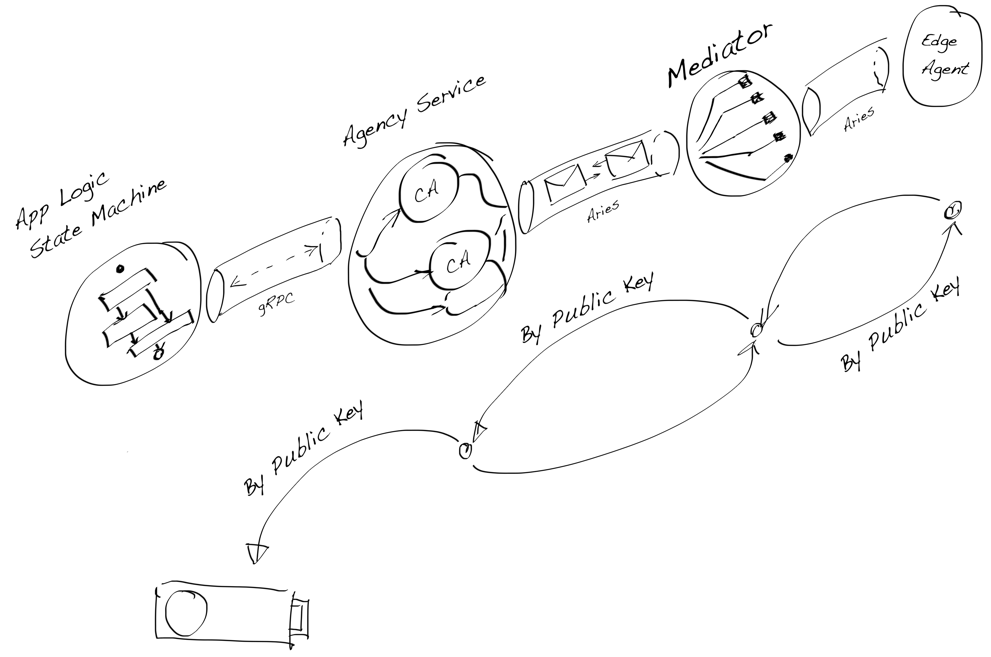
DIDComm Installation Example and Crypto Chain
FIDO2 Authentication
When we started to understand that the DIDComm protocol chain is not symmetric to all directions. Or, more precisely, when we understood that there must be one core agent for each identity domain and from that core or root agent, you should refer to multiple separated authenticators.
Let’s see what it means to have separate authenticators. The following drawing illustrates an oldish and problematic way of implementing, e.g. password manager, DID controller, SSI Edge Agent, etc.
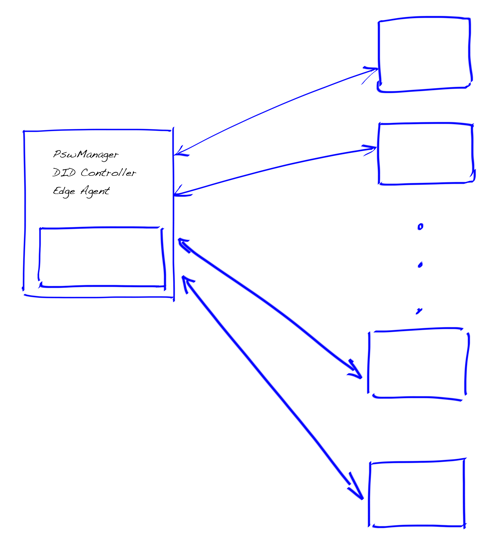
Integrated Secure Enclave
That is how we first thought our edge agent implementation where the mobile device’s secure element was felt as a cryptographic root-of-trust for an identity domain that can be individual, organization, etc. However, that leads to many unnecessary problems in protocol implementation. Most importantly, to which part of the end-to-end protocol we should implement the use cases like:
- I want to use my identity domain from iPhone, iPad, etc. same time.
- I want to have a ‘forget password’ -type recovery option (by doing nothing)
- I want to handle my identity domain’s keys easily. More precisely, I don’t want to know public-key cryptography is used under the hood
- I want to have automatic backups and recovery
If we think about the drawing above, it’s easy to see that the presented use cases aren’t easy to implement secure way if you have integrated a secure element to your agent in the same machine. In case you have only one integrated secure enclave for each edge agent, it’s near impossible.
When we separate the secure enclave from the identity domain’s root controller at the design level, everything seems to be set in a place as we can see in the next drawing.

Separated Secure Enclaves in Multiple Authenticators
I don’t imply that all of the other parties in the SSI/DID study scene have done or are making the same mistake we did at the beginning. My point is that treating secure elements as the root of the crypto chain only and not integrating it into the software agent or the device agent is running guided us in the right direction. That allowed us to realize that we don’t need a fully symmetric protocol to bind the controller to the agent. All we needed was the simplest possible thing, an authenticator, a trust anchor in all potential cases.
That innovation brought us a possibility to use modern existing solutions and still have an equally robust system where we have cryptographic root-of-rust.
It’s essential to understand why we had to consider this so carefully. Should it be just obvious? We must remember what kind of technology we were developing. We didn’t want to make a mistake that would lead back to centralization. For example, if we would still totally relay PKI, which is centralized, we couldn’t do that.
During the years we have studied the SSI/DID technology, we have constantly tested the architecture with these questions:
- Could this work and be safe without any help from the current PKI? (Naturally, it doesn’t mean that we couldn’t use individual protocols like TLS, etc. The infrastructure is the keyword here.)
- Can a use case or a protocol action be executed peer to peer, i.e. between only two parties? (Doesn’t still necessarily mean off-line)
Headless FIDO2/WebAuthn Authenticator
FIDO2 is the name of the standard. WebAuthn is just browser JS API to talk to the authenticators. So correct way to call your server is “FIDO2 Server” and to say “Authentication with FIDO2”. - WebAuthn Resource List
We started our tests with the new agent API by using implementing our FIDO2 server and by using only browsers at the beginning. When results, especially the performance and simplicity, were so good, we decided to go further.
The following architecture-drawing present the final deployment diagram of the overall system. The needed FIDO2 components are marked light red, and the ones we implemented ourselves are marked in red.
The basic idea was to have a system-level SSO where we implemented authorization with JWT and authentication with FIDO2 regardless of which type of the entity needs to be authenticated: individuals, organizations, legal entities, or system components. For us, it implicated that we needed FIDO2 for service agents, which meant that a headless FIDO2 Authenticator was required.
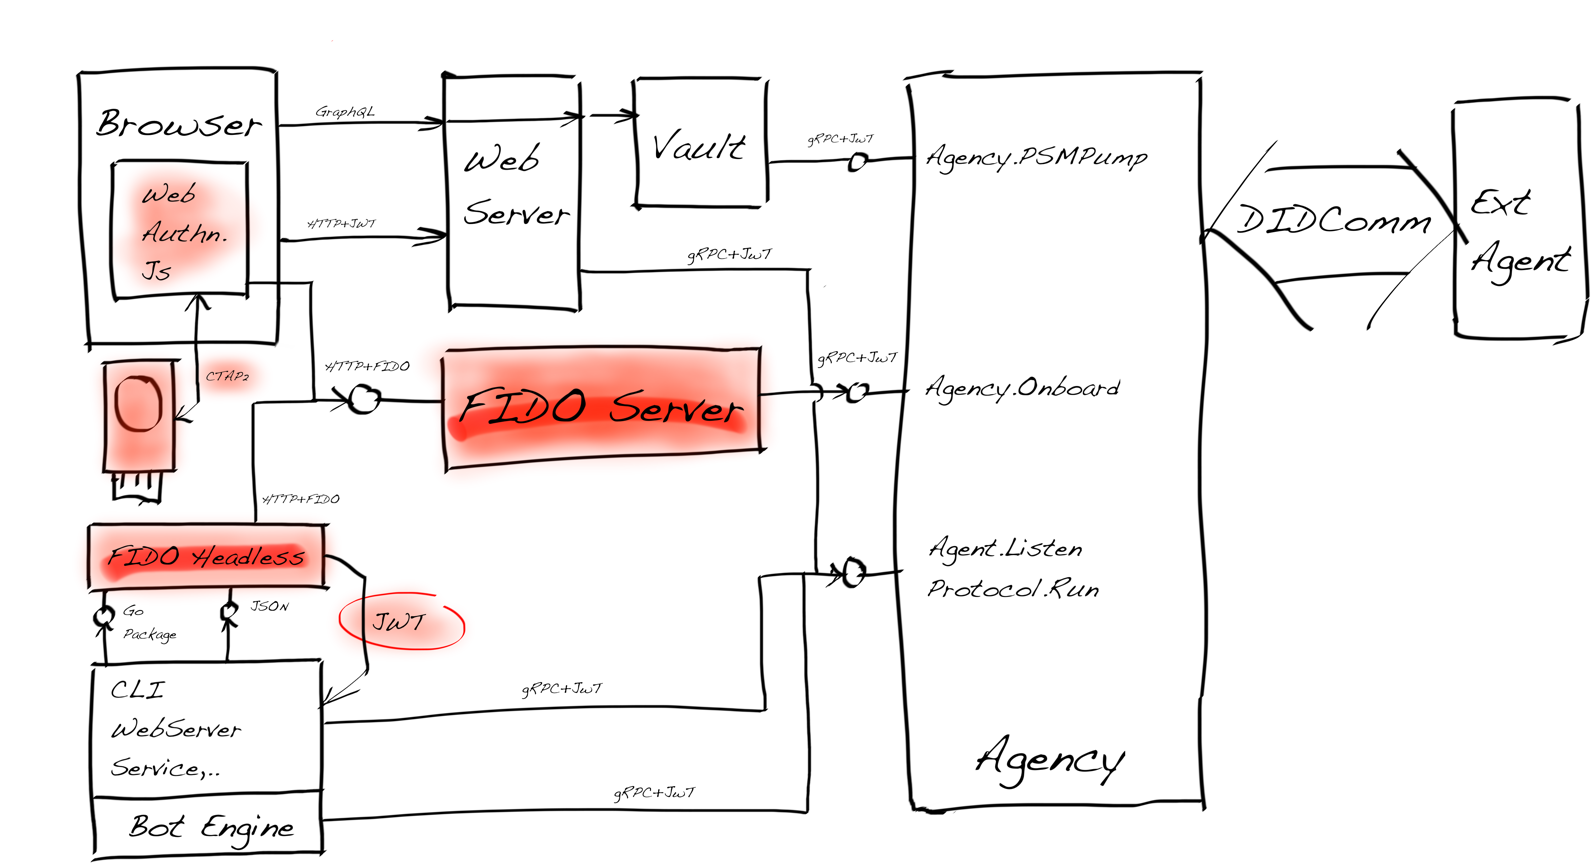
All Key Components of The System Architecture
Architectural requirements for the solution were quite complex because we wanted to have security covered, not to compromise performance, and still support polyglot development.
Polyglot Authenticator Interface
FIDO2/WebAuthn specification gives a well over a description of how main components work. Here we focus on the two most important ones. The first is the authenticator registration flow which is presented picture below.

FIDO2 Authenticator Registration - www.w3.org
To summarise, the above flow registers a new instance of an authenticator. Then it verifies that the same authenticator is bound to the account. That is done using a unique public/private key pair where the private key is in the authenticator. Note that the authenticator doesn’t map a particular user to an account. That is done thru the other process flow and by the relying party.
The flow below shows how a registered authenticator is used to authenticate the account holder.

FIDO2 Authentication - www.w3.org
The Command pattern was the perfect solution for the first authenticator implementation because it supported all of our use cases, but same time was simplest. Most straightforward to integration was naturally with a programming language it was implemented which was Go.
The second thing was to figure out how we would like to implement interprocess
communication. For that, the command pattern is suited very well. Fill the
command with all the needed data and give one of the operations we were
supporting: register and login from the FIDO2 standard. The process
communication is handled just as the process starts by reading the command from
JSON. That is suited for Node.js use as well. (For the record, my fantastic
colleague Laura did all the needed Node.js work.)
When we considered security, we followed our post-compromise principle. We didn’t (yet) try to solve the situation where someone managed to hack the server and hook a debugger to our processes without our notice. To solve that, we need TEE or similar. Our specification is ready, but before the implementation, we should think if it’s worth it, and about the use case we are implementing.
Stateless Authenticator
Because you rarely find anything that removes complexity from your implementation from security-related standards or specifications, it’s forth of mentioning: By following WebAuthn specification I did learn that I could, once again, use crypto chaining!
We knew that you would use one authenticator for many different places. That was clear, of course. But when an authenticator is used for the service or as a service, there is the next tenancy level.
Before I started to write the whole thing, I thought that I use our server-side secure enclave to store all the key pairs there and let the tenant set the enclave’s master key. It would still mean that the implementation would be state-full. From the operations’ perspective, we all know what that means: more things to take care of and manage, but most importantly, one potential scalability issue to solve.
The FIDO2 standard documentation describes a perfect solution for our needs
which made our authenticator stateless. You give the other party your public
key, but you give your private key in your credential ID. It might
first sound crazy, but it’s genius indeed.
Hold on! That cannot be?
But it is. You have to build your identifier to include your private key, but no one but you can use it because you have encrypted it with a symmetric master key. The key that no one but you controls.
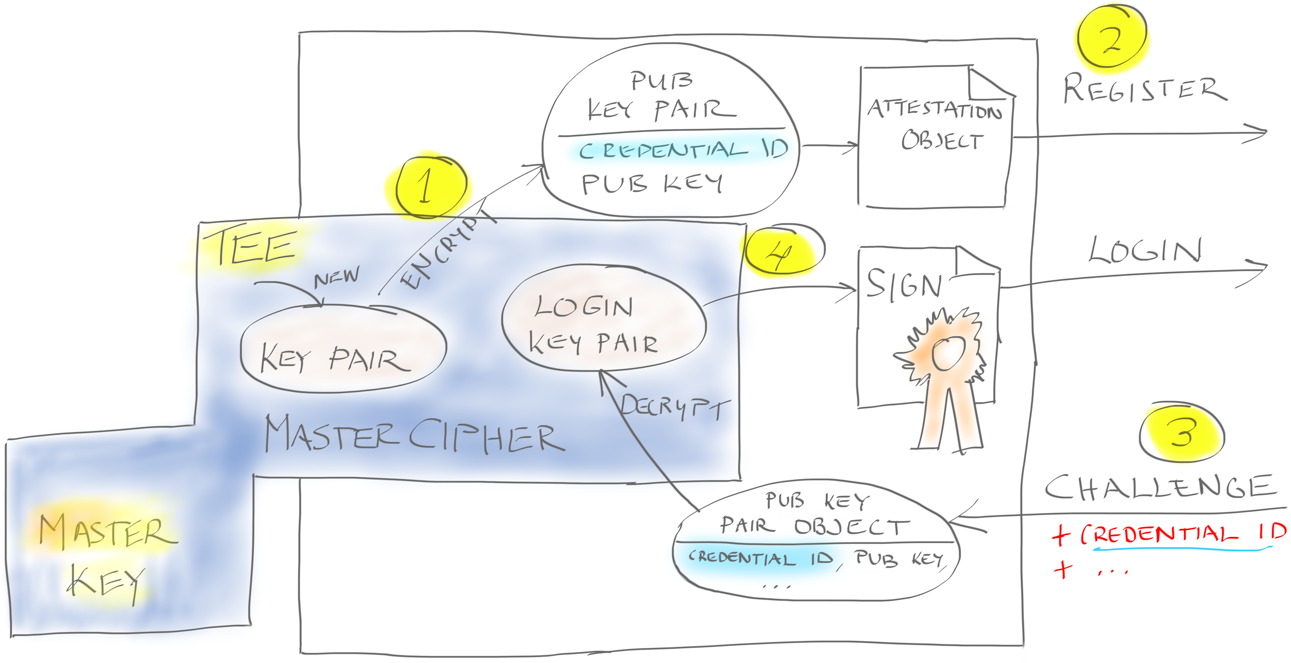
Stateless Authenticator Implementation
The draft above illustrates how our stateless FIDO2 authenticator works at a master key level. Other factors like a cloning counter and an authenticator ID are left out for simplicity.
- We can ask TEE to create a new key pair for FIDO2 registration, which gives
us a unique key pair that includes
public keyand encrypted private key, i.e.credential ID. - Our authenticator sends the FIDO2
attestation objectto the server. - When the authenticator receives the FIDO2 challenge during authentication, it builds it to the key pair in the same format as registration.
- The TEE inside the authenticator builds us the
assertion objectready to send to the FIDO2 server.
As we can see, the master key never leaves the TEE. The implementation can be done with help cloud HSM or TEE-based app; or we can implement an application with the help of AWS Nitro Enclaves or similar.
Note! This is not a good solution for a pure client-side software-based authenticator, because it needs help from the hardware, i.e. secure enclave. It’s suitable for hardware-based and certain types of server-side solutions where you can use TEE or similar solutions.
Conclusion
FIDO2 authentication is an excellent match for DID Wallet authentication. gRPC transport combined with JWT authorization has been straightforward to use. Our gRPC SDK allows you to implicitly move the JWT token during the API calls after opening the server connection. Plus, gRPC’s capability to have bidirectional streams make the programming experience very pleasant. Finally, an option is to authenticate the gRPC connection between server and client with (no PKI is needed) TLS certificates: You can authorize software components to bind to your deployment.
The SDK and the API we have built with this stack have fulfilled all our expectations:
- security
- performance
- easy to use
- solving DRY e.g. error handling
- polyglot
- cloud-ready
- micro-service friendly
And hopefully yours. Give it a try!